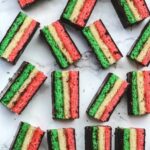
These BEST Authentic Italian Rainbow Cookies (AKA Tri Color Cookies) are soft, fluffy almond cake layers with tart raspberry jam in the middle, all covered in a smooth layer of rich chocolate. They take a little patience and love to put together, but they are really easy to make. The flavor of these cookies is so much better than the ones you'll buy at a bakery! The most beautiful addition to your Christmas cookie tray.
Why you'll love Italian Flag Cookies:
- A long history: As you maybe already know, these are not traditional Italian cookies. Rainbow cookies are an Italian-American sweet treat that was created by Italian immigrants in New York City. The red, white, and green layers represent the color of the Italian flag, which Italians (and Italian-Americans) are very proud of!
- Truly delicious cookie: Full of almond flavor, sweet jam and chocolate, these cookies are irresistible!
- Worth the effort: I'm not going to lie, these cookies do take some work to make them! But all the time you set aside to make them is truly worth it. I have never had a bakery rainbow cookie that tastes better than these homemade rainbow cookies.
Italian Rainbow cookies are sometimes also called Neopolitans, Venetian Cookies, 7 Layer Cookies, Italian Flag Cookies, and even Tri-color cookies. Many of you probably know them as Seven Layer Cookies (3 cake, 2 chocolate and 2 jam).
I grew up enjoying these festive and beautiful cookies during the holidays. I also remember eating them at many Italian and Italian-American Christmas parties as a kid. Either the Italian hostess made it or they were from a bakery. These cookies are so special and loved by all! You could make these rainbow cookies dairy-free by using margarine (or your favorite vegan butter spread) and be sure to use a dairy-free chocolate.
With some coaxing from my kids, I finally started making them for our Christmas cookie baking frenzy! The uniquely flavored almond sponge cakes colored red, white, and green to represent the Italian flag and are also the colors of Christmas.
Jump To
- Why you'll love Italian Flag Cookies:
- Authentic Italian rainbow cookies recipe
- My Favorite Italian Christmas Desserts
- What is an Italian Rainbow Cookie?
- Are Rainbow Cookies a Jewish dessert?
- What ingredients are in the best tri-color cookie recipe?
- How to make healthier rainbow cookies?
- What do you need to make the best Italian Rainbow Cookies?
- Let's get baking 3 layer cookies!
- Expert Tips for making rainbow cookies
- What to serve with these cookies?
- How to store Italian tri-color cookie:
- FAQ's
- Some other cookie recipes to try this holiday:
- Italian Rainbow Cookies
Authentic Italian rainbow cookies recipe
Every Christmas my kids ask me to make Rainbow Cookies. They also love Italian Lemon Knot Cookies-Taralli al Limone and Cuccidati-Sicilian Fig Cookies. Even though they didn't grow up in New York where you can find these in so many Italian bakeries, they found out about them through our local Sicilian bakery and the few times we baked them for Christmas. We have also found them at Jewish bakeries and other bakeries where we live, the best were from our Sicilian bakery.
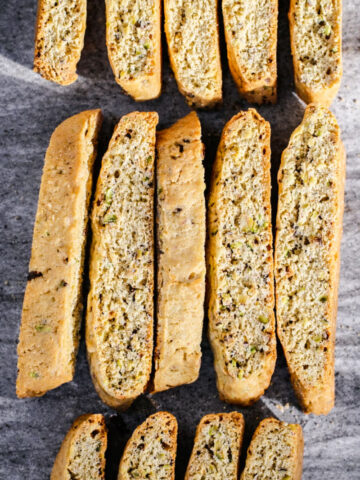
You maybe have always thought the rainbow cookies were actually a cookie. These cookies are actually thinly baked dense layers of sponge cakes. The cakes are made with flour, sugar, butter (or margarine), eggs and almond paste, which gives it its distinct flavor.
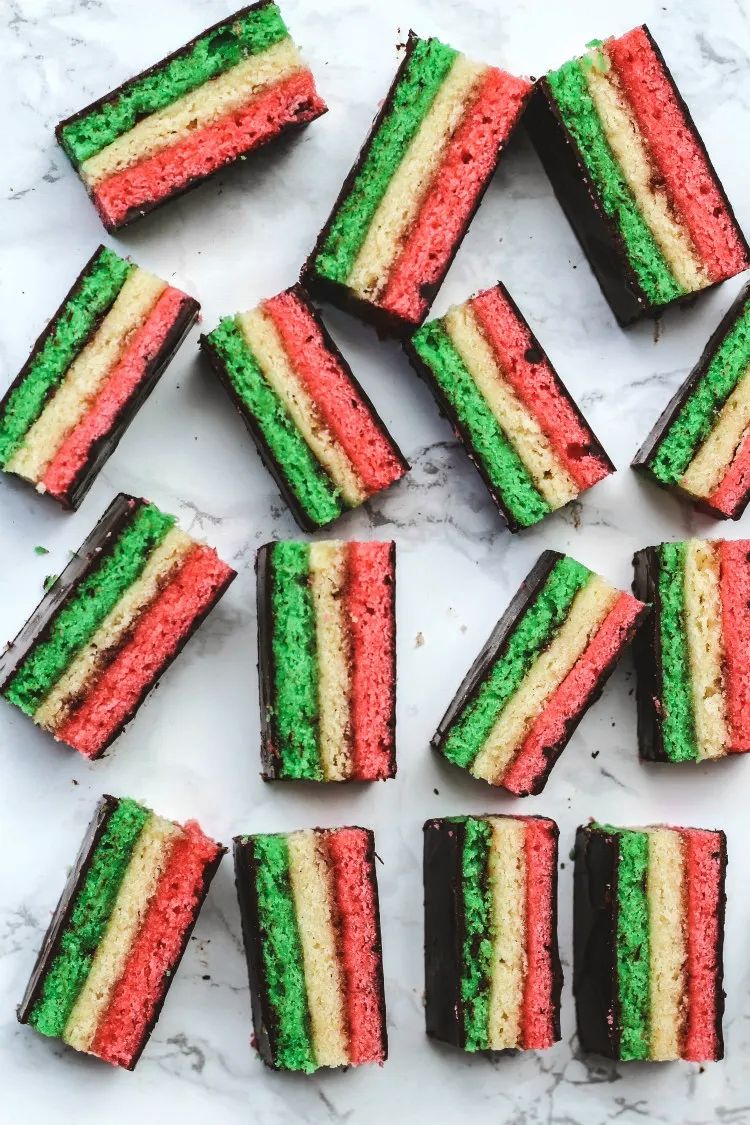
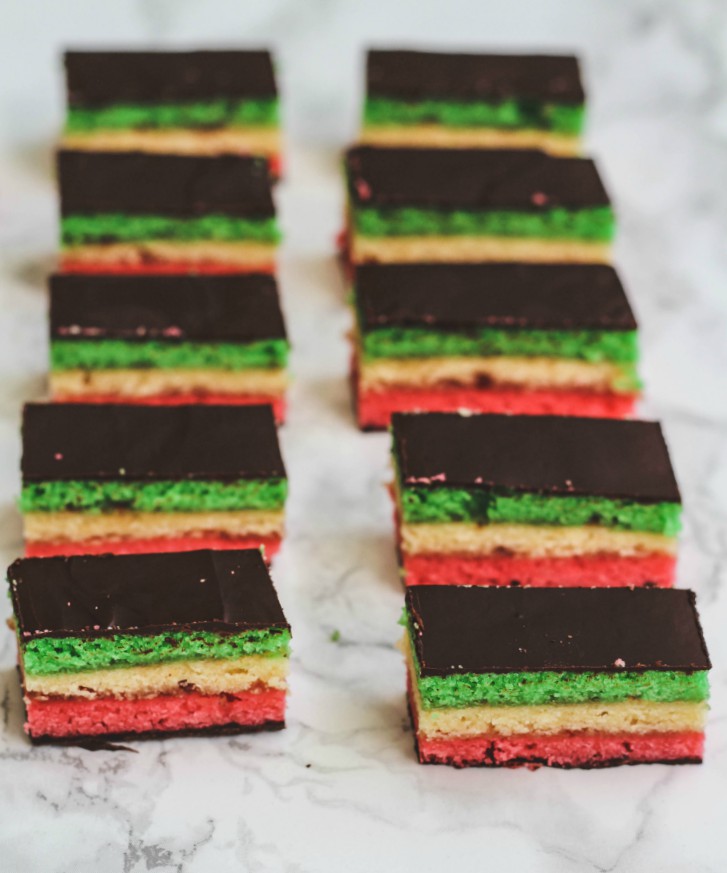
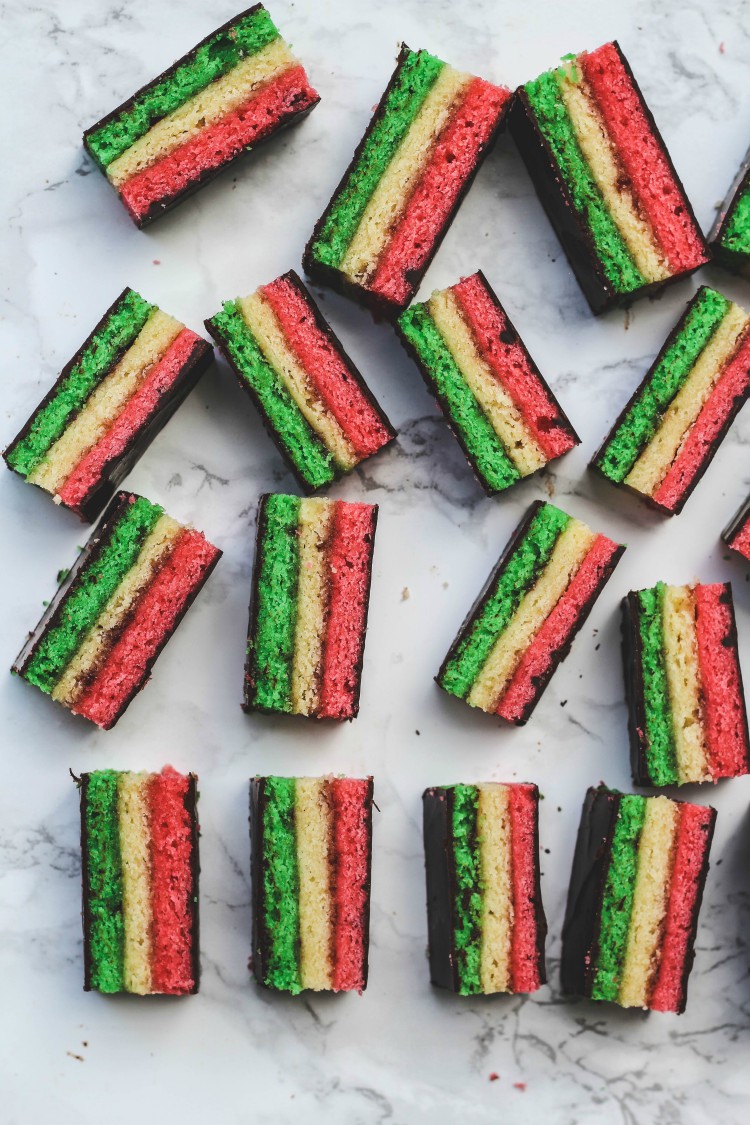
The cake layers have a very thin spreading of jam (raspberry or apricot) and when they are chilled, melted chocolate is spread over it. Once they're totally chilled, they are carefully sliced into bite-sized rectangles.
They could be difficult to find where you live and really the best alternative is to learn how to bake them yourself at home! You'll impress all your friends and family this Christmas with the seven layer cookies from your childhood.
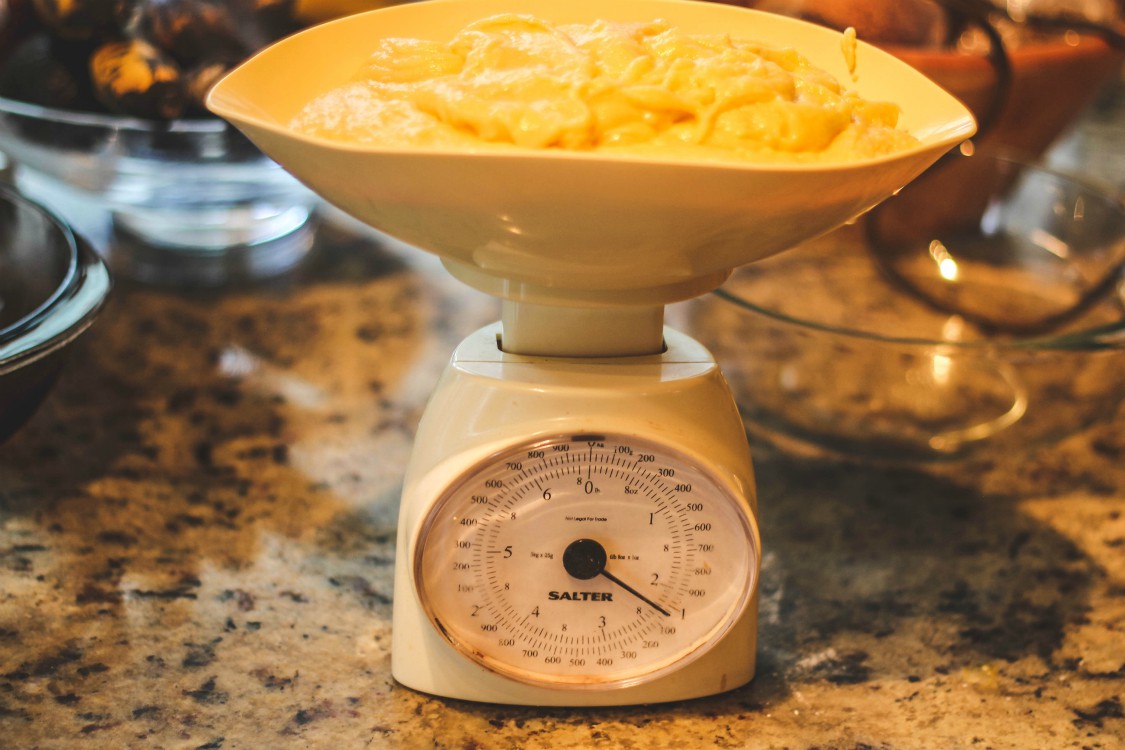
It is a time-consuming recipe with various steps. The actual cake batter is easy to put together, the trickiest part is the layering and the careful slicing. I did use a scale to make sure I separated my dough into three even portions (it was about 1000 g each portion).
My Favorite Italian Christmas Desserts
These Italian Rainbow Cookies are part of our Favorite Italian Christmas Dessert series. I recently shared our beloved Lemon Cornmeal Cookies and Italian Lemon Knot Cookies-Taralli al Limone. You can't miss my Italian mother-in-law's cherished Nocatole-Calabrian Sweet Fritters recipe. Another can't miss recipe are these Pitta 'Impigliata-Calabrian Fruit and Nut Pastries.
Reader warning: This is a long post with many photos and text. You could scroll all the way down to the recipe if you don't care to read the post. It took me a couple days and hours to put together and I hope my kids will one day take the time to follow this recipe. SOOOO...lots of details!
I followed my sister-in-law's mothers vintage recipe with lots of help from Smitten Kitchen recipe which is from Gourmet December 2005. The Gourmet recipe is the closest to what I remember having as a child. And thanks to Deb for her tips and notes that helped me in creating my recipe.
What is an Italian Rainbow Cookie?
You'll most likely hear or know these cookies only as a Rainbow Cookie. You could also know them as Venetians, Neapolitans, or Tri-color cookies, It is sometimes called Seven Layer Cookies (3 cake, 2 chocolate and 2 jam).
If you're from New York, you'll remember growing up with these and finding them at every bakery. But you will not find these in Italy. This is not a cookie my dad grew up enjoying in Sicily. Italian American immigrants are credited with creating this almond-paste colorful cookie in the States.
The name may confuse you and you could expect to find all the colors of the rainbow. A rainbow cookie is made green, red and white colors to resemble the Italian flag and is so festive! Which is why you probably grew up seeing these at every Italian American Christmas party (I did!!).
However, don't wait til December each year to enjoy the Italian rainbow cookie. With its dense sponge cake made with almond paste and layered with raspberry and apricot jam before being topped with melted chocolate, It's so delicious, it should be enjoyed all year long.
Are Rainbow Cookies a Jewish dessert?
Rainbow Cookies are not a Jewish treat. But as New York City had many Italian, Jewish and Irish immigrants, the foods of the various cultures were adopted as they lived and grew up side by side. So you will find many Italian sweets in Jewish delis and bakeries.
My Jewish sister-in-law grew up eating Italian Rainbow Cookies in NYC (they're also found in Jewish bakeries) and her mother made them when she was a little girl. She recently shared her beloved mother's recipe with me to try it out.
She asked if we could bake them together to honor her mom on her birthday (she passed away over 20 years ago). We had a copy of her lovely handwritten recipe and photos of her when she was a young girl in New York City. It was a special moment baking the cookies and reminiscing about her dear mom and these delicious Rainbow Cookies.
What ingredients are in the best tri-color cookie recipe?
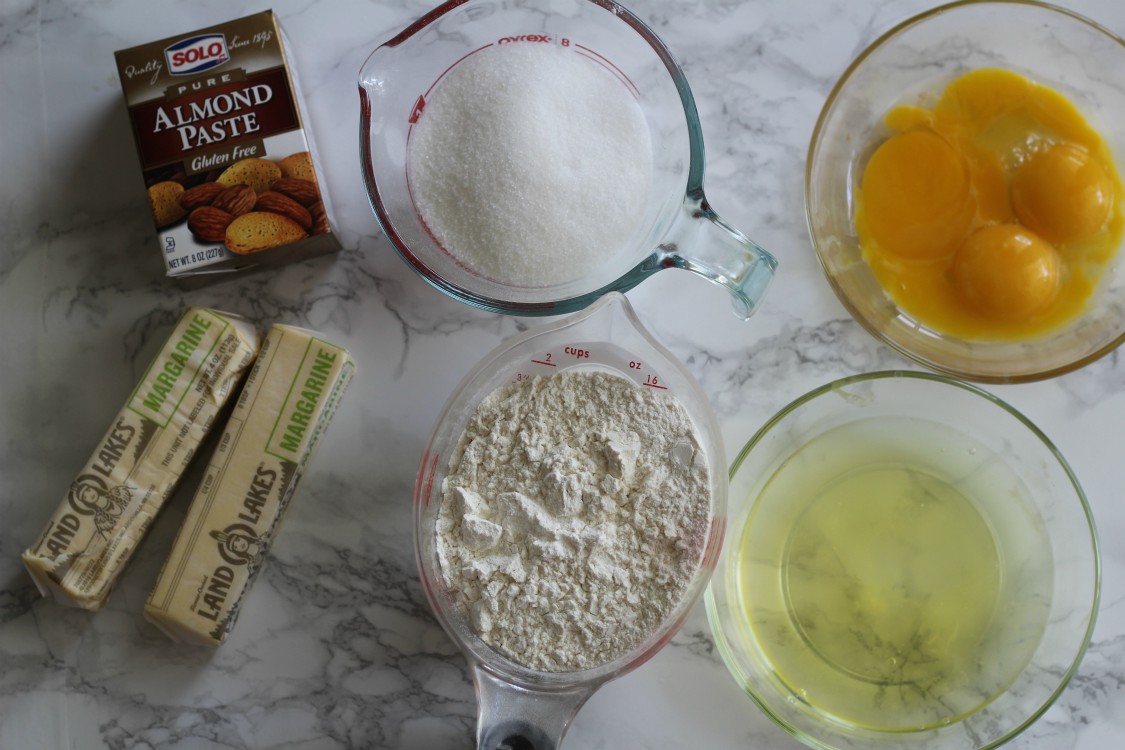
Here is all you need to make these amazing cookies! (full printable recipe is below):
- Eggs: I use large eggs and also, make sure they're at room temperature. They will be separated, as the egg whites will be beaten to soft peaks. Egg yolks are part of the cake layers.
- Granulated sugar: The sugar gets mixed with the almond paste to create the distinct almond flavor of the cake layers.
- Almond paste: Used to create the almond-cake layer.
- Margarine (or butter), softened: Gets combined to make the cake layers.
- Almond extract: Added to the batter to have more distinct almond flavor.
- All-purpose flour:
- Sea salt or kosher salt: Just a dash is needed. Brings out the flavors of other ingredients while balancing the sweetness.
- Red and green food coloring: Provide the beautiful and distinctive colors. I do instruct below how to make natural colors.
- Apricot or Raspberry preserves: You could use store-bought or your own homemade jam. Adds a touch of fruity sweetness.
- Bittersweet chocolate: Use the best quality chocolate to ensure it melts nicely and has great flavor!
How to make healthier rainbow cookies?
You will need:
- 1 small beet roasted
- 2 teaspoon matcha (ceremonial green tea powder)
If you would like to make the rainbow cookies without red and green colored dye, you will use the roasted red beet and the matcha powder. Divide batter among 3 bowls. in small blender add 1 quarter cup of batter for red cookie layer and beet and puree till smooth then add to the rest of the batter into one bowl.
For the green layer, add the matcha powder and stir it together. Leave the third portion plain white for the white layer. I weigh my layers of dough with a baking scale and they are about 1,000 g each layer.
What do you need to make the best Italian Rainbow Cookies?
- The first thing to do when making Italian Rainbow cookies is to make sure you have all your ingredients. You don't want to have to run to the store at the last minute to buy almond paste or chocolate!
- I suggest buying three jelly roll pans (13" x 9") or square 8×8 or 9×9 baking pans. Parchment paper to fit the pans. Cooling racks, and a fruit strainer.
- Food scale: If you don't have a food scale, I would highly recommend investing in one. It will make tasks like measuring batter or dough much easier and far more accurate.
- Almond paste: make sure it's fresh. The almond paste has to be broken into small pieces. You could pulse in food processor before adding to the batter.
Let's get baking 3 layer cookies!
The long instructions can be intimidating. It really takes a long time to explain the process. I hope to one day make a video of the recipe. For now, take the time to read every step and be prepared with all your ingredients.
Gather all your ingredients. Very important to have it all ready on the counter.
Make sure you have your FRESH almond paste (I had one in my cabinet that expired 2 years ago. It was tossed away and I bought another one. You could also make your own almond paste if you have the time!).
Also make sure you have your chocolate and the jam! Be sure to let them chill for at least one hour before slicing them. If you bake them the night before and chill overnight, that is ideal. If you're feeling extra ambitious, bake two batches and give some away as gifts to your friends and family…they will be loved even more by all. Only problem is, you will then become the "Official Italian Rainbow Cookie Baker".
Full recipe and instructions below.
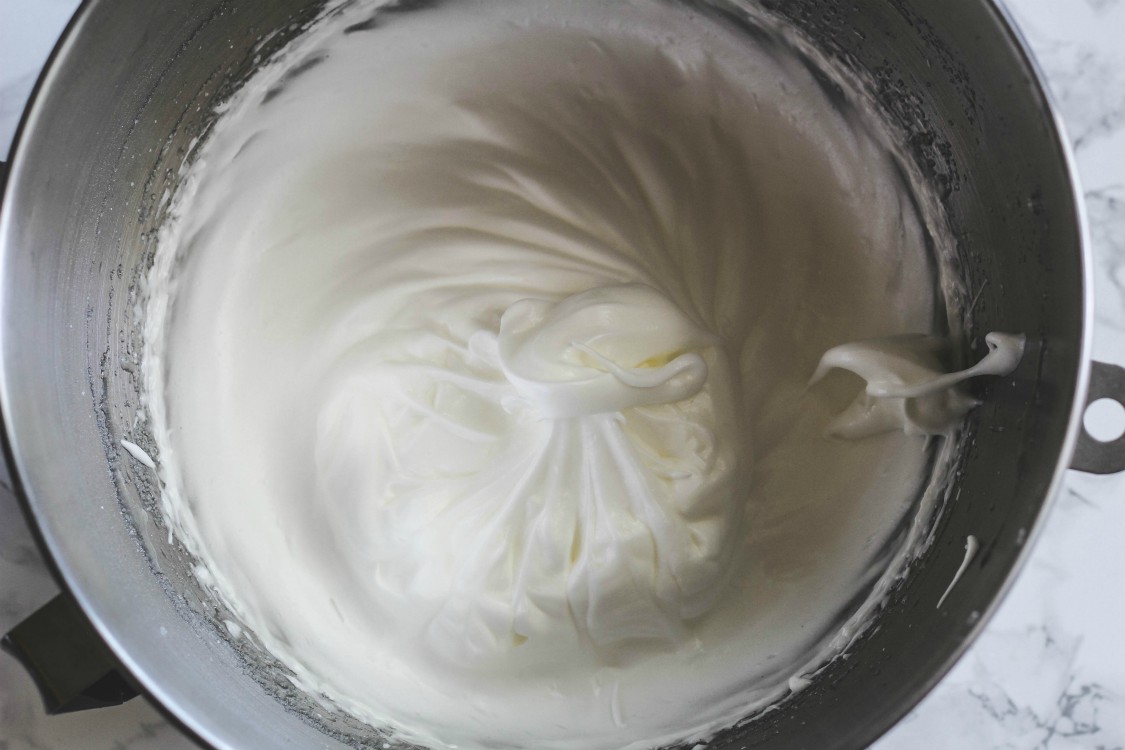
The first step is to beat the egg whites with some of the sugar in mixer until soft peaks form. Set them aside in a clean bowl while you prep the cake batter.
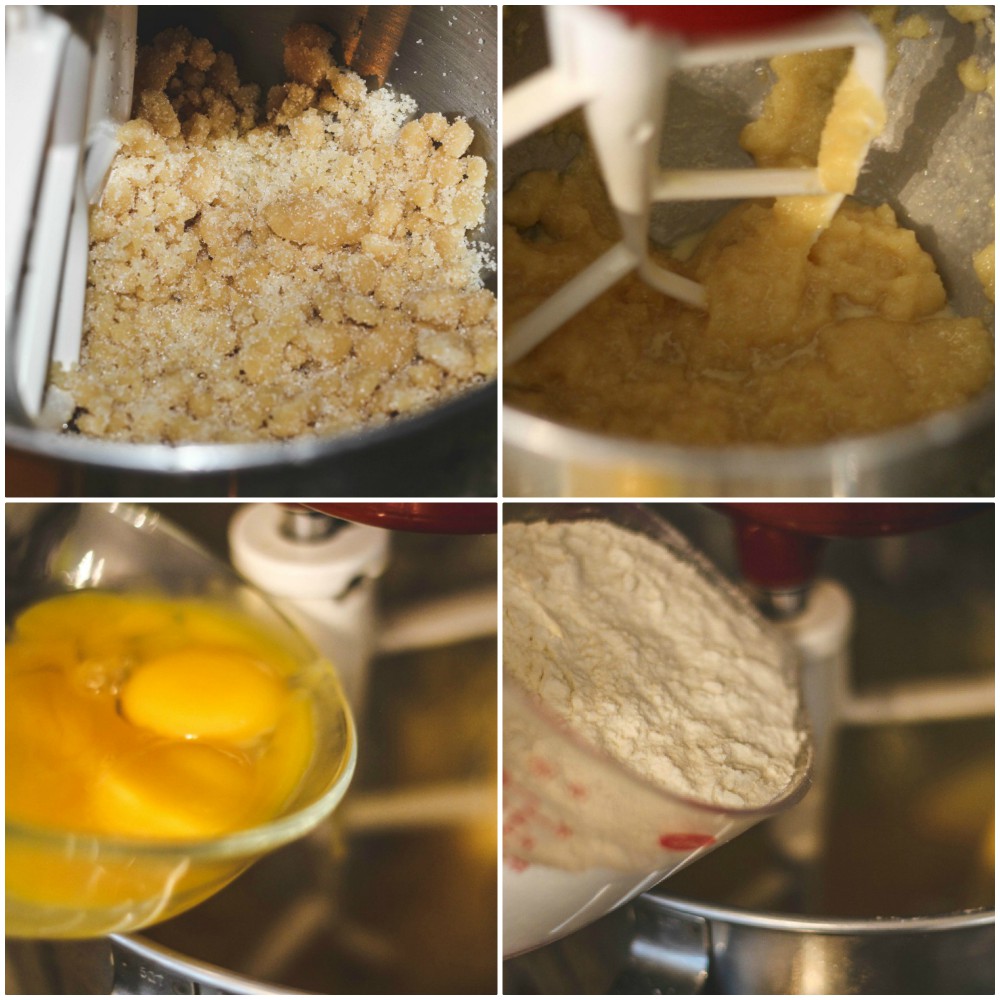
The next step is to beat the almond paste with the rest of the sugar. Add in the butter. Next add in the yolks one at a time. Beat it all until it's smooth. Mix in the almond extract. The last part is to add in is the flour a little bit at a time. You're just mixing until it's combined.
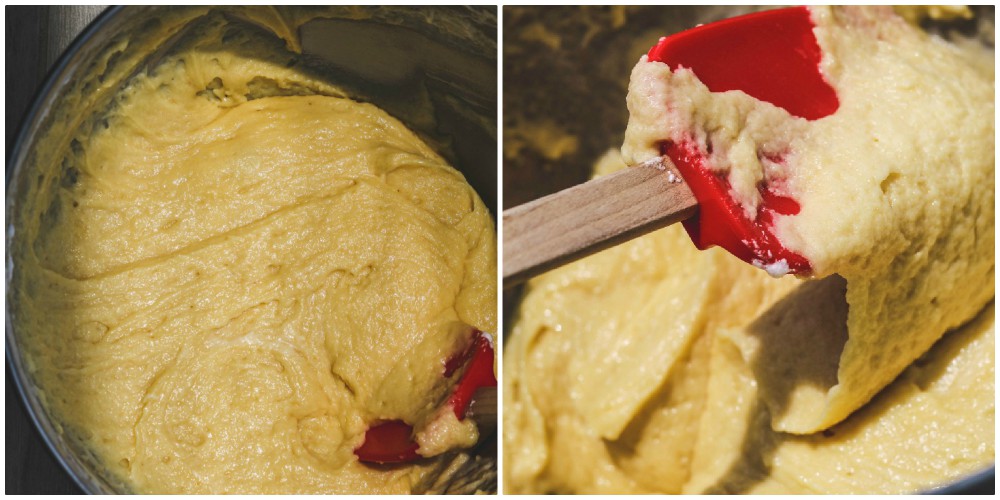
The batter will be nice and smooth. Use a spatula to make sure you got all the flour on the sides of the bowl and combine it all together. The almond scent is really wonderful.
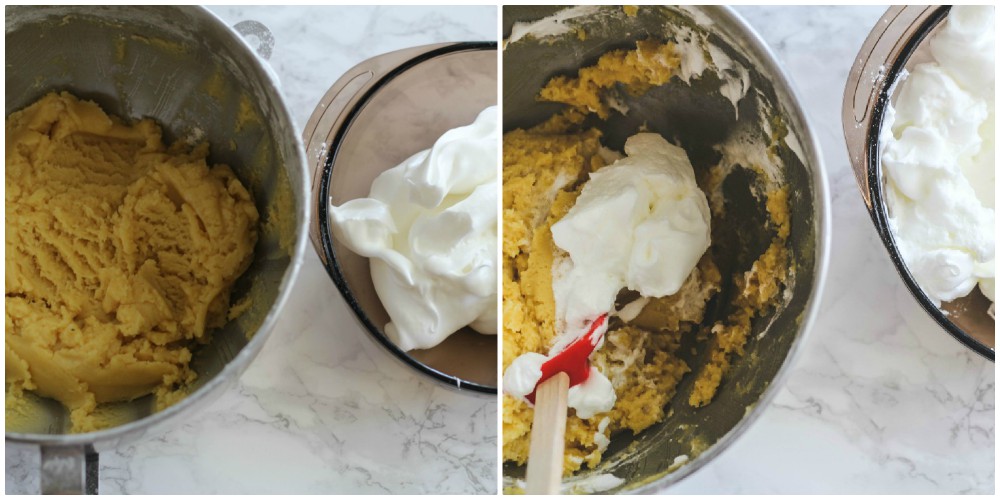
Next step is to gently fold the egg whites into the almond cake batter.
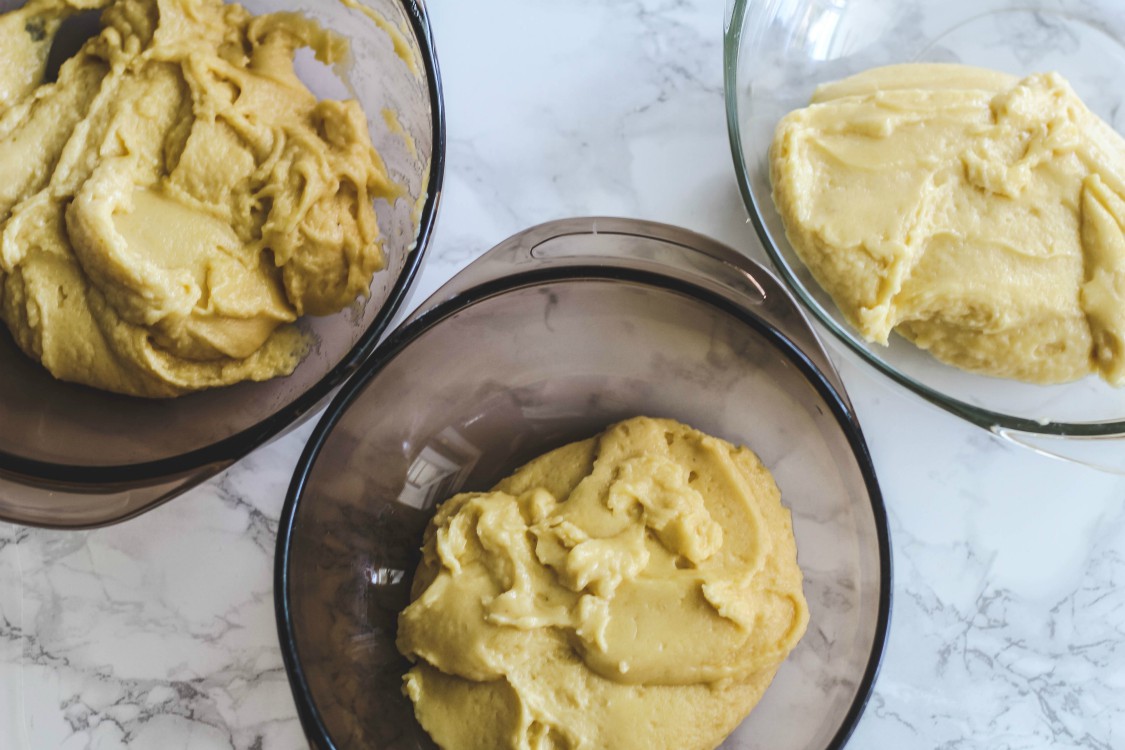
After it's all folded in, gather the batter into 3 portions of the batter in 3 separate bowls. I used my scale and weighed about 1,000 grams each portions. If you're an expert at eyeing the portions, you could also try it that weigh. But truly only way to guarantee the layers will be even is to weigh out the batter.
Here are the 3 portions of cake batter separated in the 3 bowls.
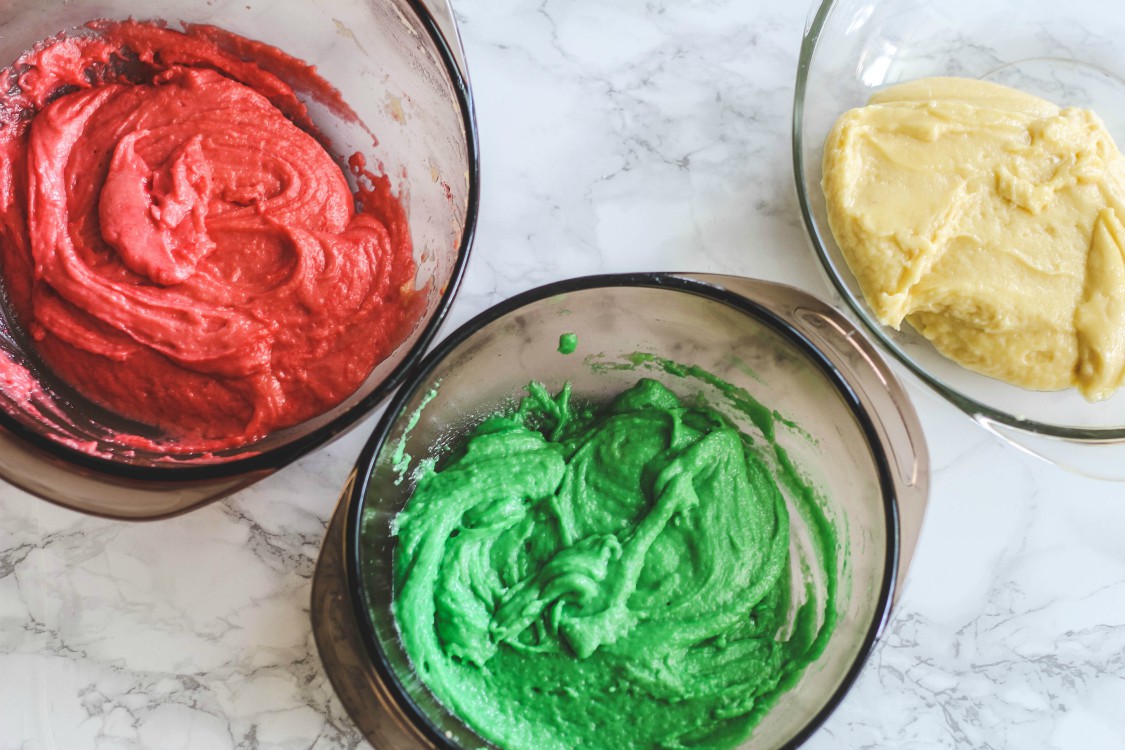
Add red coloring to one portion and green coloring to the other. Leave one portion white. Mix the colored dyes until combined (and you like the vibrancy of the color...I did about 25 drops each color). Feel free to follow the healthier color directions above (it's made with matcha and red beets).
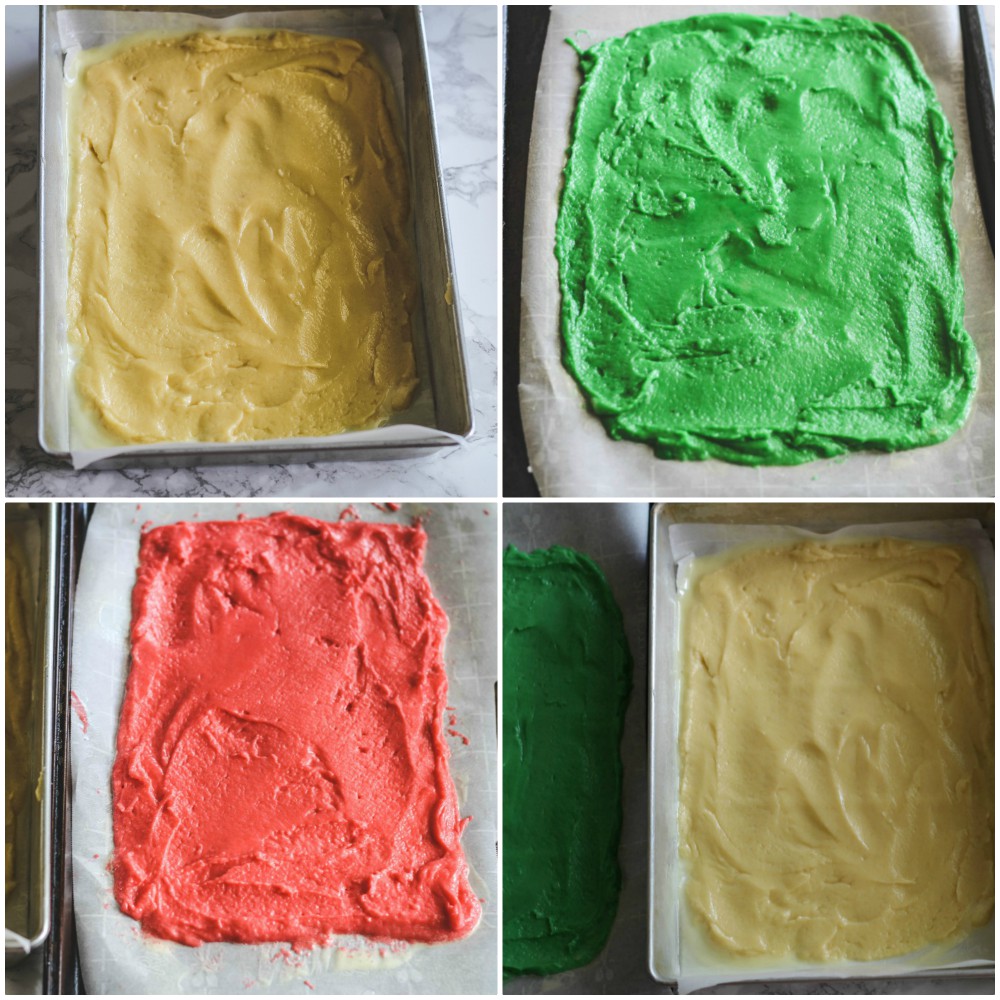
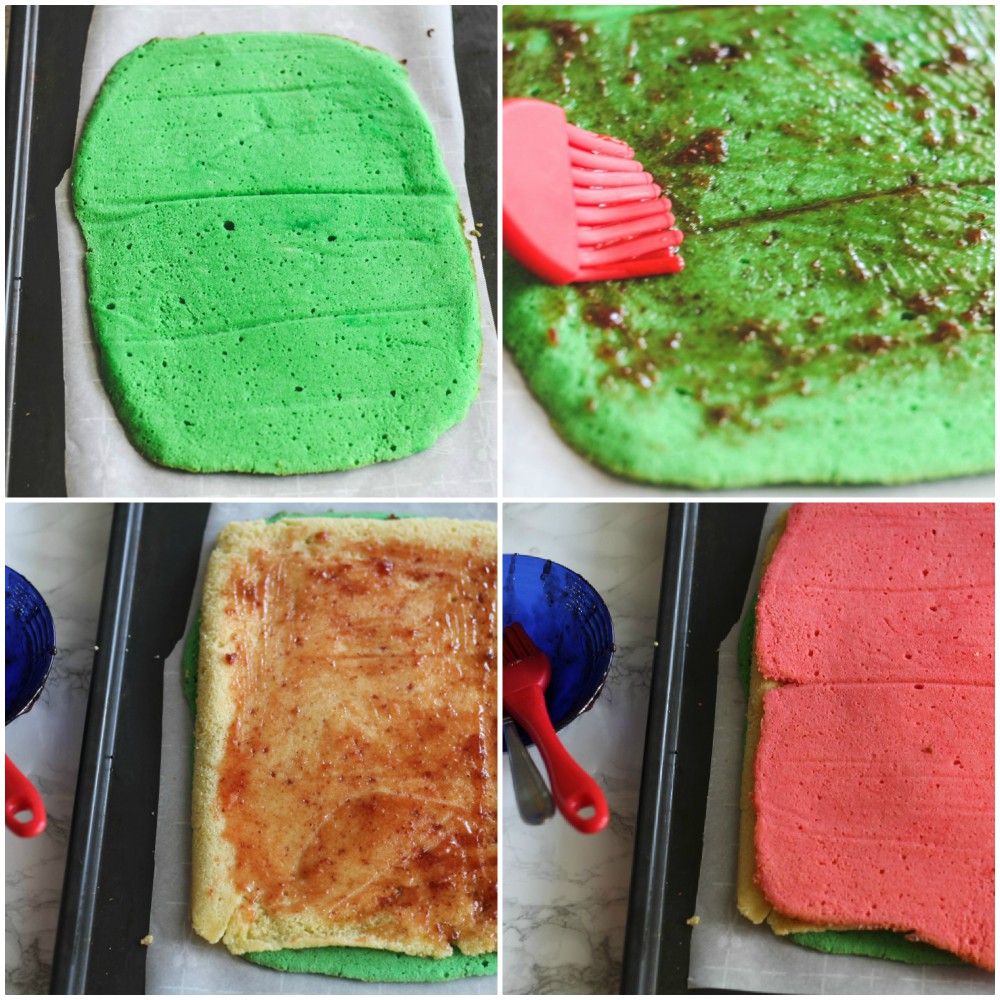
Spread each layer of cake colored cake batter in the prepped baking pans. I used baking sheets and also did a 9x13 baking tray. It does not take long to bake. Just between 8-10 minutes. You do not want to over bake the cake layers. You'll have dry rainbow cookies.
Spread half of the strained preserves (I used raspberry)over the green layer. It spreads easier if the preserves are heated up. You just want a thin layer of preserves.
Next step is to invert the white layer over the green layer and spread the rest of the jam on the white layer. Carefully place the red layer on the white layer.
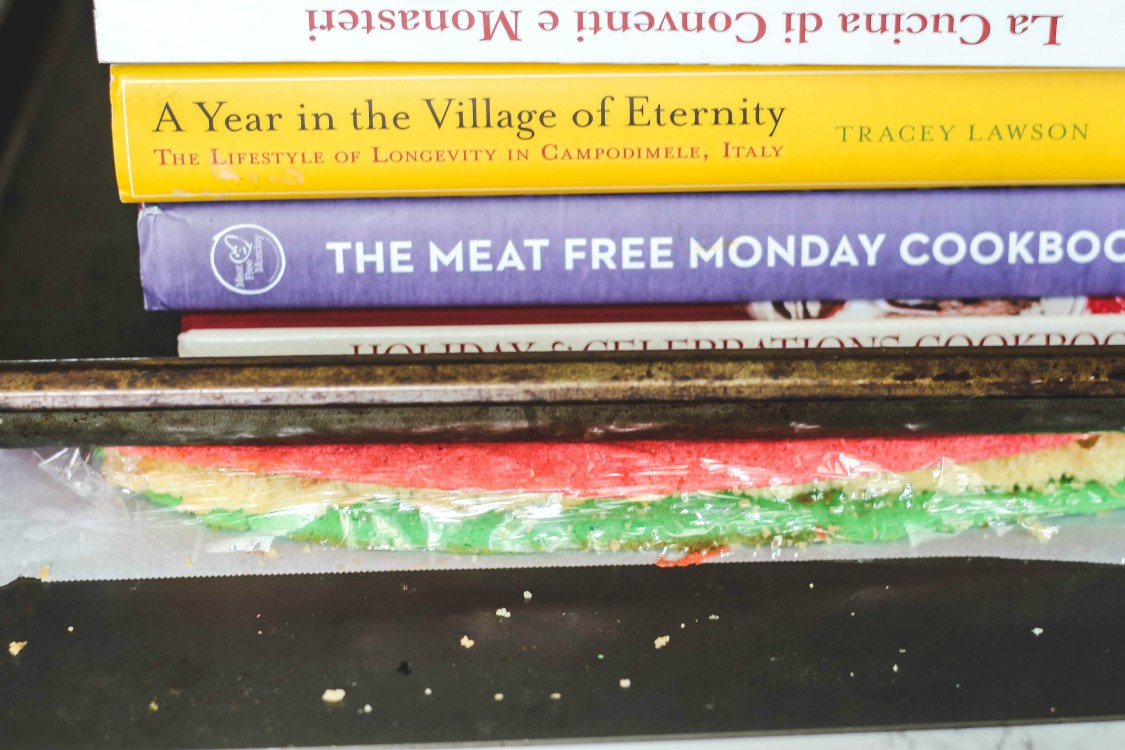
Cover the whole cake with plastic wrap. Place a baking sheet on top of the plastic wrap and weigh it down with books and place in the refrigerator to chill. It's ideal to chill for 8 hours. I have chilled it for less time and had success with the cookies.
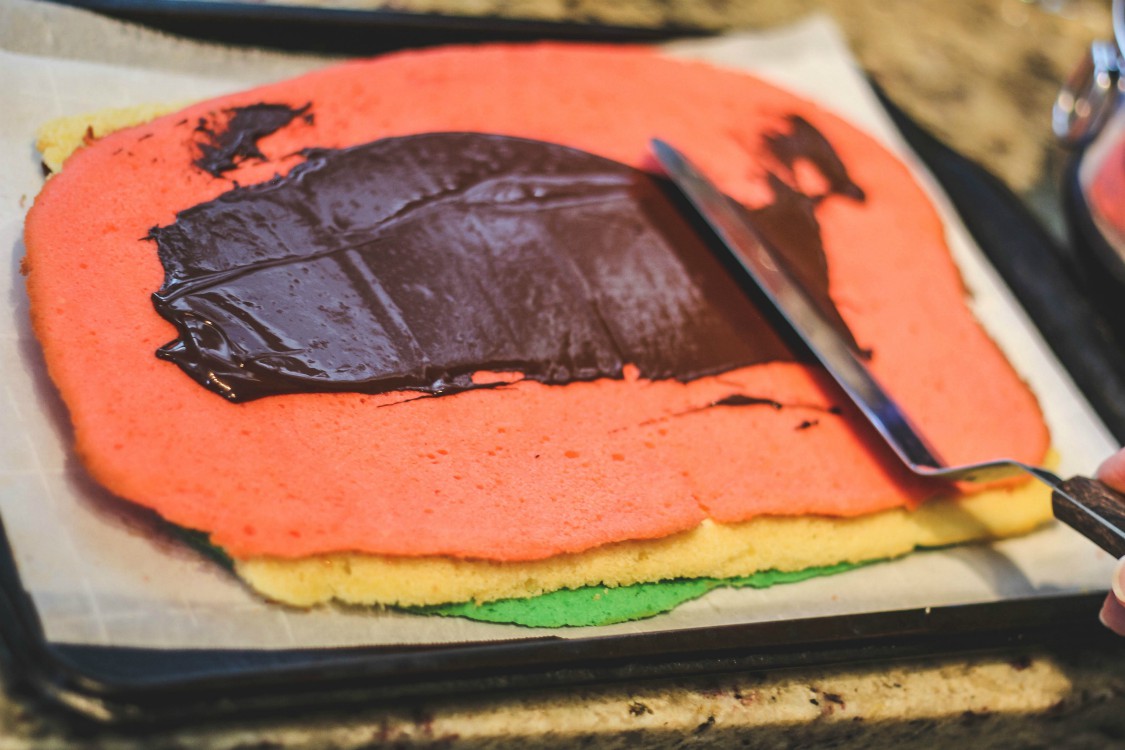
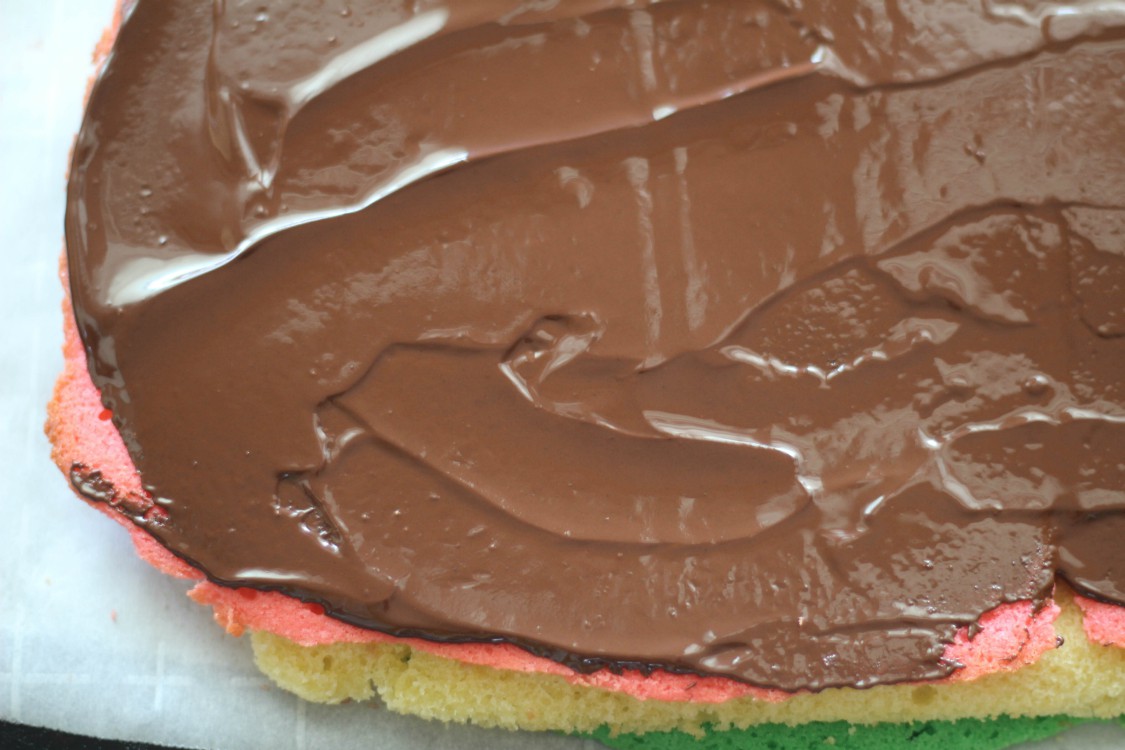
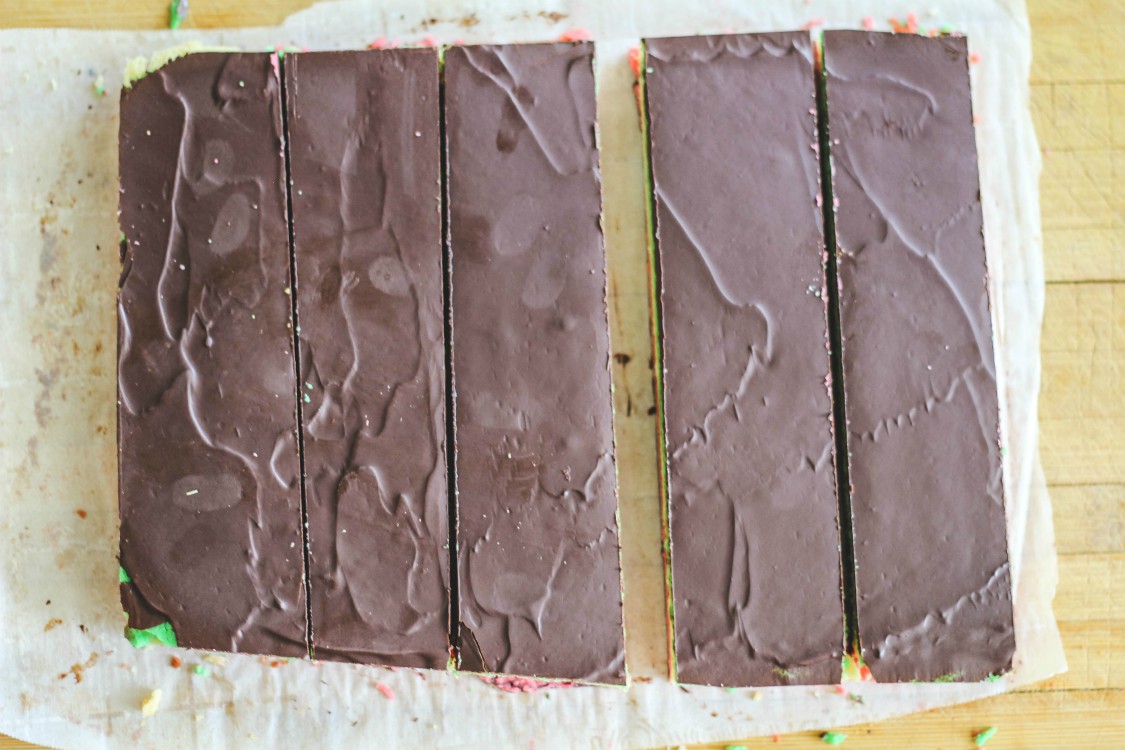
Melt the chocolate and spread it on the red part of cake in a thin layer. Use an offset spatula. You want to be sure the layer is thin. Chill until it is firm (chill uncovered about 15 minutes). Once it is chilled, place wax or parchment paper onto the chocolate layer, place on a baking sheet, invert it onto the baking sheet. Spread the remaining chocolate on the green layer (I forgot to get a photo!!). Trim the edges. Chill for 30 minutes.
Once the chocolate is very firm (I chilled for about 30 minutes), use a serrated knife to begin slicing the cake into rows. When you have the rows sliced, you begin to slice into the mini cakes (cookies). Make sure the knife is cleaned after each cut. You have to move quickly and carefully if you're not in a very cold kitchen.
The chocolate begins to melt and it could get messy if you're knife isn't clean and if chocolate is not cold enough. After the first slices if it seems the chocolate isn't cold enough, place in fridge to chill again (for about 30 minutes more).
Expert Tips for making rainbow cookies
- To melt chocolate: Make sure to use a double boiler or metal bowl set over simmering water to avoid burning the chocolate.
- For clean and even cuts, use a serrated knife to cut the cookies…very important!! And also, run the knife under hot water before slicing and clean with a wet cloth each time you slice. Otherwise it becomes very messy when you slice.
- For the chocolate: I recommend using one that is at least 60% cacao. The bittersweet flavor works well with the almond or raspberry jam. Don't be put off by the long instructions. It takes longer to explain how to make them than actually make them. Italian Rainbow Cookies are definitely worth it!
What to serve with these cookies?
These cookies are perfect served as they are, but here are some ideas: raspberry jam
- A scoop of vanilla ice cream would go really nicely with these cookies
- For an extra touch of sweetness, a drizzle of caramel or chocolate sauce on top
- A sprinkle of sea salt on top of the cookies for a delicious salty-sweet combination
- A cup ofhot chocolate or coffee on the side makes for a really cozy way to enjoy these cookies.
How to store Italian tri-color cookie:
- To refrigerate: Keep them in an airtight container in the refrigerator for up to one week
- To freeze: Store them in a large zipped lock freezer bag (date the bag)for up to 2-3 months. Also could keep them in a freezer safe airtight container.
FAQ's
Yes! You can make them ahead of time and freeze them for a couple months.
Venetian Cookies, Neapolitan Cookies, 7 Layer Cookies, Italian Rainbow Cookies, Italian Flag Cookies, Tri Colore Cookies
They won't be rainbow cookies without the distinctive flavor from the almond paste. The only thing that could be changed up is the preserves flavor. I do not recommend changing any of the ingredients as they are listed (except for preserves flavor). You can find almond paste here.
Yes and No. They were thought to be created in the 20th century by Italian immigrants in the United States. They are more prominent in Italian bakeries in the USA.
Rainbow cookies, also called "tricolore," were created by Italian immigrants in the United States during the 1900s as a way to show their patriotism. The three colors of these layered cookies - white, red, and green - are meant to resemble the Italian flag.
Rainbow cookies are a type of cookie that originates from Italy. They are also popular in New York City. The cookies are made with three layers of almond sponge cake, with raspberry jam in between the layers. They are then coated with chocolate on top.
If stored properly, these cookies will last up to a week in the fridge. This recipe makes a lot of cookies, so you'll definitely want to give some as gifts.
No, they do not. Rainbow cookies are NOT Italian. They are Italian-American cookies. Tri-color cookies were created by Italian immigrants in the States as a way to honor their Italian heritage.
In Italian they call this cookie Tricolore (three colors) because of its resemblance to the Italian flag.
You can, but I didn't. This particular recipes uses a combination of almond paste and almond extract. You will come across recipes that use almond extract only. My sister-in-law's mother's recipe was from the 1970's and it had a large amount of ONLY almond extract.
My recipe is a perfectly flavored rainbow cookie using the combination of almond paste and almond extract. I do not recommend using only almond extract. Almond extract is very strong and be sure to measure out just one teaspoon (nothing more is needed).
That is the million dollar question! It's actually 3 layers of an almond sponge cake. Cut into small portions, they're actually mini cakes. But somehow they are called a cookie.
You could make them totally dairy-free. If you use margarine in place of butter and a dark or bittersweet chocolate, instead of milk chocolate. They are not vegan, as they have eggs.
I did bake this back at the end of summer with my sister-in-law to remember her mom. It was an emotional couple days of baking and prepping and trying to get great photos.
When we bake these for Christmas, there isn't time to photograph for my blog. I finally sat down this last week to put this all together for all of you and for me and my children one day!
I do wish all of you a very Merry Christmas and Happy Hanukkah! Wishing you all happiness, health and peace for the New Year and I thank you for your support! XO
Originally posted in December 2021 and updated for content in November 2023.
Some other cookie recipes to try this holiday:
- Chocolate Crackle Cookies
- Cuccidati-Sicilian Fig Cookies
- Italian Lemon Knot Cookies
- Sicilian S Cookies
- Easy Italian Almond Cookies
Did you make this and love it? Please RATE THE RECIPE below:)
I would LOVE IT if you can leave me a star rating and a review down below and let me know your thoughts! It means the world to me to hear how you liked it.
Please Subscribe and give a follow on Instagram, Facebook, Pinterest, and TikTok xx
Italian Rainbow Cookies
Equipment
- 3 jelly roll pans
- 1 food scale
Ingredients
- 4 large eggs separated
- 1 cup sugar
- 1 8-oz can almond paste
- 2½ sticks 1 ¼ cups margarine (or butter), softened (10 oz or 285 grams total of butter)
- 1 teaspoon almond extract
- 2 cups all-purpose flour
- ½ teaspoon salt
- 25 drops red food coloring
- 25 drops green food coloring
- 1 12-oz jar apricot or raspberry preserves, heated and strained
- 7 oz fine-quality bittersweet chocolate not unsweetened, chopped
Instructions
- Put oven rack in middle position and preheat oven to 350°F. Butter a 13- by 9-inch baking pan and line bottom with wax or parchment paper, leaving a 2-inch overhang on 2 ends, then butter paper.
- Beat whites in mixer fitted with whisk attachment at medium-high speed until they just hold stiff peaks. Add ¼ cup sugar a little at a time, beating at high speed until whites hold stiff, slightly glossy peaks. Transfer to another bowl.
- Switch to paddle attachment, then beat together almond paste and remaining ¾ cup sugar until well blended, about 3 minutes. Add margarine (or butter) and beat until pale and fluffy, about 3 minutes. Add yolks and almond extract and beat until combined well, about 2 minutes. Reduce speed to low, then add flour and salt and mix until just combined.
- Fold half of egg white mixture into almond mixture to lighten, then fold in remaining whites gently but thoroughly.
- Divide batter among 3 bowls. Use a food scale to make sure the batters are even. Leave one bowl plain for the white bowl. Set the white batter bowl aside. Stir red food coloring into one and green food coloring into another. Chill green and white batters, covered. Pour red batter into prepared pan and spread evenly with offset spatula (layer will be about ¼ inch thick).
- Bake red layer 8 to 10 minutes, until just set. (It is important to undercook. They'll look like they're not done, but a tester does come out clean.)
- Using extra parchment paper overhang as "handles", transfer layer to a rack to cool, about 15 minutes. Clean pan, then line with parchment or wax paper and butter paper in same manner as above. Bake white layer in prepared pan until just set. As white layer bakes, bring green batter to room temperature. Transfer white layer to a rack. Prepare pan as above, then bake green layer in same manner as before. Transfer to a rack to cool.
- When all layers are cool, invert green onto a parchment or wax-paper-lined large baking sheet. Discard paper from layer and spread with half of preserves.
- Heat up the preserves in a a small bowl in the microwave (or in a sauce pan if you don't have a microwave like me) for one minute to help it to spread easier. Spread half of the jam over the green layer. The preserves should be a very thin layer.
- Invert white on top of green layer, discarding paper. Spread with remaining preserves. Invert red layer on top of white layer and discard wax or parchment paper.
- Cover with plastic wrap and weight with a large baking sheet. I placed cookbooks on top of the baking sheet. Chill at least 8 hours.
- Remove baking sheet and whatever you used to weigh it down and plastic wrap. Bring layers to room temperature.
- Melt chocolate in a double boiler or a metal bowl set over a saucepan of barely simmering water, stirring until smooth. Remove from heat. Keep chocolate over water. (Alternately, you can do what I did: melt the chocolate about 3.5 ounces at a time just to make sure it doesn't firm up between steps).
- Trim edges of assembled layers with a long serrated knife. Quickly spread half of chocolate in a thin layer on top of cake. Chill, uncovered, until chocolate is firm, about 15 minutes.
- Cover with another sheet of wax or parchment paper and place another baking sheet on top, then invert cake onto sheet and remove paper. Quickly spread with remaining chocolate. Chill until firm, about 30 minutes.
- With a serrated knife cut the cake into rows, then cut the rows into squares or rectangles. Be sure to use a wet towel to clean knife after each slice. Try to cut while they are still very cold. If you notice the chocolate melting too quickly after first slices, place in the refrigerator again to let it chill some more and then cut again.
- You could cut into 4 portions or cut into more like I did. I wanted the cookies to be about 1 ½ inches wide. The cookies should be cut about ¾ inch wide. If you have the patience and the time, do freeze the cake before slicing. I've done it both ways and it's much easier to slice when frozen.
Nutrition Disclaimer
Please keep in mind that the nutritional information presented below is an approximation and may vary depending on the exact ingredients used.
Notes
- To store: Store in a tightly covered container in a cool, dry place or in the refrigerator. They also freeze well.
- Yields: Makes about 5 dozen cookies (or more, if you cut them as small as I did)
- Time: These cookies take some time and work (not hard work, but it is a lot of steps) to make. BUT it is worth the effort! These take at least 11 hours from beginning to end, most of it inactive, but make sure you have a good 2 to 3 hour window.
Nutrition
© SavoringItaly.com. Content and photographs are copyright protected. Sharing of this recipe is both encouraged and appreciated. Copying and/or pasting full recipes to any social media is strictly prohibited. Please view my photo use policy here.
These brought back wonderful memories for me! I grew up having these rainbow cookies at every holiday and special occasion. So delicious and fun to make too!
I love Italian rainbow cookies. The flavor and color are both so much fun. These are really good, and I love that I was able to make them easily.
Such an iconic cookie! I love them but I never tried making them before. They were surprisingly easy!
I love showing these cookies off on my dessert tray. I know they're usually served during the Christmas holidays but I love showing them off throughout the year. The family loves them at our gatherings.
The recipe was easy to follow and the cookies turned out amazing. The almond flavor is on point - not too much but you can definitely taste it. They're so pretty, too!
These cookies are so fun and taste amazing! I added them to my Christmas cookie charcuterie board, and everyone loved them.
These are truly gorgeous! Italian rainbow cookies are such a labor of love, and yours look perfectly layered with that beautiful almond flavor. They are a staple for any holiday platter—such a delicious tradition.
These are a holiday classic! I make your recipe every year and they're always perfect!
Hi Beth-THANK YOU for letting me know. ENJOY and happy holidays!
This is the time of the year when I have time to try new recipes and I've been wanting to make these Italian cookies for a while. Thanks for this post with all the details, it's VERY useful. The cookies turned out perfectly delicious!
Hi Emily-Very happy you enjoyed the rainbow cookies!! Happy Holidays!
I love your recipe.I grew up in the Bronx, and these cookies were always a special treat. I know it's not traditional, but I had some pistachio cream spread and I was wondering if I could use it as one of the layers in place of the jam.Any thoughts?
Hi Clara-Thank you! I am not certain, but would be super curious to find out how it turns out. Maybe use it on a small section and see how it sets up and slices. Let me know!