Best Rustic Italian Bread Recipe (No Knead) is a fast and easy bread recipe! It's just like the bread my Italian mother-in-law makes!! This delicious bread is made in your Dutch oven and is ready in a few hours-no need to have it rise overnight! Perfectly crisp crust and soft on the inside. This bread is quick to make with unbelievable results!
If you like this recipe, then you have to try my classic focaccia and this fun Greek bread!

This article contains affiliate links which support us at no extra cost to you.
Jump To
- Why you'll love Italian artisan bread:
- What is No Knead Bread?
- Ingredients:
- How to make the best Italian bread?
- How to tell if your yeast is active and ready to use?
- Expert tips
- Variations for easy yeast bread recipe no knead:
- Can you make this no-knead artisan bread ahead of time?
- What to serve with this bread?
- How to store leftovers:
- Can you freeze baked bread?
- FAQ's
- Some ways we like to enjoy this bread:
- Rustic Italian Bread (No Knead)
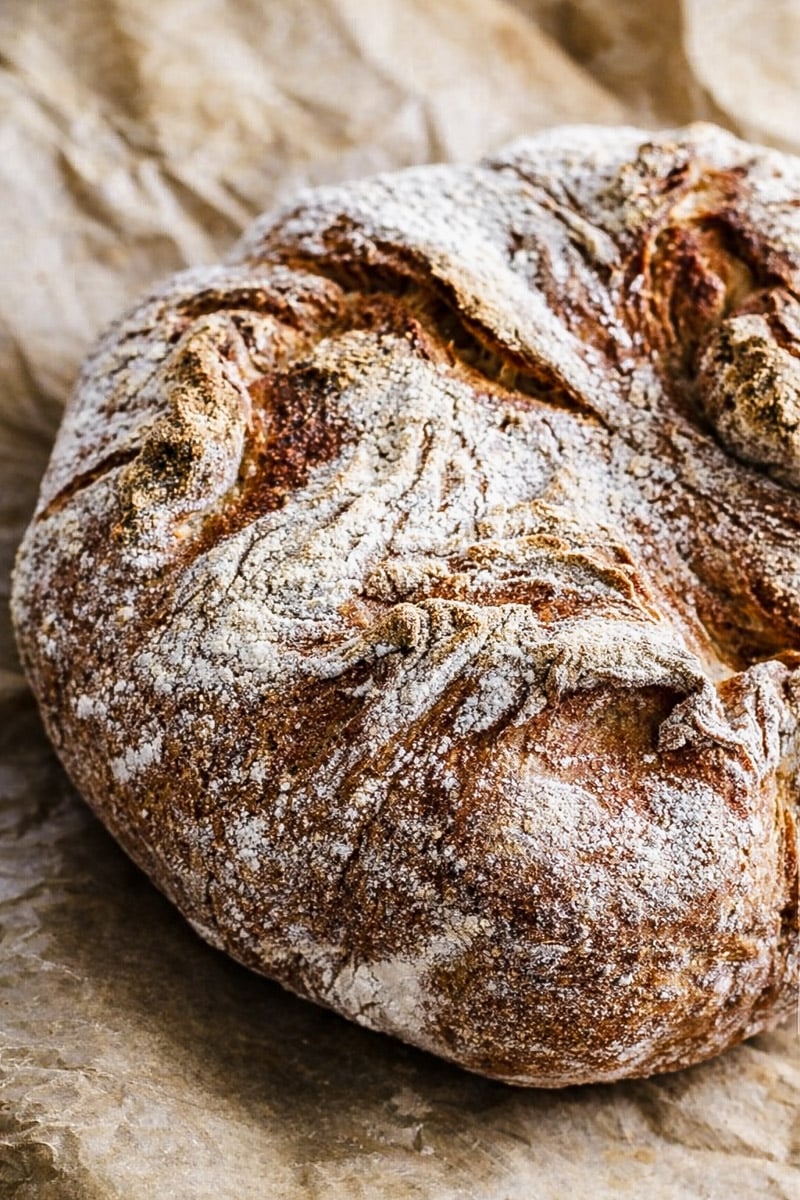
Hello, my friends. This is one of my favorite bread recipes. I have been baking it for years! It seems almost like a sourdough bread. Has the most INCREDIBLE crust and the biggest holes and soft crumb.
Whenever I am with my mother-in-law Teresa, I study what she is doing in the kitchen. I take notes. I take photos (she doesn't like them that much). I sometimes take videos. I am basically stalking her every move and and asking her the same questions I've asked her for many years. But she kindly repeats her answers and her lessons
There is her Calabrian bread that is out of this world. It is a bread she and her mother and sisters all make. Her brother's wives also make this same bread. They are all scattered all over Italy baking this same bread every week. Yes, they bake it every week.
I obviously don't have a neighborhood brick oven to share and I also don't have 12 people eating at my house on any given nights. So one small loaf is all I need. One small perfect loaf like this loaf. I'm not saying this loaf is identical to Teresa's Calabrian crusty bread, but it is definitely very close!
Why you'll love Italian artisan bread:
- Homemade is best: Homemade bread is always better than store-bought, and this recipe allows you to make delicious bread in the comfort of your own home.
- Pantry ingredients: You probably have the ingredients on hand, so no need to make a trip to the store!
- No-knead means no stress: Since it's a no-knead dough, it is no-fuss! Just takes 3 minutes to put together.
- Flexible rise time: A truly forgiving dough. You could let it rise for 2 hours or even up to 3 days.
- The best crust: This authentic Italian bread recipe bakes up with an incredible crust and soft, fluffy crumb - the perfect combination for any type of bread.
What is No Knead Bread?
A no knead bread is a type of bread that requires minimal kneading and stirring. Instead of kneading the dough, it relies on time to form gluten strands and give the bread its structure. The end result is a moist, flavorful loaf with an open crumb and delicious crust.

Look at that crust on this bread!! You can make a bread this fabulous! It just takes some patience and some time.
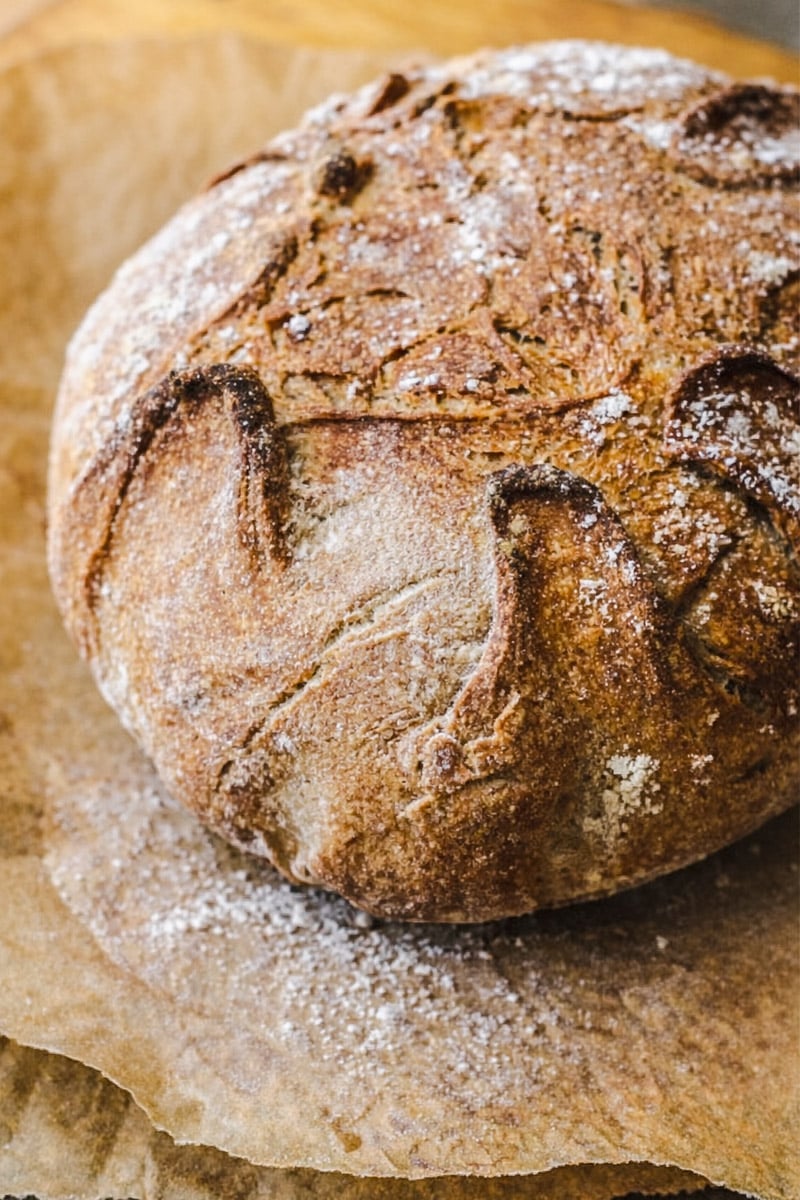
Each time I make it and pull the ends together it gives the bread a different shape. Also, if you don't use a bread proofing bowl, the flour will leave a different design in the folds each time (like mine!).
Ingredients:
This is what you'll need to get started with this bread recipe. You can find a full printable recipe below.
- Bread flour and whole wheat flour: A combination of these two flours helps to create the crispy crust and the soft crumb. It's also used for dusting and forming the loaf.
- Active dry yeast: Acts as a leavening agent to help the dough rise.All-purpose flour: Used to create the base of the dough and provide structure.
- Sea salt: Enhances flavor and helps to control yeast growth.
- Warm water: Activates the yeast and helps the bread to rise.
How to make the best Italian bread?
Here is all you need to do to make this delicious bread. Full printable recipe is below.
- Proof yeast:
- In the bowl of a stand mixer with dough hook attached, dissolve the yeast in the warm water and let it proof (5-10 minutes until foamy). You could add a teaspoon of sugar to the yeast and water to help activate the yeast.
- In a small bowl, add the flours and salt. Give it a few whisks to combine together.
- Make sticky dough:
- Add the flour to the bowl a small portion at a time and mix on low speed. Once you have added all the flour increase the speed and mix until the dough starts to pull away from the sides of the bowl. If you notice the dough is too sticky, add about a tablespoon more of flour at a time until you get a dough that is not too sticky to handle. When dough is ready, turn mixer off and remove the the dough hook.
- Mix by hand:
- No mixer, no problem. Just use a wooden spoon and a bowl. mix until ingredients have just come together and form a smooth dough.
- Let it rise:
- grease a large bowl. Place the dough in the bowl. Cover with plastic wrap and place in a warm spot until doubled in size, about 1 ½ hours (the goal is to not have the dough be too springy, it should be wobbly). If it's rising too fast, place in the fridge while you heat the oven.
- Optional:
- when your dough has risen, you could bake it or place in the fridge to develop more flavor. It could stay 8 hours or even overnight (10-12 hours), up to 3 days. It's flexible and very forgiving. So even if you forget to bake it, do it the next day!
- Sprinkle a little flour on a clean counter.
- Carefully remove the dough without disturbing it too much onto the counter. Pull the corners together to form a round bowl and place the dough back into the same bowl (sprinkle a little flour into the bowl) seam side down. Cover with a tea towel and let it rise while the oven heats up.
- Preheat oven to 460 F
- with rack in lower third of oven. Heat a covered 3 ½ quart heavy ovenproof Dutch oven (9 inches in diameter) with the lid on for 30 minutes or until dough is ready.
- Place a sheet of parchment paper
- on your counter (about the length of a baking sheet). Sprinkle on a little flour. Place your loaf seam side up on on the parchment paper.
- Carefully remove preheated pot from oven, and uncover.
- Remove the towel
- from top of bowl and quickly but carefully lift the dough using the corners of the parchment paper and place the dough into pot, seam side up (the dough is on the parchment paper). Sprinkle a little more flour on top if it has been absorbed while rising.
- Cover with lid. Bake for 30 minutes.
- Uncover pot, and bake until bread is dark brown, 15-20 minutes.
- Carefully lift bread using the parchment paper from pot and transfer to a wire rack to cool completely. Be sure to let cool completely before slicing.
How to tell if your yeast is active and ready to use?
The first and most important step in baking this simple bread bread is activating the yeast.
- In a small bowl, add the warm water.
- Sprinkle on the yeast and the sugar.
- If the yeast is still fresh, it will start to activate and bubble up in about 5-10 minutes. It may take a full 15 minutes.
- If it doesn't activate and bubble up, start over with a new packet. Either the packet is expired or the water was too warm.
Expert tips
- For best results, make sure your yeast is fresh and active. If using instant dry yeast, you can skip the step of dissolving it in warm water.
- Most important tip is to make sure the yeast is fresh! If it's expired, you'll have to start with a new packet.
- This is a very forgiving dough recipe that could rise in 45 minutes (depending if it's a hot summer day) 2 hours, or even you let it rise in the fridge for up to 3 days. As long as it's doubled in volume.
- To make sure we will have fresh bread, I will make dough when I first wake up and leave in fridge (up to 8 hours) and bake it that evening. Or make it the night before and bake next morning (8-12 hours after it's been rising in fridge).
- Feel free to get creative with this recipe and add herbs, spices, or cheese to customize the flavor.
- To reheat leftovers, simply wrap the bread in aluminum foil and bake at 350F (175C) for 10 minutes or until hot.
- If you don't have whole wheat flour, you can use all-purpose flour instead.
- For a crunchier crust, sprinkle some water on the top of the loaf before baking.
- If you want to increase the flavor complexity of this bread, add a tablespoon of olive oil or butter to the dough. This will also make it more tender and moist.
- A loose dough is going to rise better than a stiff dough.
Variations for easy yeast bread recipe no knead:
- To add some flavor to your bread, try adding herbs like rosemary or thyme to the dough during the mixing process. You can also top the bread with seeds like sesame or poppy for a crunchy texture.
- If you don't have a Dutch oven, you can use any heavy, oven-safe pot with a lid. Just make sure it can withstand high temperatures and fits in your oven.
- For a sweeter bread, try adding some honey or maple syrup to the dough mixture. You can also mix in raisins, dried cranberries, or chopped nuts for a delicious twist.
- Remember to let your bread cool completely before slicing into it. Cutting into warm bread can result in a gummy texture.
Can you make this no-knead artisan bread ahead of time?
Yes, you can. Let the dough rise following the recipe, cover with plastic wrap, and place bowl in the refrigerator for up to 3 days. By the 3rd day, the dough does deflate and that is not a problem, the flavor will still be great.
Shape it into the round and place on the parchment paper following the recipe. Let it sit for up to 60 minutes to warm up from being in the fridge and then bake according to the recipe.
What to serve with this bread?
- Soups and stews: this is the perfect bread to dunk into any of our soups or stews.
- Bruschetta: It is a really great bread to toast up and make this easy appetizer.
- Garlic bread: Instead of a baguette, use this bread...it is amazing!
How to store leftovers:
Here are some simple instructions on how to store and freeze your freshly baked bread:
- Allow the bread to cool completely before storing or freezing. This will prevent moisture from building up and causing the bread to become soggy.
- To store the bread, wrap it tightly in plastic wrap or aluminum foil and place it in a cool, dry place such as a pantry or bread box. The bread can last for up to 3-4 days when stored properly.
- To freeze the bread, wrap it tightly in plastic wrap and then place it in a freezer-safe bag or container. It is important to remove as much air as possible from the packaging to prevent freezer burn. Date the bag. The bread can be frozen for up to 3 months.
- When ready to enjoy, thaw the bread at room temperature for a few hours or overnight in the refrigerator. To reheat, preheat your oven to 350°F (175°C), wrap the bread in aluminum foil and bake for 10-15 minutes until warmed through.
- Sliced bread can also be frozen. Simply place parchment paper between each slice before freezing so they do not stick together. You can then thaw and toast individual slices as needed.
- For longer term storage, you may also slice the bread before freezing and freeze it in individual portions. This way, you can take out only what you need and prevent any waste.
- If you store the bread the right way, it could be frozenfor 2-3 months. Longer than that, it could get freezer burn and lose its flavor.
- It is important to note that bread can also be stored in the refrigerator, but it will dry out faster due to the cold temperature. If you do choose to store your bread in the fridge, make sure to use it within 1-2 days for best results.
Can you freeze baked bread?
Yes! This is how you freeze this amazing homemade bread:
- Cool the bread completely.
- Wrap bread very will with plastic wrap.
- Place bread in zipped lock freezer bag (or even wrap very well with foil paper).
- Freeze for up to 3 months.
- When you are ready to use the bread, thaw in the refrigerator overnight. Simply warm up in oven (I like to warm up at 350F/180C) for about 35 minutes.
FAQ's
The main difference between Italian bread and Sicilian bread is the texture. Italian bread generally has a softer, doughier texture with an open crumb, while Sicilian bread is denser and drier with a tight crumb. Additionally, Italian bread often contains ingredients like olive oil, rosemary, or thyme for added flavor, while Sicilian bread is usually made without any additional ingredients.
No-knead bread is a quick, easy way to make delicious homemade bread with minimal effort. Traditionally, breads require kneading and rising several times in order to develop the gluten strands that give structure to the loaf. With no-knead bread, this process is greatly simplified by relying on time instead of kneading. This type of bread is also ideal for beginner bakers as it requires very little effort and skill to make a delicious loaf.
The most common ingredients used in Italian bread are yeast, olive oil, salt, sugar, and a variety of flour including all-purpose, semolina, or durum wheat. These ingredients give the bread a distinct aroma and flavor that can't be replicated with other types of breads.
The main difference between French bread and Italian bread is the texture. French bread typically has a crisp crust and a light, airy interior with large holes, while Italian bread usually has a chewy texture and an open crumb.
For this bread I used 5 qt, but you could even use a 3 quart Dutch or French oven (Le Creuset calls them French Oven). It's best to use piece of parchment paper to make it easier to lift the loaf in and out of the Dutch oven.
Yes, flour quantities may vary. I start out with 2 ½ cups of flour and I add the last ½ cup and sometimes a little bit more. You may even need less flour. There are variables that affect the dough, such as humidity and also the temperature.
If it's a cold and rainy day, your flour amount will differ from a hot and sunny day. If you feel your dough is too sticky, add a little bit more flour at a time. Rising time could also differ from kitchen to kitchen. If you have a hotter environment like we do here in Florida, it will rise much quicker.
Another fantastic bread recipe is the overnight version of the no knead to knead bread.
The bread goes perfectly with any great Italian cheese or salami and olives.
Originally published January 2023 and updated for content January 2024.
Some ways we like to enjoy this bread:
- Lentil Soup with Caramelized Onions
- Zuppa di Fagioli
- Bucatini alla Carbonara
Are you a pasta fan? Yes, Italians do eat bread with their pasta!
Did you make this and love it? Please RATE THE RECIPE below:)
I would LOVE IT if you can leave me a star rating and a review down below and let me know your thoughts! It means the world to me to hear how you liked it.
Please Subscribe and give a follow on Instagram, Facebook, Pinterest, and TikTok xx

Rustic Italian Bread (No Knead)
Equipment
Ingredients
- 1 packet 2 ¼ teaspoons active dry yeast
- 1 ¼ cup warm water about 100 F
- 1 teaspoon granulated sugar
- 2 cups bread flour plus extra for dusting
- 1 cup whole wheat flour
- 1 ¼ teaspoon sea salt or kosher salt
Instructions
- Prep the yeast: In the bowl of a stand mixer with dough hook attached, dissolve the yeast in the warm water, stir in the sugar, and let it proof (5-10 minutes until foamy).
- Combine flour with yeast mixture: Add the flour to the mixing bowl a small portion at a time and mix on low speed. Once you have added all the flour increase the speed and mix until the dough starts to pull away from the sides of the bowl. If you notice the dough is too sticky, add about a tablespoon more of dough at a time until you get a dough that is not too sticky to handle. When dough is ready remove dough hook.
- Mixing by hand: If you're mixing by hand, mix until ingredients have just come together and form a smooth dough.
- Let dough rise: Grease a large bowl. Place the dough in the bowl. Cover with plastic wrap and place in a warm spot until doubled in size, about 1 ½ hours (the goal is to not have the dough be too springy).
- Sprinkle a little flour on a clean counter. Carefully remove the dough without disturbing it too much onto the counter. Pull the corners together to form a round dough, sprinkle a little flour into the bowl, and place the dough back into the same bowl seam side up. Cover with a tea towel and let it rise while the oven heats up.
- Preheat oven to 460 F with rack in lower third of oven. Heat a covered 3 ½ quart heavy ovenproof Dutch oven (9 inches in diameter) with the lid on for 30 minutes or until dough is ready.
- Transfer to paper: Place a sheet of parchment paper (not wax paper)on your counter (about the length of a baking sheet). Sprinkle on a little flour. Flip the loaf seam side up on the parchment paper. Carefully push and slide it into the middle so it takes on a round shape. It won't be perfectly round and that is fine!
- Carefully remove preheated pot from oven, and uncover.
- Remove the towel from top of bowl and quickly but carefully lift the dough using the corners of the parchment paper and place the dough into pot, seam side up (the dough is on the parchment paper). Sprinkle a little more flour on top if it has been absorbed while rising.
- Cover with lid: bake for 30 minutes covered.
- Uncover pot: bake until bread is dark brown, 15-20 minutes.
- Carefully lift bread using the parchment paper from pot and transfer to a wire rack to cool completely.
- Cool before slicing.
Nutrition Disclaimer
Please keep in mind that the nutritional information presented below is an approximation and may vary depending on the exact ingredients used.
Notes
- Flour - If all you have is all-purpose flour on hand, that is fine to bake bread with. Although, bread flour does result in a very chewy crumb and it does keep the bread freshly for longer.
- Wholewheat flour - You could use wholewheat (wholemeal) flour, just use a little bit less and increase to add more as you need as wholewheat flour is more absorbent.
- Yeast - Instant or rapid rise yeast is fine to use and can be added right into the flours, doesn't need to be dissolved in water. I used active dry yeast.
- Salt - I do not recommend using table salt, as it will turn out to be too salty. Sea salt or kosher is the best.
- Water temperature - boiling hot will kill the yeast. It should be warm water (just above lukewarm), about 110-115°F. I always say like warm milk from a baby's bottle, too hot, and you wouldn't be able to drink it!
- Dough rising- different factors will affect how the dough rises. The flour brand, room temperature, and humidity levels will all take an effect. As long as the dough is doubled in volume, wobbly, and bubbles on the surface, it doesn't matter if it rose faster or slower. It is a forgiving dough.
- Too cold- In case your room is too cold and it's taking too long to rise, I like to turn on my heater and let it run a few minutes, and then put the bowl in the dryer. Do not let the dough rise in direct sunlight.
- Dough consistency- the flour brand and the humidity of the room will affect how the texture of the dough is. I like to suggest while you're making the dough to not add all the flour at once. I would prefer the dough to be too sticky than too dry. Once you have added too much water, it's tricky to add water to loosen the dough and make it moist again. Much better to add less flour and keep adding if you need to to get to the full amount.
- Dough rises fast-If your dough does happen to rise before you had a chance to preheat oven, go ahead and place the bowl in the refrigerator and get the oven heated.
- Place tray in oven with the dough.
- Fill the metal pan with boiling water. If it fits on middle rack next to tray with dough, fit it in there, if not, bottom rack.
- Shut oven door and bake for 40-45 minutes, until it forms a nice crust with dark golden color.


Did I miss something - you said if using instant yeast no water is required so where does the moisture come from?
Hi Sharon-Water still is used! Great question...here is how you can do it: How to adjust your recipe with instant yeast
Whisk the instant yeast directly into the bread flour, whole wheat flour, and salt.
Add the warm water straight into the mixer and begin mixing on low speed until a dough forms.
Increase speed and mix until the dough pulls away from the sides of the bowl, just like in your original method.
After that, everything stays the same: rise, shape, and bake exactly as written.
Hope that helps!!
This crusty Italian bread absolutely wonderful. Perfect to go with soups and stews on these cold days!
I love the simplicity and rustic flavor. It was perfect with my chicken Alfredo.
Great bread. I love the old-world style. It was perfect with herbed butter.
We loved this no knead recipe so much!
Great recipe! The bread is easy to make and tastes delicious. I added poppy seeds for extra flavor and texture.
Hi, I am interested in making this recipe but I ONLY use flour imported from Italy. For this recipe do you suggest a “00” or “0” or other type of flour for this recipe?
Also if I wanted to make it a bit more healthier, can I use Italian Integrale Whole Wheat flour? If yes, would I only use the integrale or mix it with “00” or “0” ratio?Thank you
Hi Jenn-YES, you could use "00" flour. I've never made it mixed with whole wheat and 00, but you could sure give it try!! ENJOY!
You said that if the dough is too sticky to add a little more dough. Did you mean that we should add a little more water?
Hi Len-to clarify: if dough is too sticky, add about a tablespoon more of flour at a time until you get a dough that is not too sticky to handle. Take care not too add TOO much flour, then you'll get a dough that's too dry.
The dough is wonderful and tastes so good! Any tips on the bottom not burning? I put my oven up to the 460° and baked it for the 30 minutes with the cover and then for 10 minutes with the cover off and it burned on the bottom 🙁 any tips would be appreciated!!!
Hi Charissa-Yes, every oven is different and you could try these tips:
Place a baking pan on the lower rack beneath the bread to shield it from excessive heat. Start by preheating the oven to 460°F, then reduce the temperature to 425°F when you begin baking. If you're using a black cast iron pot, switch to a different type that isn't black to avoid overheating. Also, be sure to set a timer and not go over the recommended baking time. Hope these tips could make a difference for the next loaf! Let me know!
Is there sugar in this recipe, I don’t see it in recipe but it’s mentioned in comments?
Hi Lorraine-You could use a teaspoon of sugar to dissolve with the yeast. If you don't use the sugar, the yeast should still activate (as long as it's fresh and the water isn't too HOT). Hope that helps!
Hi! You mention sugar towards the top, mixing it in the warm water with the yeast. But I don’t see how much, and sugar is not mentioned in anywhere else…. not even in the ingredients list. Are we supposed to add it? And if so, how much?
Yes, just a teaspoon of sugar. The sugar helps activate the yeast. Hope that helps!
I am a beginning bread baker and I have to say, this was not a difficult bread recipe to make. It has the best crust! Smells really incredible while it's baking. I will be baking again!
Great recipe, worked perfectly. I was wondering, since my Staub dutch oven is very large, can i just double the ingredients to make a larger loaf?
Hi D - I have never doubled the recipe, but you could go ahead and try. Let me know how it turns out!Happy Baking!
This bread is actually not that hard to make, I’m not a very skilled cook and loved this recipe !
Hi Jessica-Great! Really happy you enjoyed the bread! Thanks for letting us know 🙂
I don't have a Dutch oven and wonder if I can bake this on a metal rack instead?
Hi Orna-I would bake it on a baking steel or pizza stone (if you have)...if not a metal baking sheet. Preheat the baking steel, pizza stone or metal baking sheet in the oven for about 45 mins-1 hour (to get the best results).Place the bread on parchment paper to carefully transfer to the sheet.
To create the steam, fill small baking dish with water (1 cup is usually plenty) and place it in the oven, on a rack directly under your baking stone or steel, 5-10 minutes before you place your bread in the oven. When you’re ready to bake, place your bread onto the baking steel (or baking sheet), and bake as directed. Carefully remove the dish of water from the oven for the last 10-20 minutes of baking.I think that would do the trick to create the nice crust!
Great loaf! Great story about your MIL! I miss Twelve Loaves! It was such an inspiration!
Hi Karen-Thank you. Miss baking monthly with you...you're such an incredible bread baker! XX