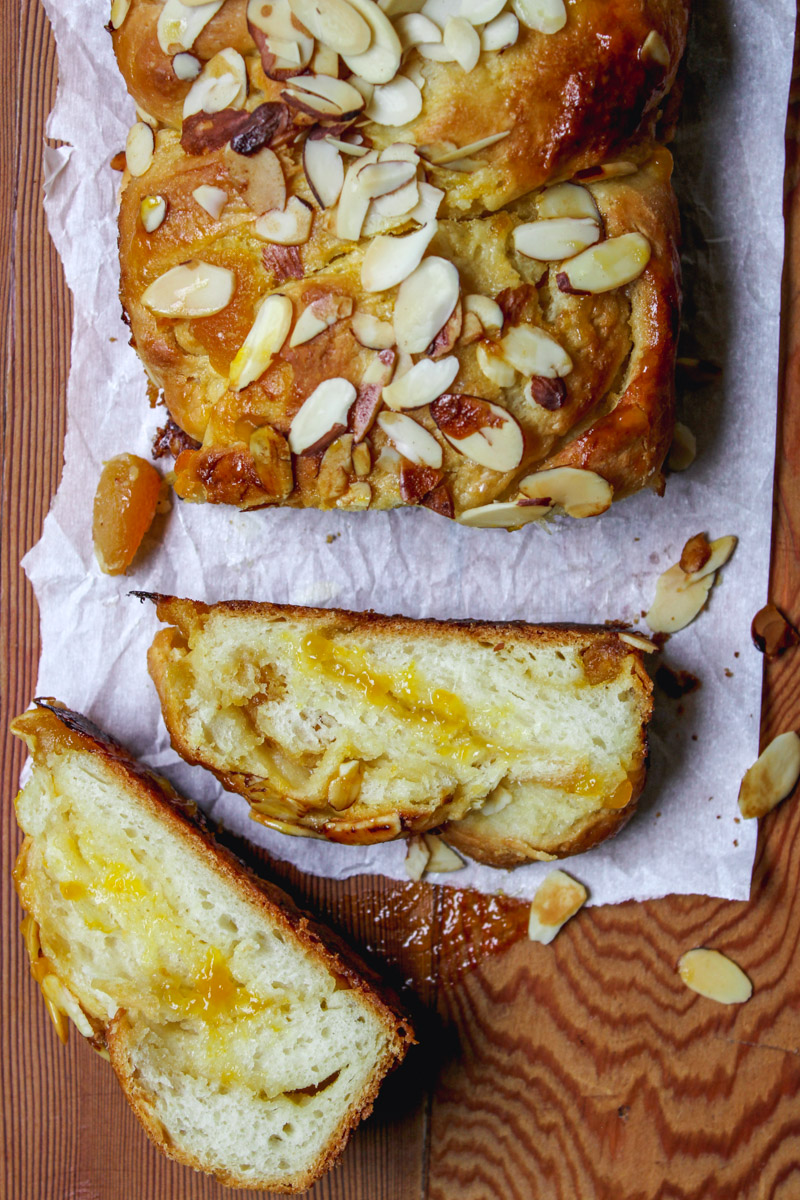
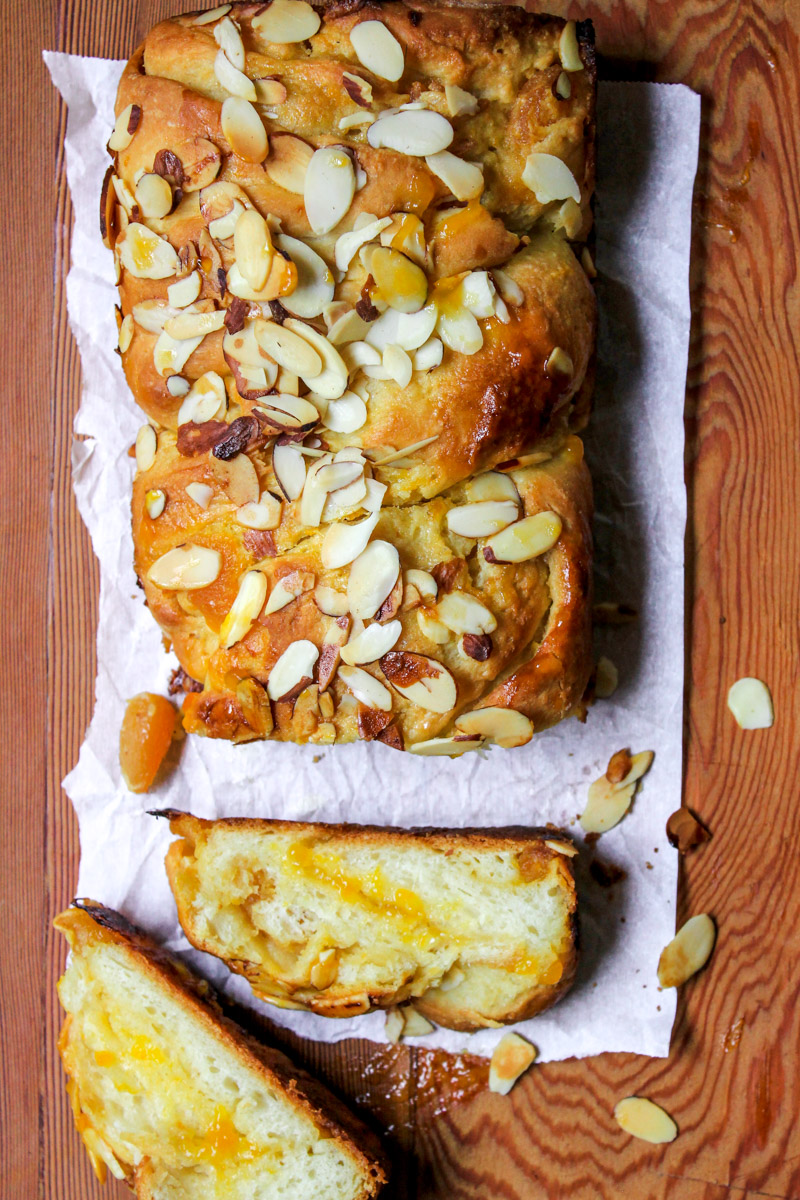
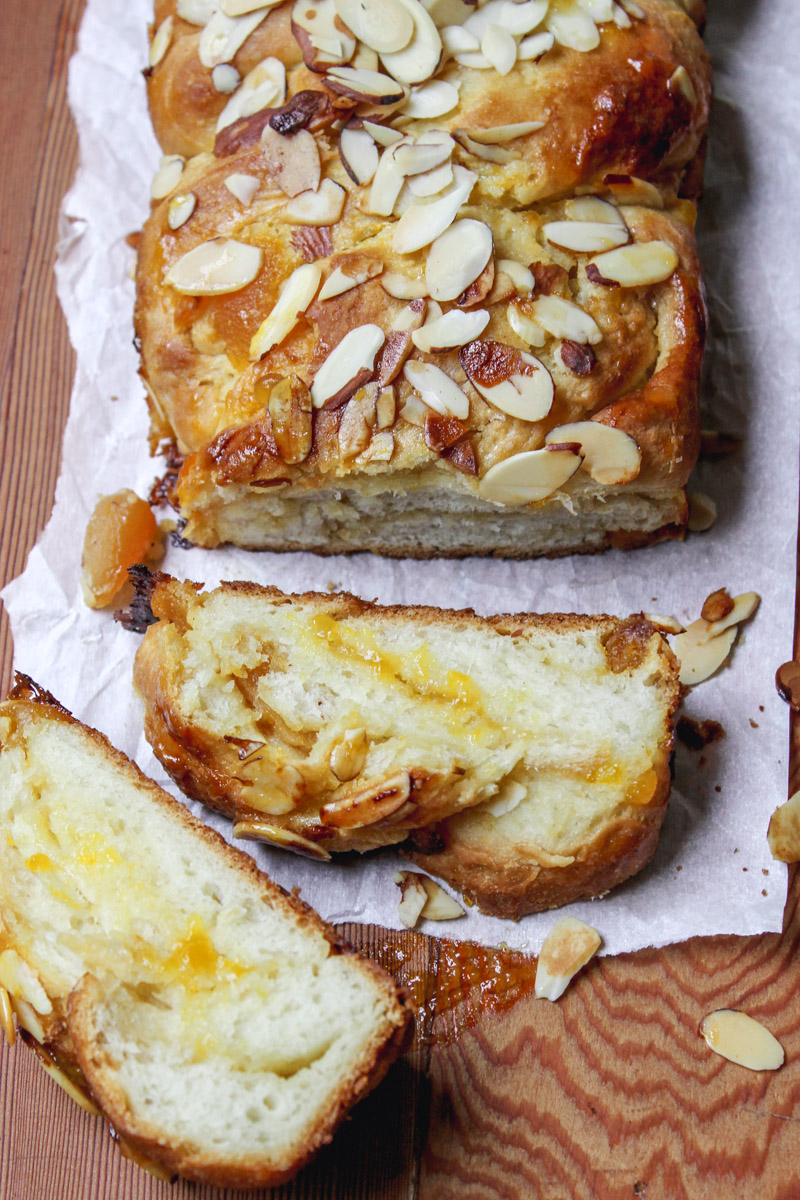
This yeasted Apricot Bread is slightly sweet and a little tart with an incredible apricot filling. Sliced apricots are sprinkled on top before it bakes. As soon as it's out of the oven, apricot jam is brushed on top. Serve slices of this delicious bread with coffee or afternoon tea.
Originally posted in July 2013 and updated September 2022 for content. I have a feeling not many of you venture in the kitchen in the summer time. It's hot. It's hot and sticky. I had little desire to bake a yeast bread for this month's theme.
Until I saw this apricot bread online. I don't remember how I came across it. It was through one site and another that led me to this beauty.
What is Apricot Bread ?
This delicious Apricot Bread is a type of bread that uses apricots as one of its main ingredients for the filling. The other main ingredients in this bread recipe include flour, sugar, salt, dried apricots, fresh apricots, and yeast. This bread is often baked in a loaf pan and then sliced into pieces to be enjoyed. Apricot Bread can be enjoyed as a breakfast bread, snack bread, or even dessert bread. Here are some other apricot recipes to check out.
Side Note:
I will be completely honest with you. I had some baking difficulties. Some major dough issues. So bad that I almost chucked the whole thing in the garbage. But it looked so good with it's incredible filling. I had every intention of making a ring and a twist bread and some mini rolls.
The smaller twist bread was no problem, and the rolls were a cinch.
What ingredients are needed to make a yeasted apricot bread?
for the dough:
- milk
- active dry yeast
- granulated sugar
- eggs
- unsalted butter
- all-purpose flour
- teaspoon salt
for the filling:
- dried apricots
- fresh apricots
- orange juice
- unsalted butter
- granulated sugar
- all-purpose flour
for topping:
- unsalted butter
- apricot jam
- sliced almonds
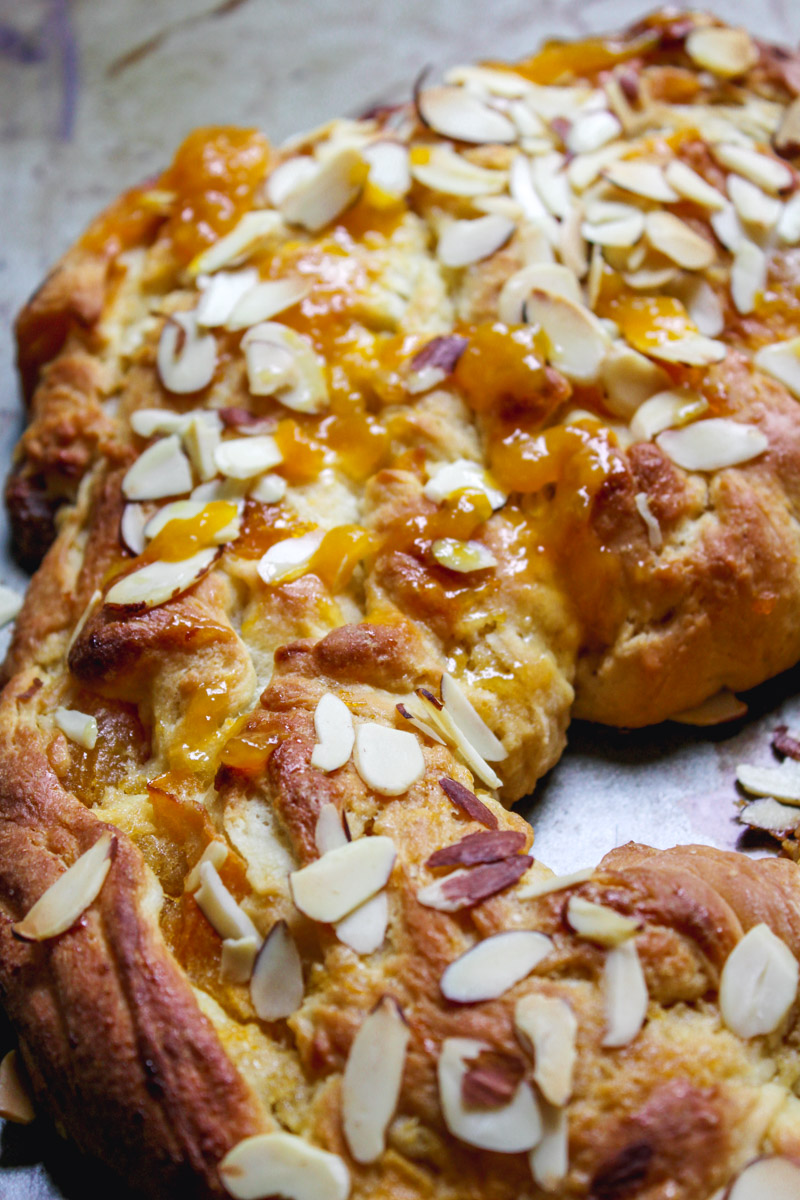
But this beast below...well, I call it a beast and it ended up being quite the beauty. I almost threw this part of the bread process away. Thank goodness I stopped myself and gave it a chance! What's my bread baking moral? Don't ever give up on the yeast!
The recipe yields one very large ring, or you could do two loaves and some mini loaves (like I did the second time). If you do one loaf, you should have enough dough to even make a small ring, and section out the other portions and place in muffin tins.

At first, it wasn't turning out to be the prettiest and I had the worst time shaping it into a ring. Blame the heat. Blame my rushing. I don't know what in the world happened. It seemed it would be one big mess.
But I persevered. And it happened. The bread baked up beautifully and it all turned out fine in my bread baking world.
I even got a text from my neighbor after I sent his kids a sample to try a little of it all, "Did you bake those breads? All of them?". Completely sensed his utter disbelief. As if, perhaps, I stopped by a bakery and bought all that bread.
I told him yes...I did bake these breads. He was quick to respond and ask me when am I baking them again;).
Tips to activate yeast:
How to activate yeast Step 1: Check the date
Most important step, look at your yeast package and check the expiration date. I know, it seems simple, but you may rush, and forget (I've done it...ONCE, then I learned my lesson).
Yeast is fresh, ok, on to the next step!
How to activate yeast Step 2: Warm water
Packet of yeast is fresh and not expired, so add some warm water to a bowl (about 110F). I do not check the temperature, but if you have doubts, use a thermometer. Sprinkle on the yeast. There is no need to stir it.
How activate yeast Step 3: Add touch of sugar
In this part, take a teaspoon of sugar from what will be used in the dough, and gently stir it in the yeast and water. Leave it alone. The sugar will help to activate the yeast. it will begin to foam. Be patient, it's not going to happen in 30 seconds!
How to activate yeast step 3: Patience
It's not easy to have patience, but this isn't going to transpire in 30 seconds. It may take a full 10 minutes for the yeast magic to happen. If your kitchen is on the warmer side (mine is!), it will happen sooner.
If your kitchen is a bit chillier, it could take a full 15 minutes. Try to resist the urge to stare at it, willing it to happen (I've done that!). Continue on with something else and soon the yeast will be foaming up.
What if my yeast does not foam up and activate?
There is a possibility that after 15 minutes your yeast does not come alive. That's why it's good to have extra packets of yeast on hand. Start all over again with another portion of warm water (110F).
Maybe the water was too hot, or maybe you rushed and grabbed an expired packet of yeast. So double check, and make sure the next packet of yeast is fresh and give it another try!
DOUGH FREQUENTLY ASKED QUESTIONS
What can I substitute for the apricots?
Since fresh apricots are only in season sometimes, feel free to replace them with another chopped fresh fruit like pitted cherries, plums, peaches or nectarines.
Could instant or rapid rise yeast be substituted for active dry yeast?
I used active dry yeast for this bread, but you could sub in either instant or rapid rise yeast. A tip is to use a little less of the rapid or instant yeast (1 ¾ teaspoon instead of the 2 ¼ teaspoon of active dry yeast).
OR use the same amount (1 package which is 2 ¼ teaspoons) and the dough will rise a bit faster (also, expect it to double in size faster)
Could this dough be kneaded by hand?
Yes, it certainly could! And you'll get a good arm workout. No stand mixer, no problem! Just use a clean counter, or work space, and give it a go!
But first, start the dough in a large bowl. Use a wooden spoon to start stirring it until a shaggy dough comes together and you have incorporated the dry ingredients. Dump out the dough onto your clean work space.
With the heel of your hand, press and fold down the dough, and with every press turning the dough about 90°. Keep on kneading the dough, touching your hands in a little bit of flour, so the dough won't be too sticky.
Take care to not add too much flour, you don't want a dry dough. Think about achieving an elastic dough that is smooth to the touch. It should be ready after about 7 minutes of kneading (more or less).
The dough will initially seem sticky, so don't add more flour to the dough itself, just dust your hands. As you keep on kneading, the dough should firm up and smooth out.
But if you do need to add more flour, do it 1 tablespoon at a time. It will become smooth and elastic by the time you're done kneading, about 5 to 7 minutes.
How do you store apricot bread?
The bread will keep fine stored in an airtight container for up to 2 days.
Should you peel apricots before baking?
There's no need to peel apricots before baking - the skin will soften during the cooking process and will be perfectly edible. If you're looking for a time-saving shortcut, simply give them a quick wash before adding them to your recipe.
Can I freeze apricot bread?
Yes, it is a bread that freezes! Simply slice the bread, and wrap each portion with plastic wrap. Put the wrapped portions in zipped lock bags. It will freeze for up to 2 months. Defrost on your counter and then warm it up in your toaster oven or your oven (at 350F for about 10 minutes).
Here is what other bakers in our group created:
- Apricot Bread from Savoring Italy
- Peach Apricot Honey Bread from Try Anything Once Culinary
- Peach Muffins from Ma Che Ti Sei Mangiato
- Peach Challah from Vintage Kitchen Notes
- Cherry Muffins from Magnolia Days
- Apricot Braided Loaf from Karen's Kitchen Stories
- Cinnamon Peach Monkey Bread from Hip Foodie Mom
- Peach Oat Quick Bread from A Baker's House
- Nectarine Raspberry Bread from A Handful of Everything
Look at what we've baked this past year!
May theme: Focaccia
June theme: Corn Rolls
July theme: Challah
August theme: Summer Fruit
September: Say CHEESE!
October: Seeds, nuts and grains
November: Autumn Fruits: Apples and Pears
December: Boozy Bread
January: Clean Slate
February: Open Challenge
March: Holiday Breads
April: Berries
#TwelveLoaves-founded by Savoring Italy.
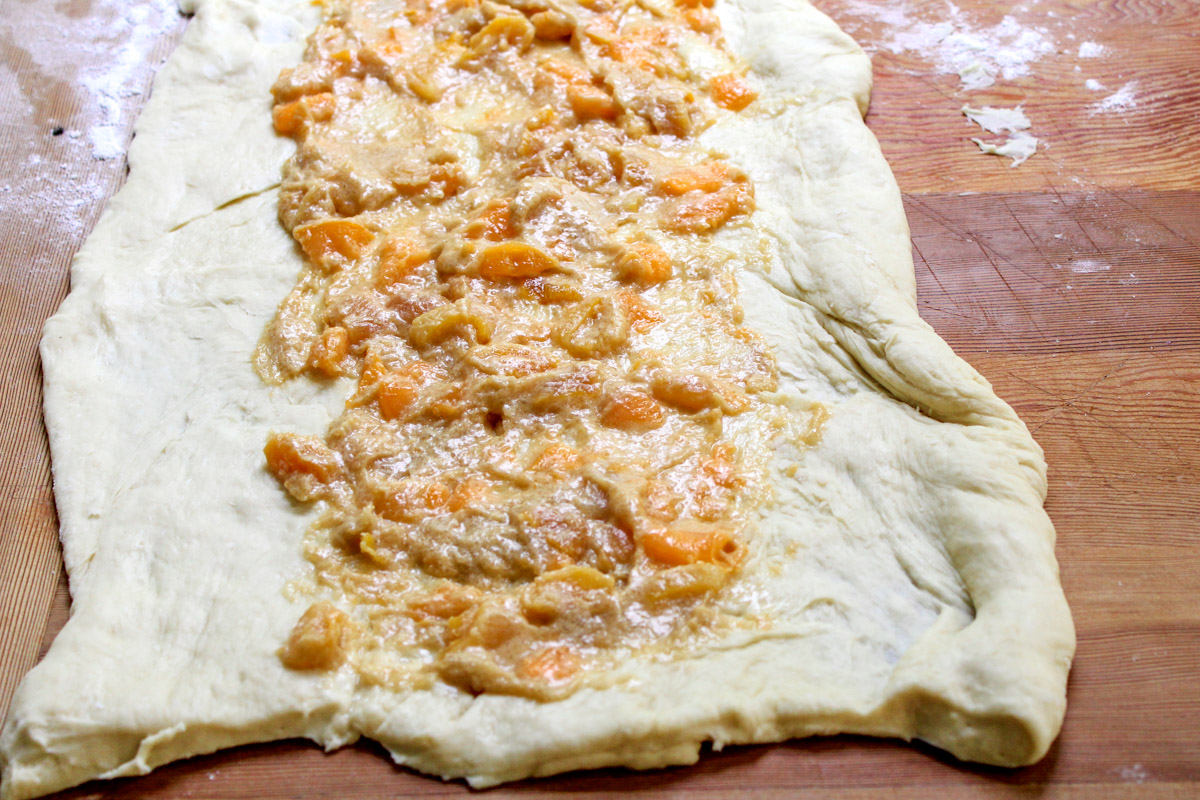
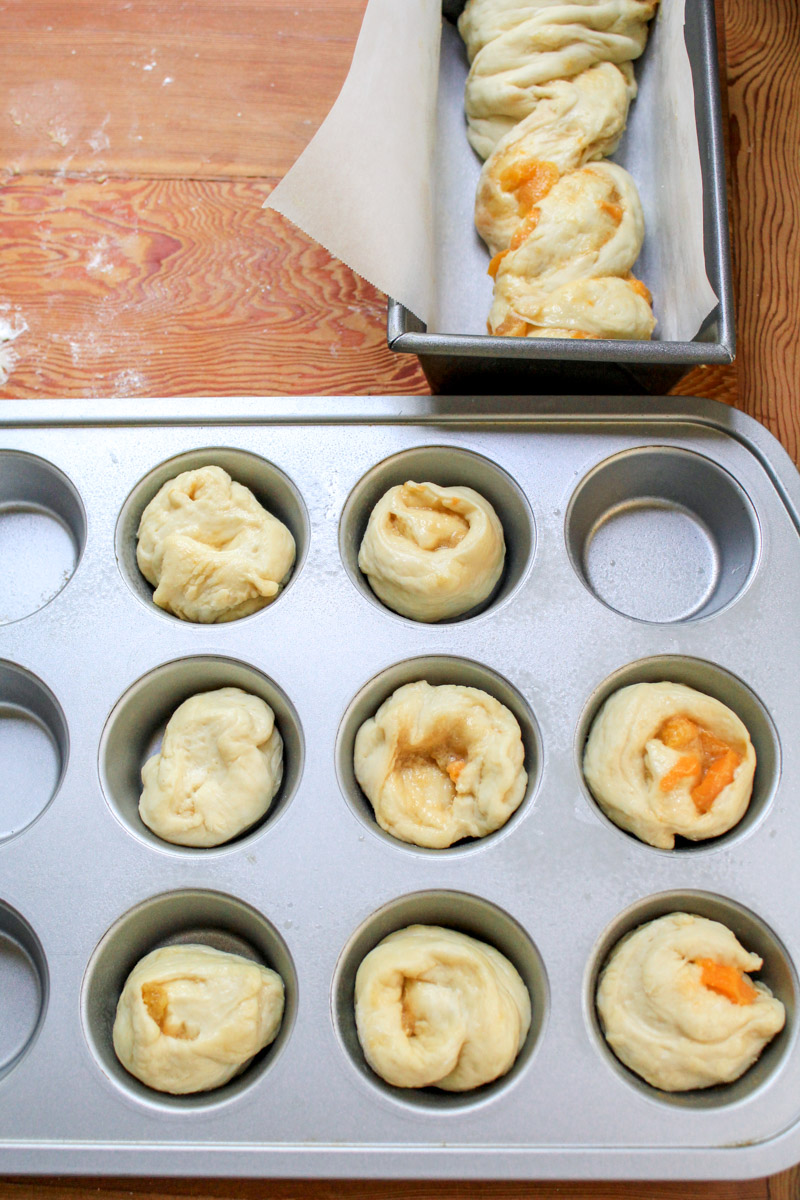
Here are some photos of the process. It was so messy, so I didn't get to take that many. But forming it is so similar to the Estonian Kringle I posted a while back.
I ended up making loaves, making a ring, and making mini loaves in the muffin tin. All with one batch of the dough!
The twisting part is a little tricky. But take your time!
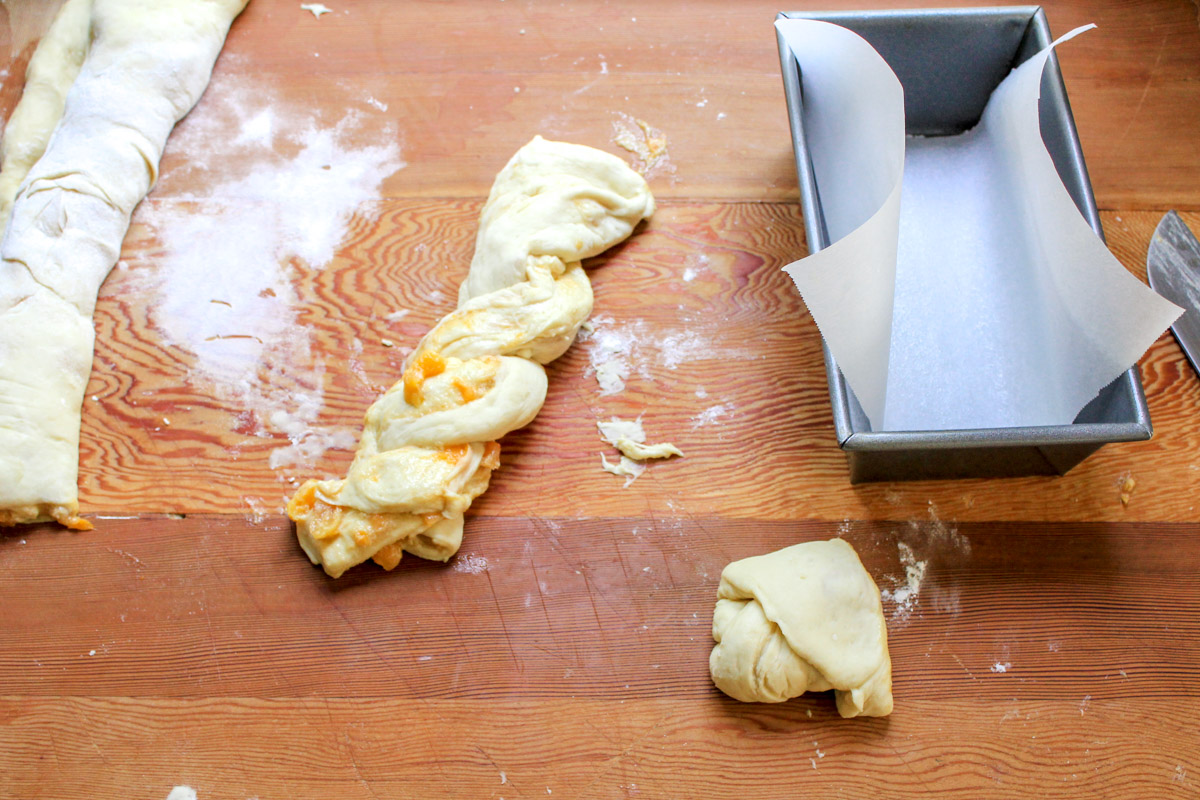
I did form some into small rolls and baked them in muffin tins.
Seriously, not only is it gorgeous, it is delicious!
Some other yeast dough recipes to try:
This post contains affiliate links. As an Amazon Associate I earn from qualifying purchases. See my privacy policy for details.
Just a quick request: if you enjoyed this apricot bread as much as we did, would you kindly leave us a 5-star rating and a short (or long!)comment-the ratings are what helps get our recipes and hard work discovered, so we can keep leaving you more delish recipes!
Your comments mean the world to me….and I really SMILE when I read them. Thank you so much! XX

Apricot Bread
Ingredients
- FOR THE DOUGH
- 1 cup whole milk
- 1 ½ ounce envelope active dry yeast
- ¼ cup warm water 100 to 110 degrees
- 3 Tablespoons granulated sugar
- 2 eggs
- ¼ cup unsalted butter melted
- 4½-5 cups all-purpose flour
- ½ teaspoon salt
- FOR THE FILLING
- ½ dried apricots chopped
- ½ cup fresh apricots chopped
- ½ cup orange juice
- 6 Tablespoons unsalted butter
- ½ cup sugar
- ¼ all-purpose flour
- FOR THE TOPPING
- 2 Tablespoons unsalted butter melted
- ½ cup apricot jam
- ½ cup sliced almonds
Instructions
- MAKE THE DOUGH
- Heat the milk in a small saucepan over medium heat until it just begins to boil. Remove from heat and let stand until cooled to room temperature. Meanwhile, sprinkle the yeast over the warm water in a large bowl. Add 1 T of the sugar and let stand until foamy, about 5 minutes.
- Beat in the remaining 2 tablespoons sugar, eggs and butter. Beat in cooled milk. Gradually add the flour and salt, scraping down side of bowl, until a soft dough forms.
- Turn dough onto a floured work surface and knead the remaining flour into the dough, adding more flour if too sticky. Knead for about 10 minutes until smooth. The dough will be soft.
- Grease a large bowl. Place the dough in the bowl. Cover with plastic wrap and place in a warm spot until doubled in size, about 1 ½ hours.
- While dough is rising, soak the apricots in the orange juice (I also threw in a Tablespoon of limoncello. If you have any and you like the flavor, use it!)
- Line a regular and mini size loaf pan with parchment paper. (if you don't have a mini loaf pan, you can use a muffin tin) .
- FOR THE FILLING
- In a mixing bowl, cream the butter and sugar until fluffy. Drain the apricots from the juice. Reserve the juice. Mix the apricots and flour into the butter/sugar mixture.
- Punch down the dough. Dump the dough out onto a floured surface, roll out the dough into a 10-by-18-inch rectangle. Spread the apricot mix over the dough, leaving a 1-inch border on the sides.
- Brush the borders with water. Tightly roll the dough into an 18-inch log, rolling toward the clean border; pinch the seam to seal. Cut the ends off.
- Place the ends in a small loaf pan or (muffin tins that have been sprayed with baking spray.)
- Place roll seam-side down on the baking sheet. Cut the log in half so you now have two logs to work with. Cut the first half of the log in half lengthwise with a chef's knife.
- Twist the two halves together, crossing one over the other a few times. Pinch the end together, then tuck both pinched ends under the loaf slightly. Carefully place in the first parchment lined loaf pan.
- Repeat with the second log and place in the other parchment lined loaf pan (if you don't have two loaf pans, you could bake the other log on a parchment lined baking sheet). You could also make a 1 large ring bread or two smaller ring breads.
- Cover the loaf loosely with plastic wrap and set aside in a warm place until plump, 30 minutes.
- Preheat the oven to 350 degrees F. Uncover the loaves and brush butter on the loaves (and the rolls, if you made rolls). Sprinkle on the almonds.
- Bake the bread, rotating the baking sheet halfway through, until golden brown , 30 to 35 minutes. (check the rolls as they may be done a few minutes before). Brush bread and rolls with melted butter.
- While bread is baking, heat up the apricot jam with the reserved orange juice.
- BRUSH ON JAM
- When the bread is ready, brush the apricot jam on the bread hot of the oven.
Nutrition Disclaimer
Please keep in mind that the nutritional information presented below is an approximation and may vary depending on the exact ingredients used.


[…] Apricot Bread from Cake Duchess Peach & Apricot Honey Bread from Try Anything Once Culinary Peach Muffins from Ma Che Ti Sei Mangiato Peach Challah from Vintage Kitchen Notes Cherry Muffins from Magnolia Days Apricot Braided Loaf from Karen´s Kitchen Stories Cinnamon Peach Monkey Bread from Hip Foodie Mom Peach Oat Quick Bread from A Baker’s House Peach Cinnamon Rolls from That Skinny Chick Can Bake Nectarine Raspberry Bread from A Handful of Everything […]
[…] Apricot Bread from Cake Duchess […]
[...] Open Challenge March: Holiday Breads April: Berries May: Open Theme June: Summer Buns July: Stone Fruits August: Savory September: Farmers [...]
[...] Open Challenge March: Holiday Breads April: Berries May: Open Theme June: Summer Buns July: Stone Fruits August: [...]
[...] 2013 January: Clean Slate February: Open Challenge March: Holiday Breads April: Berries May: Open Theme June: Summer Buns July: Stone Fruits [...]
such a moist and lovely apricot loaf, seriously drool worthy, would warm up any cold day 🙂
This looks delicious Lora, very summery indeed. I'm glad the dough finally worked out well for you.
[...] all these delicious fruits are in abundance. You can find all the other delicious entries here at Cake Duchess. After baking my Peach Brown Buttered Shortbread I knew that more stone fruits needed to be baked [...]
Lora, I just picked a whole basket of apricots from our tree yesterday, and now I have a new wonderful recipe for them~perfect timing! it never gets too hot to turn on the oven around here either:) Your loaf turned out gorgeous, as always! THANKS, my friend!
Do you mind I'm taking a bite on this luscious bread. Hmm....I just love anything yeasted. Your bread looks so really tempting. Slurppp....
Kristy
Lora this looks amazing! Thank you for the recipe I am sure I will make this bread soon.
Hugs
now that would be perfect! one day...one day!:)
oooh, as I sit here with my coffee I wish I had a slice of this to go with it... and YOU sitting here at the table with me!
Oh my gahh, Lora, I can't get enough of your breads, this apricot bread being no exception! It's so 'glazy', fruity, nutty and beautiful! My 'Lora's Goodies' bookmarks are starting to take over the folder! I'd do anything..well, most anything, for a couple slices right now, or several of those baby breads! Love fresh apricots and that photo with the pit is killing me! xo
I'm going to have to tough this one out. I am bringing this for the 4th of July to our friend's house! I have three box fans strategically placed in my house to vent the hot air from the kitchen. I am way too cheap to use my ac. 😛 Those fans are what keeps us from passing out with the added heat of the oven, but with them on it stays nice and cool while we still get delicious baked goods! You really inspire me to get into the kitchen and bake...even in 100 degree weather.
What a beautiful bread! I think I'd like to be your neighbor and receive treats and goodies like these.