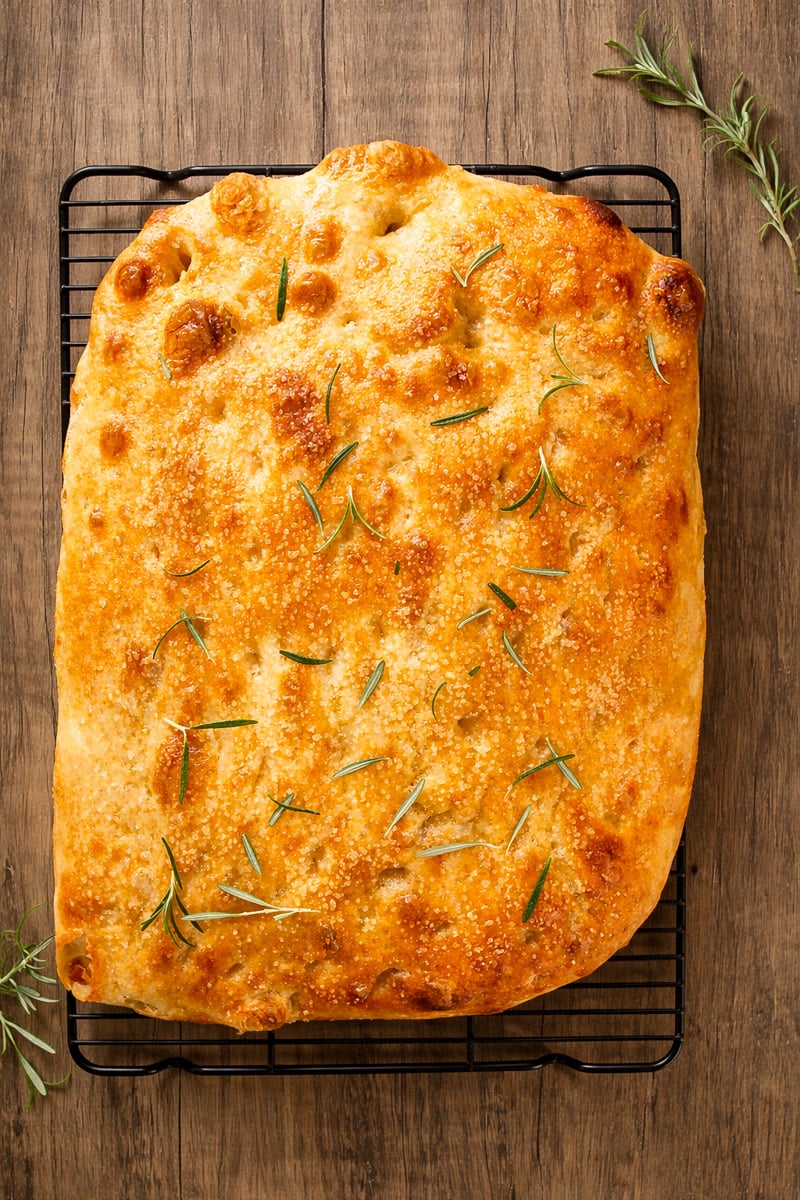
Learn how to make our fluffy focaccia bread with this easy overnight focaccia recipe. Soft, airy inside with crispy edges and rich olive oil flavor.
If you love baking Italian bread at home, my Traditional Focaccia with Rosemary is another must-try - it's the classic Ligurian version with flaky sea salt and fresh herbs and for something a little more indulgent, try my Focaccia with Caramelized Onions.

This article contains affiliate links which support us at no extra cost to you.
Jump To
- Ingredients (simple focaccia dough)
- How to make focaccia (step-by-step)
- How to tell if your yeast is active and ready to use?
- How much water needs to be added to focaccia dough?
- My tips for the best focaccia bread
- Variations to try
- FAQs
- Some other yeast dough recipes you'll love:
- 📖 Recipe
- Fluffy Focaccia Bread Recipe
If you've been searching for the best focaccia bread recipe that actually delivers that airy, bubbly texture… this is it. This fluffy focaccia recipe uses an overnight rise to create a soft, pillowy interior with golden, crispy edges. No kneading. No stress. Just really good focaccia.
I've tested a lot of focaccia recipes, and this method is the one I keep coming back to. The long rest does all the work for you, and the result tastes like something you'd get from a bakery in Italy.
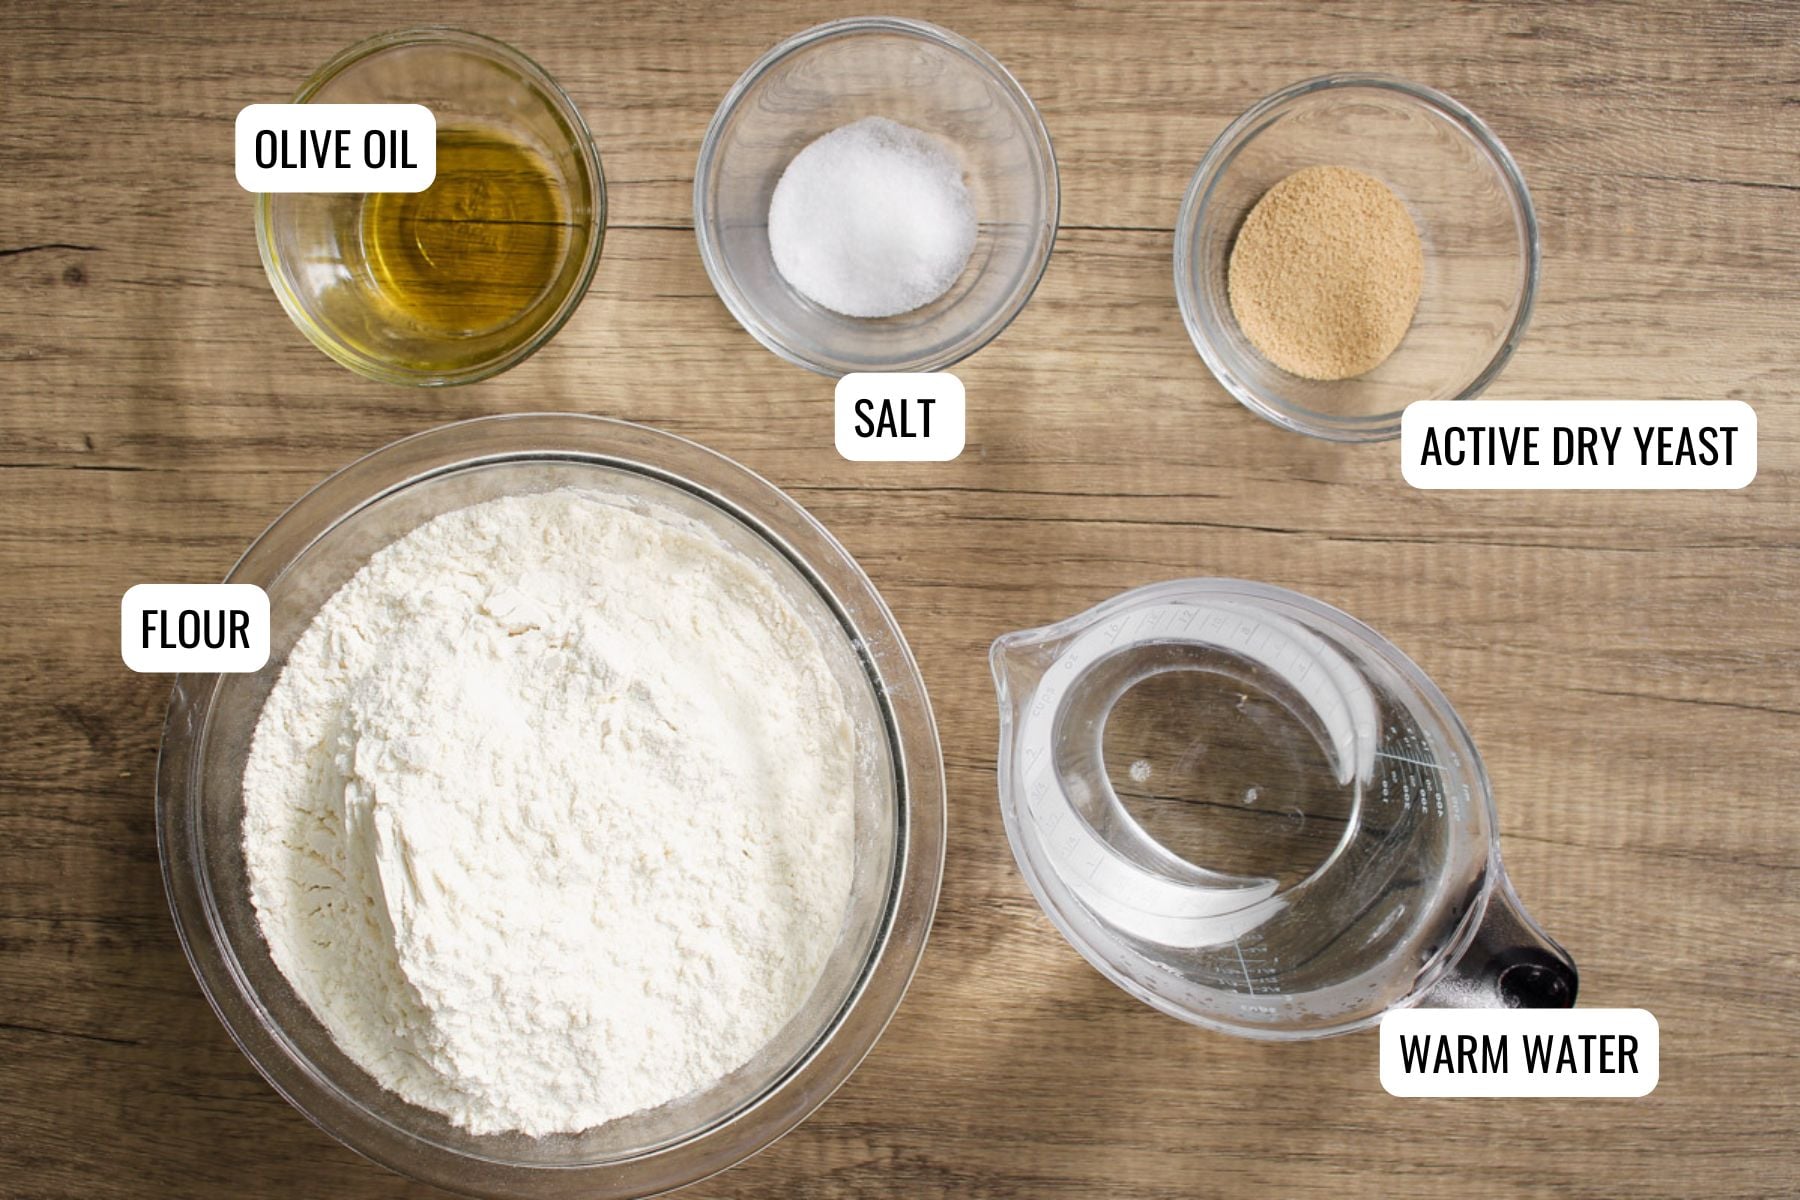
Ingredients (simple focaccia dough)
This is a classic focaccia dough recipe with pantry staples:
- For the dough:
- Warm water helps activate the yeast and create a light, airy rise (about 110F degrees)
- Envelope active dry yeast gives the dough its structure and fluffy texture
- Extra-virgin olive oil (plus more for pan and finishing) adds richness and flavor throughout the dough and creates those crispy edges
- Unbleached all purpose flour creates a soft, tender crumb, while bread flour can be used for a slightly chewier texture using the same measurements
- Sea salt enhances the overall flavor of the focaccia
- For the topping:
- Sea salt (or kosher salt)enhances the overall flavor of the focaccia
- Fresh rosemary chopped fine not the stems adds a classic, aromatic finish to the bread
- Extra-virgin olive oil adds richness and flavor throughout the dough and creates those crispy edges
How to make focaccia (step-by-step)
When you are making this very easy focaccia dough, you are doing it all by hand with a wooden spoon. There is the option to let it rest and bake same day, or let it rest overnight in the refrigerator, bake the next day.
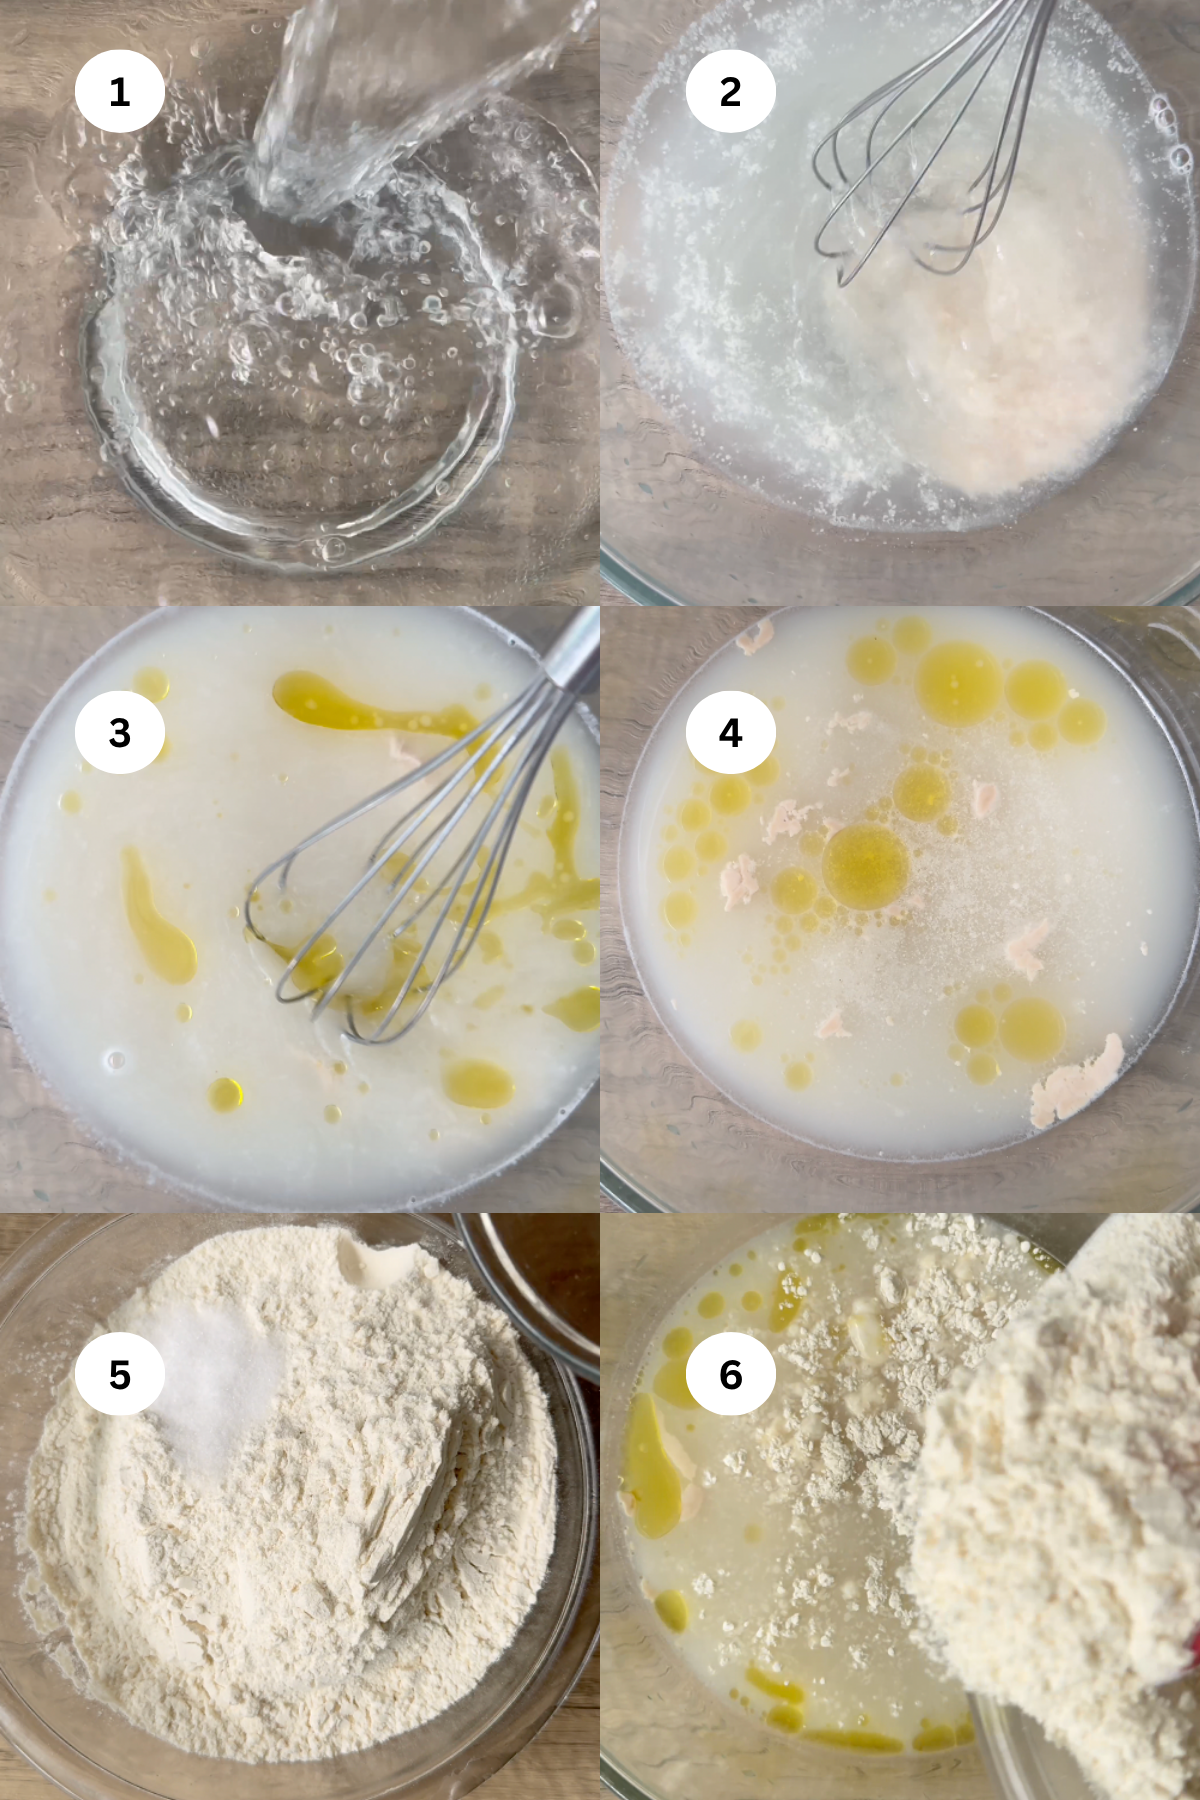
Steps 1-4 Bloom the yeast
In a large bowl, whisk together the water, olive oil, and yeast until combined. The water must be 110F, which when you put on your wrist, should feel not hot, not tepid, just WARM.
Step 5 Add salt
Add the sea salt to the flour whisk together.
Step 6 Add flour
Add the flour mixed with salt to the yeast mixture.
Step 7-9 Mix
Mix with a wooden spoon or spatula until a shaggy dough forms and everything is fully hydrated.
Scrape down the sides of the bowl.
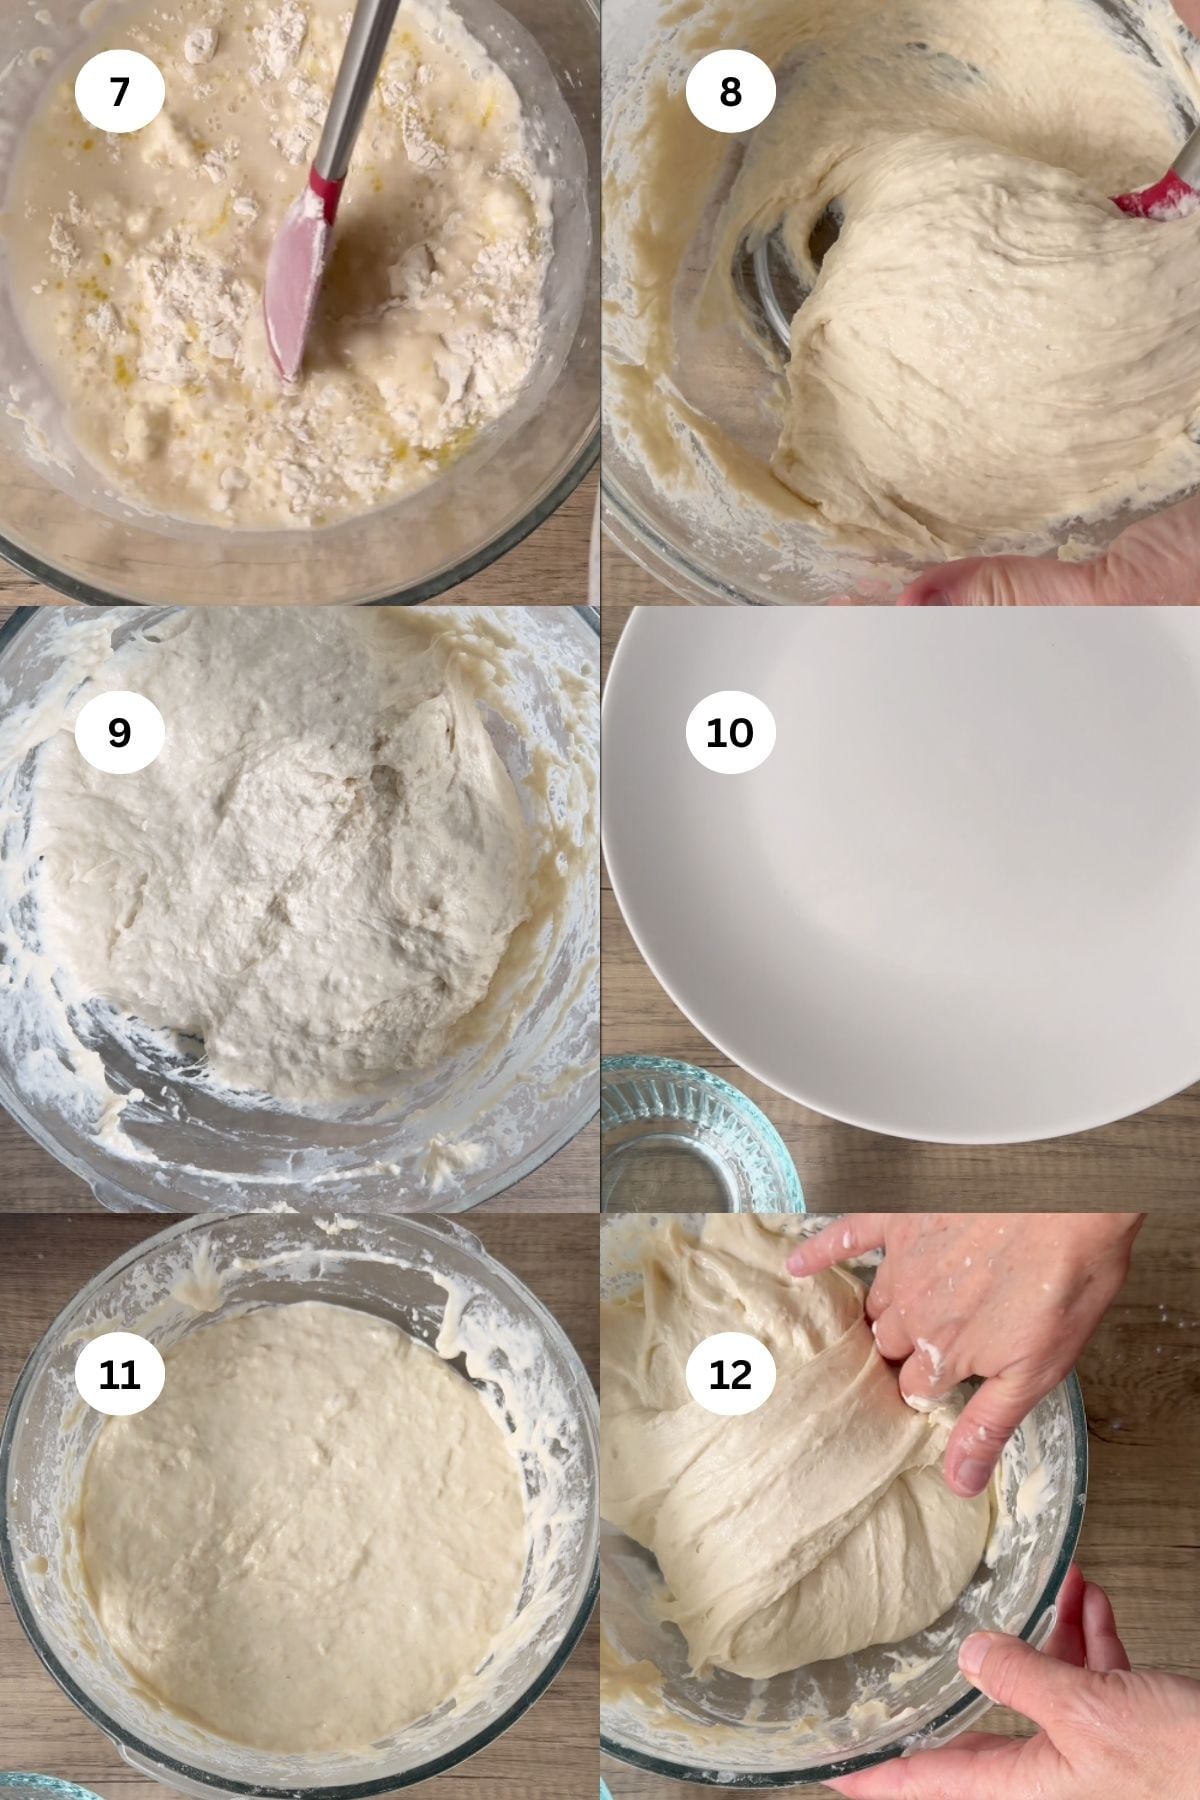
Step 10 Cover & Rest
Cover the bowl with a plate, and let it rest for 30 minutes. I like leave it in the warmest part of my kitchen where there is no draft.
How Much Water
Flour absorbs water differently depending on the type and brand. If your dough feels dry or stiff, add a little more water until you get a soft, sticky dough.
You are looking for a wet, slightly loose texture. This is what gives focaccia those airy bubbles and soft interior.
Steps 11-15 stretch + Rest
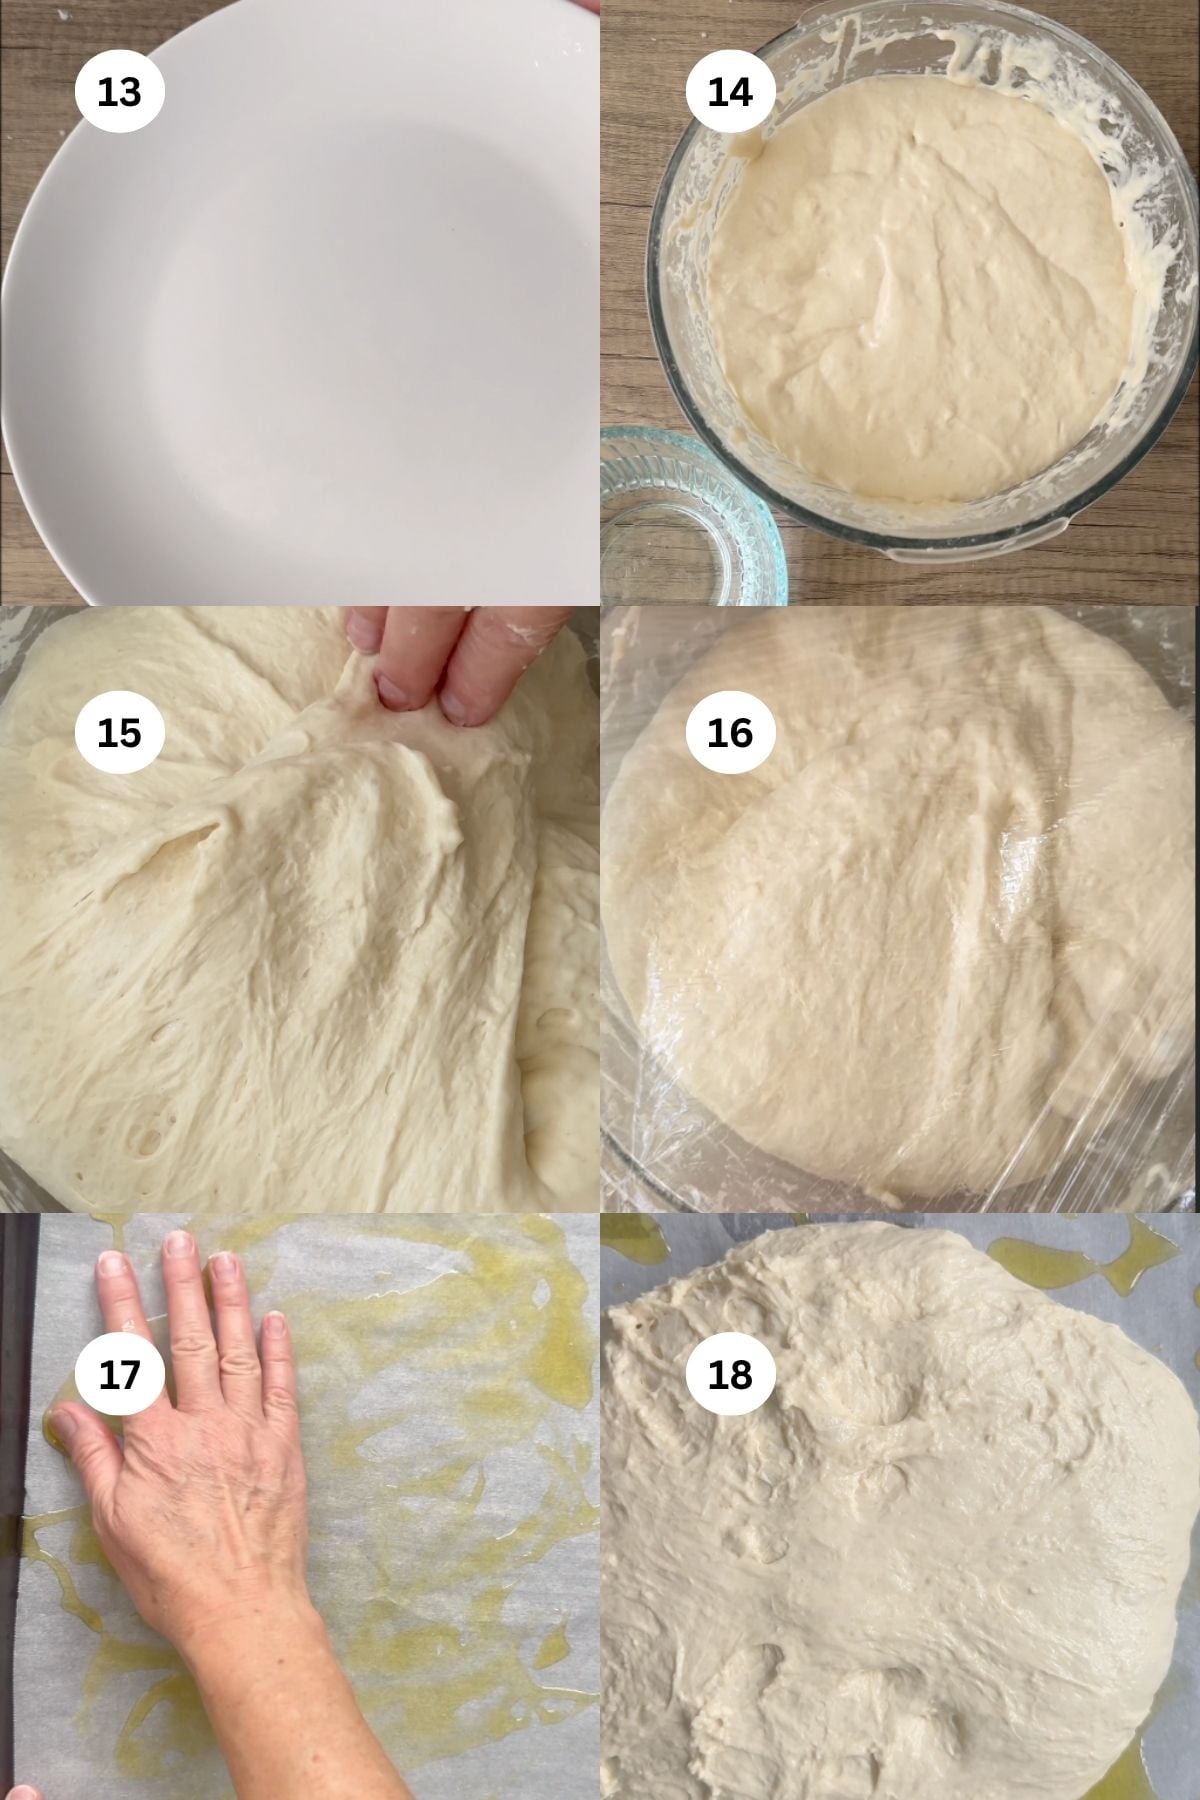
You will do four rounds of stretch and folds.
Take one side of the dough, stretch it up, and fold it over to the opposite side of the bowl. Rotate the bowl ¼ turn, and repeat. Do this FOUR times per round and there are FOUR rounds.
This method builds structure without kneading and creates that light, fluffy texture.
Step 16. Let the Dough Rise
After your final stretch and fold, cover the dough and place it in the fridge overnight.
Cold fermentation slows down the yeast and develops a deeper flavor while improving the texture. You can leave it in the fridge for up to 48 hours, but overnight is ideal.
If you want a quicker option, let the dough rest at room temperature for 30 to 40 minutes instead. I covered the dough and let it rest for 40 minutes.
Steps 17-19 . Shape and Final Proof
At this step there are two options. You could either let it rise and bake same day. OR, you could let it rest in the refrigerator overnight and bake it next day. I baked it same day.
Add 3 to 4 tablespoons of olive oil into a 9x13 inch non stick baking tray that is at least 5 cm deep. Be generous with the oil because focaccia needs it.
If your pan is not non stick, line it with parchment paper first, then spread the olive oil over the paper.
Transfer the dough into the tray after one final gentle stretch and fold, then gently stretch it with your hands so it fits the tray. Drizzle more olive oil over the top.
Option 1: Cover (I used an upside down baking sheet to cover it) and let it rise for about 1 hour (if you skipped the overnight rise in the refrigerator).
Option 2: Cover and refrigerate overnight (8-24 hours). This is what transforms it into the best focaccia texture with the most large bubbles.
If you left it overnight covered in the refrigerator, remove from the refrigerator. Let it rise for about 2 hours if it was refrigerated so it can come back to room temperature. Cover and refrigerate overnight (8-24 hours). This is what transforms it into the best focaccia texture.
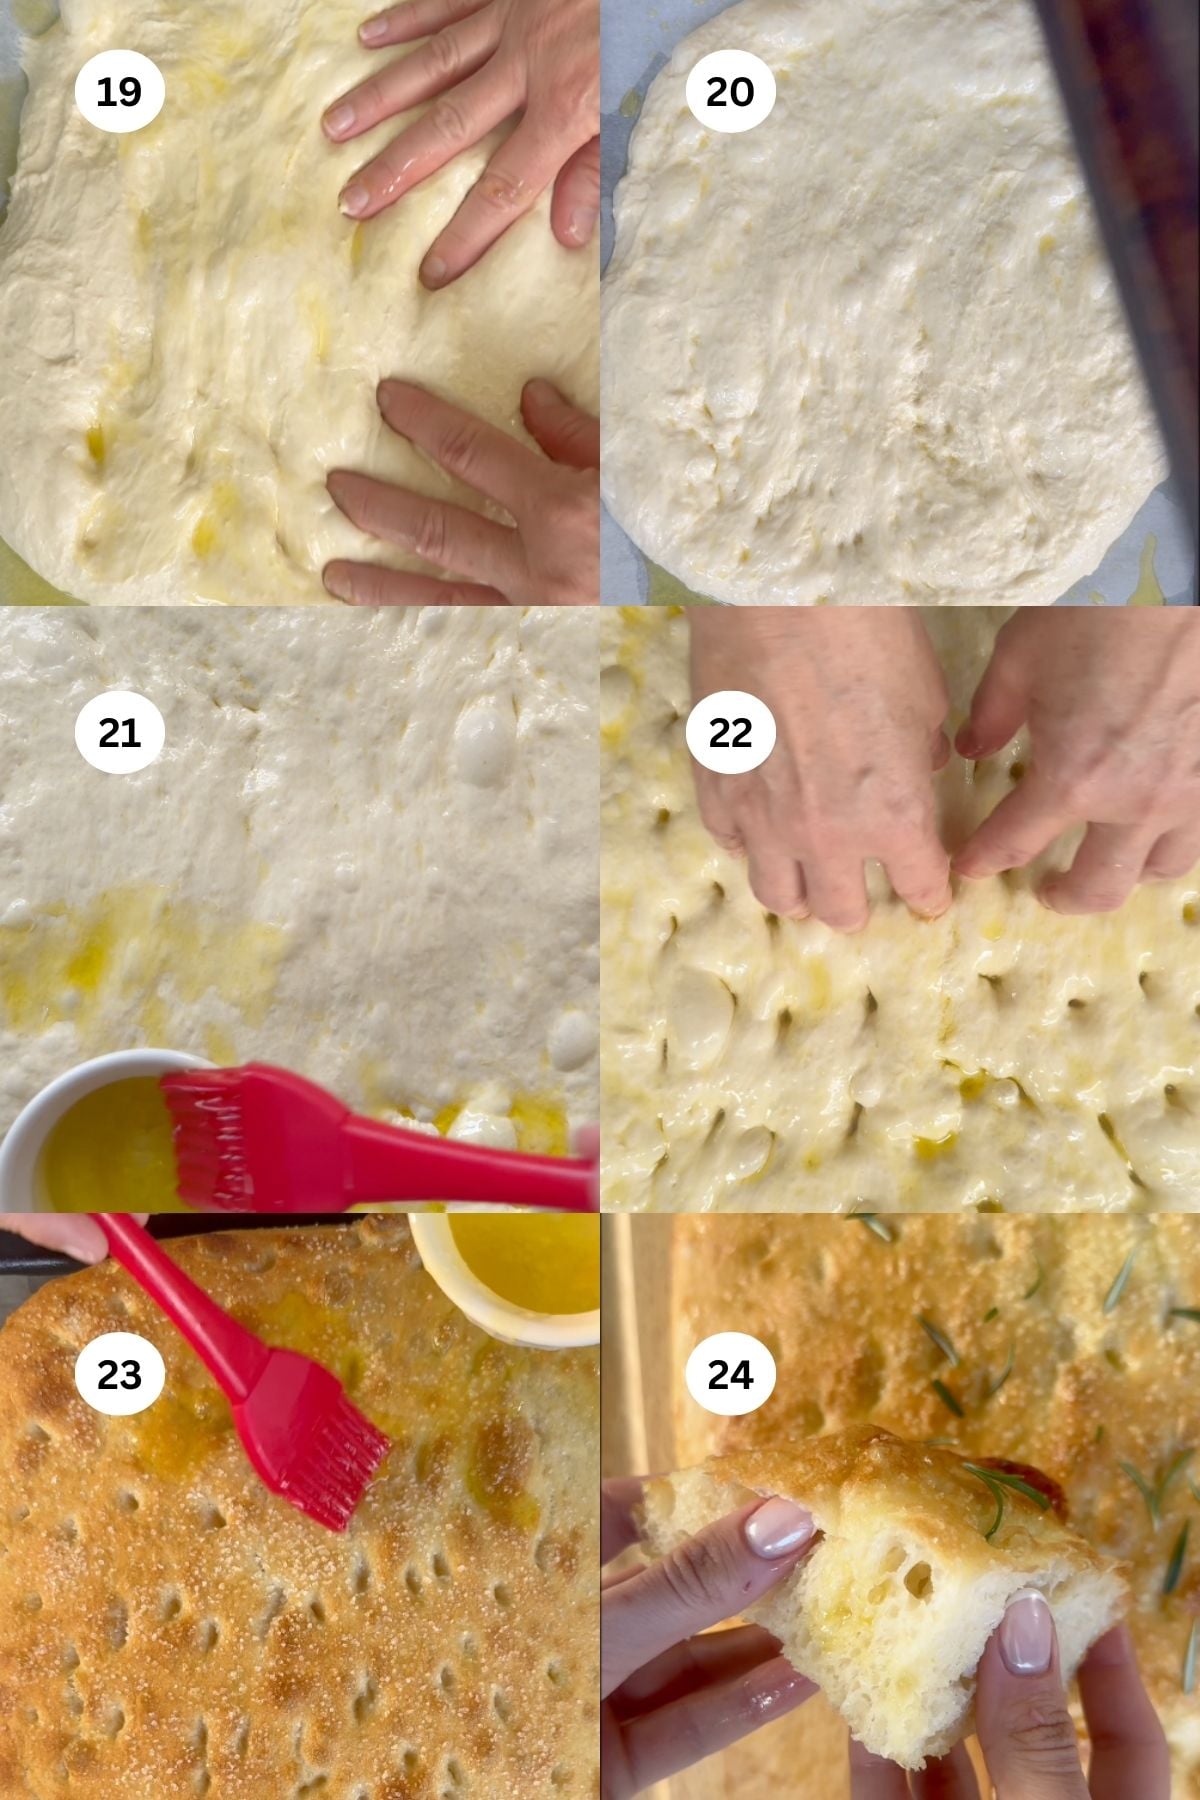
Step 20-22. Dimple and Add Flavor
Mix one quarter cup olive oil with one quarter cup water.
Uncover the dough. Brush this oil mixture over the dough. Then coat your hands in oil and press your fingers into the dough to create dimples.
Gently move the dough so it spreads evenly in the pan.
Add your toppings and lightly coat them in oil so they do not burn. I like to add coarse sea salt here for that classic focaccia finish.
Bake
Preheat your oven to 520°F (270°C) with the fan on. I have a convection oven so I did it on convection. While the oven is heating, the dough will be rising even more in the uncovered pan.
Bake for about 6 minutes until the top starts to turn golden and crisp.
Then reduce the temperature to 345°F (175°C) and bake for another 3 minutes until fully golden and crisp.
Step 23. Finish
Brush the focaccia again with the olive oil and water mixture while it is still hot.
Once baked, if you like, finish with fresh rosemary for extra flavor and that fresh, aromatic touch.
Let it rest for 10 to 15 minutes before slicing.
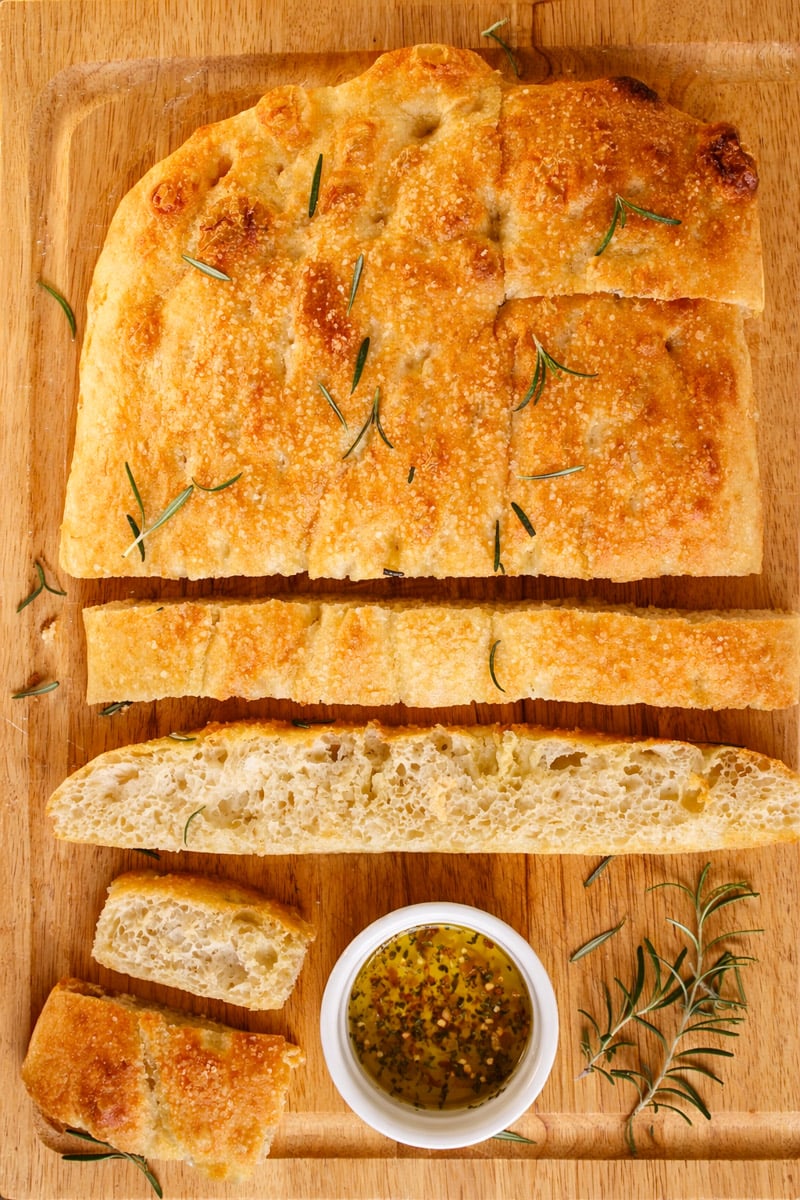
Step 24. Serve
Serve warm or at room temperature. It is especially good slightly warm when the outside is crisp and the inside stays soft and airy.
How to tell if your yeast is active and ready to use?
- Let it sit for about 5 to 10 minutes.
- If the yeast is active, it will begin to foam and bubble. Sometimes it can take up to 15 minutes.
- If you do not see any activity, discard it and start again with a fresh packet.
- This usually means the yeast is expired or the water was too hot.
How much water needs to be added to focaccia dough?
- Flour absorbs water differently depending on the type and brand. If your dough feels dry or stiff, add a little more water until you get a soft, sticky dough.
- You are looking for a wet, slightly loose texture. This is what gives focaccia those airy bubbles and soft interior.
My tips for the best focaccia bread
This is where most people go wrong:
- Do not add extra flour
Sticky dough = fluffy focaccia. Adding flour makes it dense. - Be generous with olive oil
This is what gives you that classic olive oil focaccia crust. - Let it rise properly
If your dough doesn't look airy and jiggly before baking, wait longer. - Use a metal pan if you can
It crisps the bottom better than glass. Be sure to line it with parchment paper.
Variations to try
Once you've nailed this easy homemade focaccia bread, switch it up:
- Cherry tomatoes + garlic
- Caramelized onions
- Olives + oregano
- Make it into focaccia sandwich bread (slice horizontally and fill)

FAQs
High hydration + long fermentation. The overnight rest allows gluten to develop naturally, which creates those air pockets.
Yes, but it won't be as airy. If you skip the overnight step, let it rise at room temp for at least 3-4 hours.
Bread flour gives a slightly chewier texture, but all-purpose works perfectly for a softer result. For this recipe, I used all-purpose flour.
Usually one of three things:
Too much flour added
Not enough rising time
Over-handling the dough
Yes, you can adapt this into focaccia sourdough, but you'll need to adjust timing and hydration.
Did you make this and love it? Please RATE THE RECIPE below:)
I would LOVE IT if you can leave me a star rating and a review down below and let me know your thoughts! It means the world to me to hear how you liked it.
Please Subscribe and give a follow on Instagram, Facebook, Pinterest, and TikTok xx
Some other yeast dough recipes you'll love:
📖 Recipe

Fluffy Focaccia Bread Recipe
Equipment
- 1 large wooden spoon
Ingredients
For the dough:
- 1 ⅓ cups warm tap water about 110 degrees
- 2 ½ teaspoons 1 envelope active dry yeast
- ¼ cup extra-virgin olive oil plus more for pan and finishing
- 3 ¼ cups unbleached all-purpose flour
- 3 teaspoons sea salt
For the topping:
- 1-3 teaspoons sea salt or kosher salt
- 1-2 Tablespoons fresh rosemary chopped fine not the stems
- Extra-virgin olive oil
Instructions
Bloom the yeast
- In a large bowl, whisk together the water, olive oil, and yeast until combined. The water must be 110F, which when you put on your wrist, should feel not hot, not tiepid, just WARM.
Add salt
- Add the sea salt to the flour whisk together.
Add Flour
- Add the flour and salt to the yeast mixture. Mix with a wooden spoon or spatula until a shaggy dough forms and everything is fully hydrated.
- Scrape down the sides of the bowl.
Cover & Rest
- Cover the bowl with a plate, and let it rest for 30 minutes. I like leave it in the warmest part of my kitchen where there is no draft.
Stretch & Rest
- You will do four rounds of stretch and folds.
- Take one side of the dough, stretch it up, and fold it over to the opposite side of the bowl. Rotate the bowl ¼ turn, and repeat. Do this FOUR times per round and there are FOUR rounds.
- This method builds structure without kneading and creates that light, fluffy texture.
Let the Dough Rise
- After your final stretch and fold, cover the dough and place it in the fridge overnight.
- Cold fermentation slows down the yeast and develops a deeper flavor while improving the texture. You can leave it in the fridge for up to 48 hours, but overnight is ideal.
- If you want a quicker option, let the dough rest at room temperature for 30 to 40 minutes instead. I covered the dough and let it rest for 40 minutes.
Shape and Final Proof
- At this step there are two options. You could either let it rise and bake same day. OR, you could let it rest in the refrigerator overnight and bake it next day. I baked it same day.
- Add 3 to 4 tablespoons of olive oil into a 9x13 inch non stick baking tray that is at least 5 cm deep. Be generous with the oil because focaccia needs it.
- If your pan is not non stick, line it with parchment paper first, then spread the olive oil over the paper.
- Transfer the dough into the tray after one final gentle stretch and fold, then gently stretch it with your hands so it fits the tray. Drizzle more olive oil over the top.
- Option 1: Cover (I used an upside down baking sheet to cover it) and let it rise for about 1 hour (if you skipped the overnight rise in the refrigerator).
- Option 2: Cover and refrigerate overnight (8-24 hours). This is what transforms it into the best focaccia texture with the most large bubbles.
- If you left it overnight covered in the refrigerator, remove from the refrigerator. Let it rise for about 2 hours if it was refrigerated so it can come back to room temperature. Cover and refrigerate overnight (8-24 hours). This is what transforms it into the best focaccia texture.
Dimple and Add Flavor
- Mix one quarter cup olive oil with one quarter cup water.
- Uncover the dough. Brush this oil mixture over the dough. Then coat your hands in oil and press your fingers into the dough to create dimples.
- Gently move the dough so it spreads evenly in the pan.
- Add your toppings and lightly coat them in oil so they do not burn. I like to add coarse sea salt here for that classic focaccia finish.
Bake
- Preheat your oven to 520°F (270°C) with the fan on. I have a convection oven so I did it on convection. While the oven is heating, the dough will be rising even more in the uncovered pan.
- Bake for about 6 minutes until the top starts to turn golden and crisp.
- Then reduce the temperature to 345°F (175°C) and bake for another 3 minutes until fully golden and crisp.
Finish
- Brush the focaccia again with the olive oil and water mixture while it is still hot.
- Once baked, if you like, finish with fresh rosemary for extra flavor and that fresh, aromatic touch.
- Let it rest for 10 to 15 minutes before slicing.
Serve
- Serve warm or at room temperature. It is especially good slightly warm when the outside is crisp and the inside stays soft and airy.
Nutrition Disclaimer
Please keep in mind that the nutritional information presented below is an approximation and may vary depending on the exact ingredients used.
Notes
- Use warm water, not hot Aim for about 110°F. It should feel warm on your wrist, not hot. Hot water can kill the yeast.
- Hydration matters Flour absorbs water differently depending on the type and brand. If your dough feels dry or stiff, add a little more water until you get a soft, sticky dough. You are looking for a wet, slightly loose texture. This is what gives focaccia those airy bubbles and soft interior.
- Do not skip stretch and folds This step replaces kneading. It builds structure and creates that light, fluffy texture. Do all four rounds for the best result.
- Overnight rise improves flavor and texture Cold fermentation slows down the yeast and develops a deeper flavor while creating larger air pockets. You can leave it in the fridge up to 48 hours, but overnight is ideal.
- Room temperature option If you are short on time, let the dough rest at room temperature for 30 to 40 minutes instead of refrigerating.
- Use plenty of olive oil Be generous with olive oil in the pan and on top. This is what creates the crispy edges and rich flavor.
- Choose the right pan A 9x13 inch metal pan works best. If it is not non stick, line it with parchment paper before adding oil.
- Let the dough come to room temperature If refrigerated, let it sit out for about 2 hours before baking so it rises properly.
- Dimples are key Press your fingers deeply into the dough to create dimples. This helps hold the olive oil and gives focaccia its signature look.
- Coat toppings in oil Whether using rosemary, tomatoes, or olives, lightly coat them in oil so they do not burn in the oven.
- Watch your oven Ovens vary, so keep an eye on your focaccia. You want it golden and crisp, not too dark.
- Finish with oil for extra flavor Brushing the olive oil and water mixture after baking adds shine, moisture, and extra flavor.
- Let it rest before slicing Allow the focaccia to cool for 10 to 15 minutes. This helps set the structure while keeping the inside soft and airy.
- Best served warm It is especially good slightly warm with a crisp outside and fluffy interior.


This focaccia bread really was easy to make, and so fluffy! Impaired perfectly with the beef stew we had tonight for dinner. Looking forward to making it again.
I love homemade focaccia. This was a very nice recipe..perfect to have alongside our roast chicken dinner.
Tried it today and it came out perfect. Fluffy inside and golden outside. I’ll definitely make this again!
The texture of this bread was absolutely perfect—so airy with those classic crisp edges. It was a beautiful addition to our dinner.
This is so freaking good! I made it last night to go with my grilled chicken. Tasty.
This is so yummy! I have never made focaccia like this before. Mine is usually flatter and just... not right somehow.
Best focaccia I've ever made. The texture was absolutely perfect.