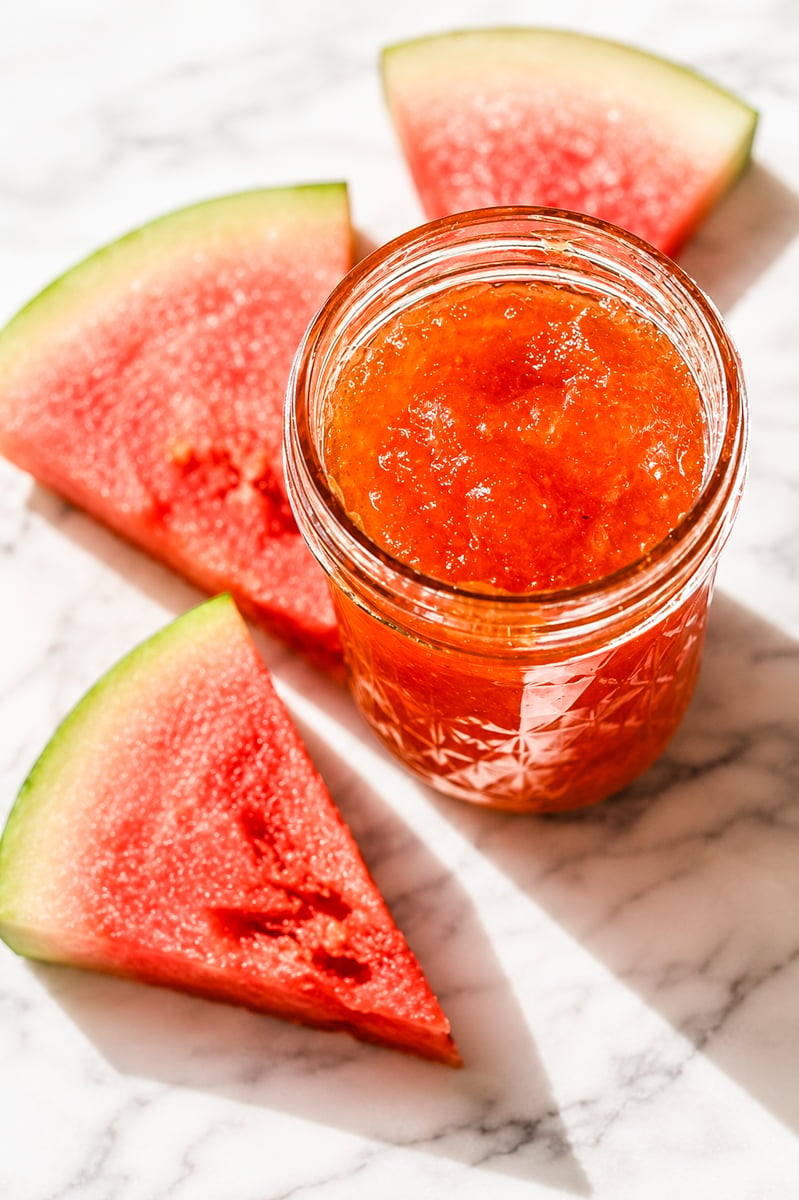
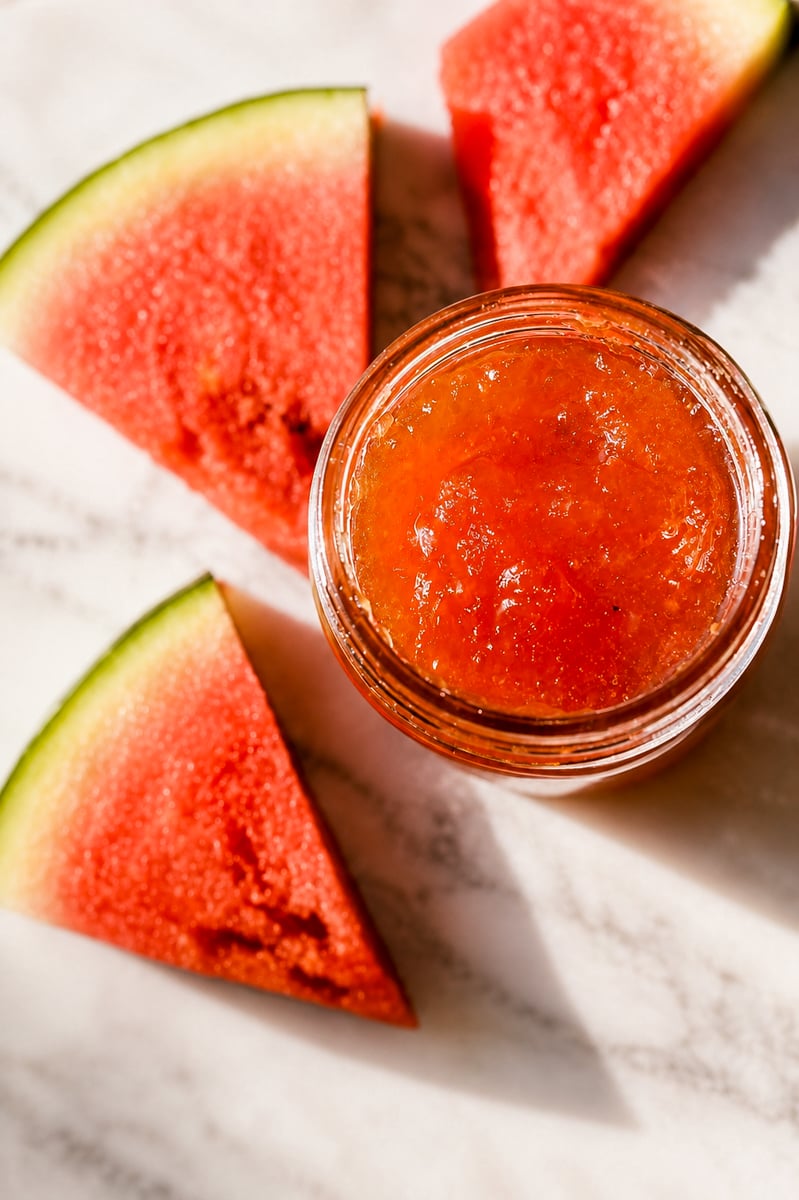
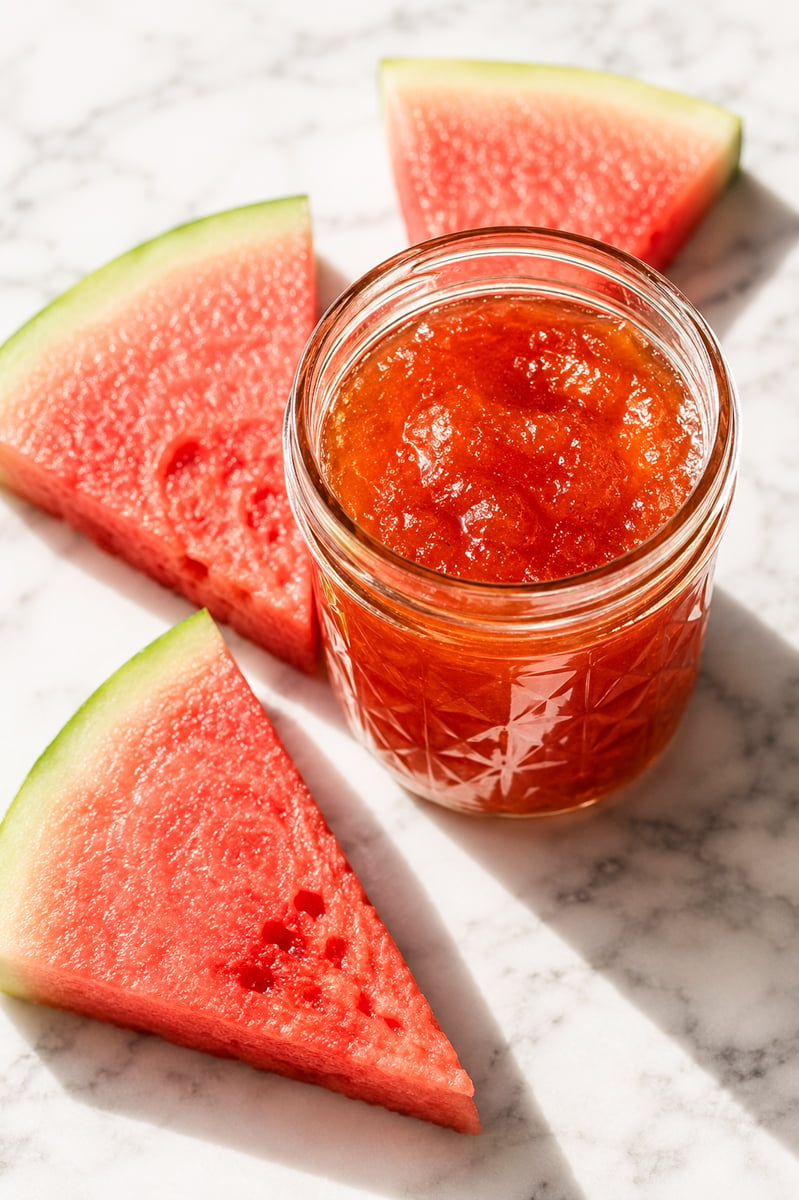
Homemade Watermelon Rind Jam recipe a delicious jam made with watermelon rind, apple, sugar, lemon juice, and vanilla extract. So easy to make and it comes together without pectin! After eating the juicy red watermelon pulp, use the peeled rind to make this sweet, vanilla-flavored jam.
If you love creative ways to use watermelon, you will also want to try my Easy Pickled Watermelon Rind and this summer-perfect Watermelon Cucumber Feta Salad - between the three of you can use the whole watermelon with nothing going to waste.
This article contains affiliate links which support us at no extra cost to you.
Jump To
As summer turns to fall for us in Florida in the next few months, we will be exploring other recipes that use up waste to make some creative recipes. It's a project we have wanted to share here for a while and will do so little by little.
I had come across this recipe in Sale e Pepe magazine this summer in Italy. They called it Confettura di Bucce di Anguria (Watermelon Rind Jam). Their recipe used double the amount of watermelon rind and even more than double the amount of sugar. I followed pretty much their same process, although they give detailed instructions on how to store it for up to one year.
Our instructions are to store it in the fridge. Also, their recipe states it makes 4 250 ML jars. Ours made one small (8 oz) Ball jar. Since we really loved this jam, next time we will double the recipe to make more!! One of the ways we used it was to mix it with a spicy pepper jam and served it on crackers with different cheeses and olives for a perfect aperitivo!
What ingredients are in watermelon rind jam?
- watermelon rind
- apple
- sugar
- lemon
- vanilla extract
Is watermelon a fruit or vegetable?
Here is some news for you in case you were wondering: Watermelon is a fruit that grows from a seed. It's also a vegetable as it is a part of the pumpkin family. Watermelon is also harvested in fields like other vegetables!
How do you make homemade watermelon rind jam?
This is a really easy and delicious jam recipe. You don't even need pectin and it just goes in the fridge when it's ready.
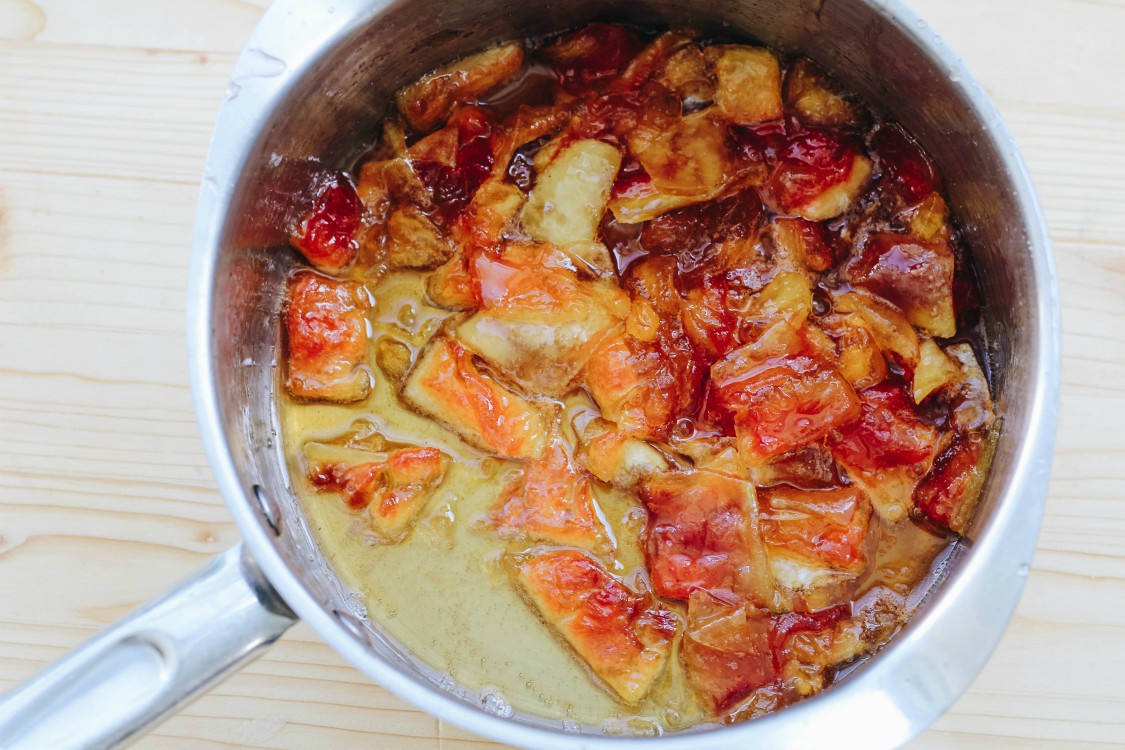
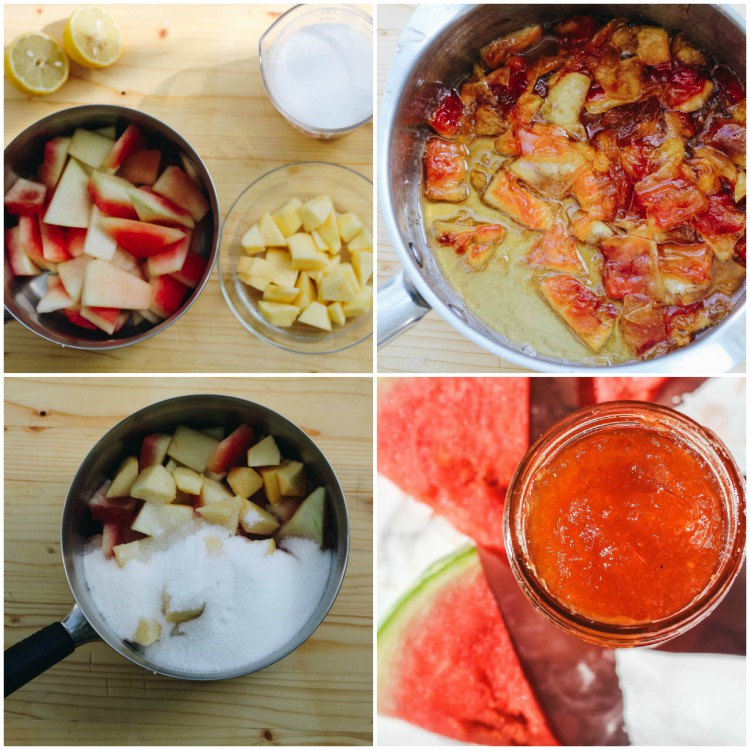
Similar to the prep for our easy pickled watermelon rind: The first step is to peel off the tough green skin, chop up the white remains with some of the pink still on it. Next step is to add this to a large sauce pan with apple pieces, sugar, lemon juice and a little bit of vanilla. It all cooks down to a sticky and lovely mixture.
You could even leave it as it is in the sticky and delicious pieces or with an emulsifier carefully blend it all to a jam (you could also carefully add it to a blender and blend to a jam). It's safest to allow the mixture to completely cool down before emulsifying.
I, of course, did not have the patience to wait. I decided to emulsify while it was still too hot and I will warn you, it will burn you if it splatters on your hands. It's best to wait until it completely cools down.
The first step is to cut the watermelon rind pieces.
Next cut the apple into small pieces and you add them to a large saucepan with sugar, watermelon, lemon juice and vanilla extract.
Let it come to a boil and you lower the heat to a simmer and stir constantly. It all comes together without pectin (the apple provides natural pectin)! Such an easy jam to make and it is just delicious!

The next time I make this I will cut smaller pieces and not even bother to emulsify it. I think it would be just perfect with the larger pieces and it's also so pretty!! A perfect jam to spread on toast or to have even with plain yogurt (I love coconut yogurt!).
We give instructions to store this jam in the refrigerator. We don't have a truly cool room where we could store things for a many months. We just love to make jams and can! We store most of what we can in the refrigerator. For more detailed info on canning instructions or directions, follow the USDA guidelines.
Some other easy summer recipes to enjoy:
Originally published August 2019 and updated on July 2021
One last thing…I promise.
Just a quick request: if you enjoyed this watermelon rind jam as much as we did, would you kindly leave me a 5-star rating and a short (or long!)comment-the ratings are what helps get my recipes and hard work discovered, so I can keep leaving you more delish recipes!
Your comments mean the world to me….and I really SMILE when I read them. Thank you so much! XX
This post contains affiliate sales links.
Watermelon Rind Jam
Ingredients
- 4 cups watermelon rind cut into small pieces
- 1 large apple peeled, cored and cut into small pieces
- 1 cup sugar
- juice of one lemon *use 2 lemons if doubling recipe
- 1 teaspoon vanilla extract
Instructions
- The first step is to peel off the tough green skin, chop up the white remains with some of the pink still on it.
- In a stainless steel saucepan (or Dutch oven), add the rinds, apple pieces, sugar, lemon juice, and vanilla. Bring to a boil. Stir until the sugar dissolves. Lower heat and stir until the rind is tender and translucent (could take up 60-120 minutes…mine took about 1 hour).
- When it is translucent, remove from heat. Let cool down and carefully emulsify.
- Carefully spoon the jam into sterilized jars. Apply lids jars.
- Wipe rims with a clean, damp towel and screw lids on securely but not too tightly.
- Process in boiling water bath for 10 minutes.
- Carefully remove jars using tongs. Use potholders to tighten the lids. Place jars on a rack upside-down and let them cool. When they've cooled down, store them in the refrigerator. The jam should keep unopened for several months.
Nutrition Disclaimer
Please keep in mind that the nutritional information presented below is an approximation and may vary depending on the exact ingredients used.
Notes
- Always let the jam cool completely before blending - hot jam in a blender can spatter and burn. This step is not worth rushing.
- The chunky version is just as beautiful as the smooth one. Translucent rind pieces look gorgeous in the jar and taste wonderful with cheese and crackers.
- To double the recipe, use 8 cups rind, 2 apples, 2 cups sugar, juice of 2 lemons, and 2 teaspoons vanilla. The cook time is similar.
- Always use a sterilized jar, whether storing in the fridge or processing for the pantry


Can you blend the rind before cooking?
I've never blended it. It softens up while cooking. You could try and let me know how it turns out!
yummy. family loved it! Thanks for sharing.
btw....no water needed. The watermelon produced sufficient water all by itself 😉
Hi JT-REALLY happy to hear you enjoyed the watermelon rind jam recipe. Great to know you didn't need to add any water. THANK YOU!
yummy. family loved it! Thanks for sharing
Could you do this in a slow cooker?
Yes, you could try it out. I haven't tried in my slow cooker, but these are slow cooker directions. Add to slow cooker: Toss in the watermelon rind, sugar, lemon juice, and optional ginger/cinnamon. Add just enough water to barely cover the rinds (no more than 1 cup).
Cook on LOW for 6–8 hours or HIGH for 3–4 hours, uncovered for the last hour to reduce liquid. Stir every hour if possible to prevent sticking.
Let me know how it works out!
I haven’t tried this yet, I plan to make it very soon!! It looks delicious!
Hi Terri-I do hope you try it! ENJOY!
Tried this out of curiosity and wow—such a fun way to use up the rind! Sweet, tangy, and super satisfying.
This jam is delicious and so easy to make! Perfect for summer and my family loved it.