
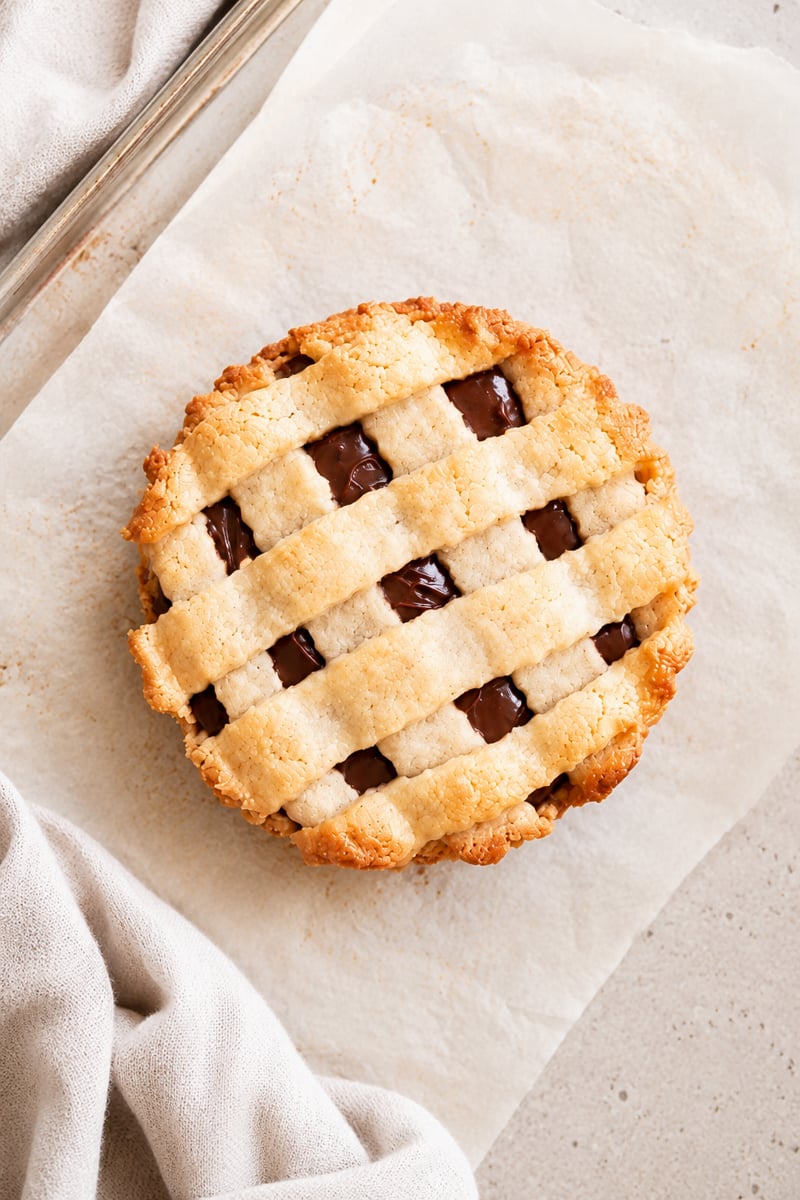
This crostata alla Nutella has a tender, lemon-scented pasta frolla shell and a silky Nutella filling. A true Italian classic - easy to make and stunning to serve.
If you love Italian pastry, also try my Teresa's Crostata with Amaretti and my Italian Thumbprint Cookies - both use the same pasta frolla dough and are perfect alongside a coffee.
This article contains affiliate links which support us at no extra cost to you.
Jump To
There is a version of crostata alla Nutella in almost every Italian home I have ever visited. It is on the counter after Sunday lunch, it is what Italian kids eat as their afternoon merenda (snack), and it is what gets pulled out when guests arrive and someone needs to put something on the table fast. The lattice top, the golden crust, the dark Nutella peeking through - it is one of the most recognizable shapes in Italian baking.
This recipe uses the classic pasta frolla dough - Italy's all-purpose shortcrust pastry, scented with lemon zest and vanilla - filled with a silky Nutella mixture that firms up beautifully as it cools.
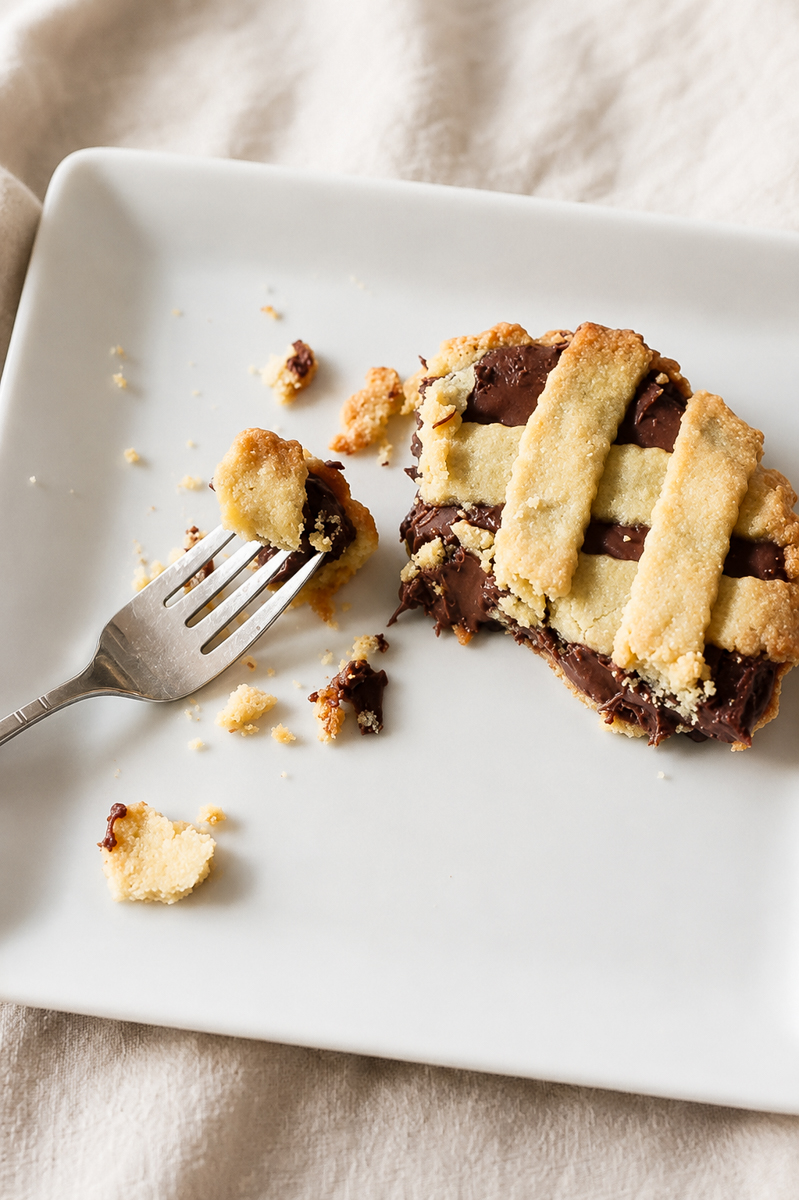
A small amount of heavy cream and butter added to the Nutella creates a filling with a smoother, more ganache-like consistency than Nutella straight from the jar, which tends to dry out and crack after baking. The result is a tart that slices cleanly and holds together perfectly.
Nutella itself is Italian - created in Piedmont by the Ferrero family after the Second World War when chocolate was scarce and hazelnuts from the region were abundant. Using it in a traditional Italian tart feels exactly right.
What Is Crostata alla Nutella?
A crostata is the Italian version of a tart or pie - a pastry shell made from pasta frolla (shortcrust dough) filled with jam, pastry cream, or in this case, Nutella. The lattice top is traditional and is what distinguishes a crostata from a simple open-faced tart. I also make a version of this with my Teresa's Crostata recipe, which uses an amaretti filling in the same pastry shell.
What makes a Nutella crostata different from other chocolate tarts is the texture of the dough. Pasta frolla is tender and crumbly in the best possible way - it is closer to a shortbread cookie than a pie crust, slightly sweet and deeply buttery. It provides the right contrast to the rich, creamy filling without competing with it.
What Is Pasta Frolla?
Pasta frolla is Italy's foundational sweet shortcrust pastry. The name translates roughly to "crumbly dough" and that is exactly what it is - a buttery, lightly sweet dough that forms the base of crostate, biscotti, and filled cookies all over Italy. It is made from butter, sugar, flour, eggs, and a leavening agent, with lemon zest and vanilla as the classic flavorings.
Unlike a French tart shell, pasta frolla is worked very minimally and chilled before rolling. The goal is a dough that is tender and short (crumbly) rather than flaky - you are building a pastry that holds its shape but melts on the tongue. The small amount of baking powder keeps it from being too dense.
Ingredient Notes
- Butter: Must be genuinely room temperature - soft enough to press with a finger. Cold butter will not mix evenly into the flour and the dough will be crumbly in the wrong way. For the filling, the butter melts into the warm cream.
- Sugar: Just 100g, which keeps the dough lightly sweet rather than dessert-sweet. The Nutella filling provides plenty of sweetness.
- All-purpose flour: Standard all-purpose. Pasta frolla is forgiving - you do not need to sift it or handle it with the care you would a puff pastry. Measure by weight for accuracy.
- Baking powder: A small amount gives the crust a slightly lighter texture than an unleavened shortcrust. It is standard in Italian pasta frolla but some recipes omit it - either works.
- Lemon zest: The scent of lemon in the dough is subtle but distinct and very Italian. Use a microplane and avoid the white pith. This is what makes a pasta frolla taste like something made in an Italian kitchen.
- Vanilla extract: Pure vanilla extract, not imitation. Adds warmth alongside the lemon.
- Eggs: One whole egg and one additional yolk. The extra yolk adds richness and helps the dough stay tender. Both should be at room temperature.
- Nutella: Use the actual Nutella brand - the specific ratio of hazelnuts, cocoa, and sugar in Nutella is what makes this filling taste the way it should. Generic chocolate hazelnut spreads have a noticeably different flavor and consistency. A 16 oz jar is exactly the right amount for this recipe.
- Heavy cream: Warmed with the butter and whisked into the Nutella, it creates a filling that is looser before baking and sets to a smoother, sliceable ganache-like consistency as it cools. Without the cream, the baked Nutella can crack and dry out.
- Cocoa powder: Dusted lightly over the baked and cooled tart just before serving for a classic finish. Use unsweetened Dutch-process cocoa for the best color and flavor.
How to Make Crostata alla Nutella
Make the Pasta Frolla Dough
- In a stand mixer fitted with the paddle attachment, beat the butter and sugar together on medium speed until well combined, about 2 minutes. Scrape down the sides.
- Add the flour, baking powder, and salt. Mix on medium-low speed until the mixture resembles fine, damp sand with no large butter pieces remaining. Scrape down the bowl as needed.
- Add the vanilla extract and lemon zest, then the egg and egg yolk. Mix on low speed just until the dough comes together. Do not overmix - the moment it forms a cohesive dough, stop.
- Gather the dough and divide it into two uneven portions: ⅔ for the tart shell and ⅓ for the lattice. Flatten each piece into a disc and wrap in plastic wrap. Refrigerate for at least 30 minutes.
Make the Nutella Filling
- In a small saucepan over low heat, warm the heavy cream and butter together until the cream just begins to bubble at the edges. Do not boil. Remove from heat and set aside to cool for about 5 minutes.
- Measure the Nutella into a medium bowl. Pour the warm (not hot) cream and butter mixture over the Nutella and whisk slowly and steadily until the mixture fully comes together into a smooth, slightly thickened filling. It will take several minutes of patient whisking - keep going until there are no streaks.
- Set the filling aside at room temperature while you prepare the tart shell.
Roll, Fill, and Bake
- Remove the larger disc of dough from the refrigerator. Roll it out between two sheets of parchment paper to about ⅛ inch thick - the circle should be an inch wider than your tart pan on each side.
- Peel off the top layer of parchment, then replace it. Flip the dough over (still between parchment), peel off what is now the top layer, and carefully invert the dough into the tart pan. Press gently into the bottom and sides, patching any cracks with scraps. Trim the overhanging dough flush with the rim using a knife held parallel to the work surface. Return to the refrigerator.
- Roll the remaining ⅓ of dough (plus any scraps) to a similar thickness between two sheets of parchment. Transfer to a sheet pan and refrigerate for 30 minutes.
- Preheat the oven to 350°F (177°C).
- Remove the sheet of rolled dough from the refrigerator. Using a ruler and a sharp knife, cut into long strips about 1 inch wide. Keep them on the parchment and return to the refrigerator while you fill the tart.
- Spoon the Nutella filling into the chilled tart shell. Use a small offset spatula or the back of a spoon to level and smooth the surface.
- Lay half the dough strips across the tart in one direction, spacing them about 1 inch apart. Press the ends gently into the edge of the crust to seal. Lay the remaining strips at an angle to form a diamond lattice pattern. Trim any overhanging ends.
- Chill the assembled tart in the refrigerator for 30 to 60 minutes - a cold tart goes into the oven, not a warm one.
- Bake for 30 to 35 minutes, until the crust and lattice are pale golden brown. The filling should look set but not puffed. Transfer to a wire rack and cool completely.
- Refrigerate the cooled tart for at least 1 hour before slicing - this allows the filling to firm up enough to cut cleanly. Dust with cocoa powder just before serving.
How to Make the Lattice Top
The lattice is simpler than it looks. You do not need to weave the strips - just lay one set of parallel strips across the tart, then lay a second set on top at an angle (about 45 degrees from the first set). The result is a diamond pattern, which is the traditional shape for an Italian crostata. Use a cold knife to cut the strips cleanly, and work quickly so the dough does not soften too much before you place it.
If the strips crack or break, press them back together with your fingers - the dough is forgiving and the fills any gaps during baking. Do not skip the final chill before baking. A cold lattice holds its shape; a warm lattice slumps.
Tips
- Keep the dough cold at every stage. Warm dough stretches, sticks, and loses its shape. Chill the shell before filling, chill the lattice before cutting, and chill the assembled tart before baking. Each chill makes the next step easier.
- Do not overmix the dough. Stop the mixer the moment the dough comes together. Overworked pasta frolla turns tough rather than tender.
- Whisk the filling slowly. The cream and Nutella need patient, steady whisking to emulsify properly. If you whisk too fast, the mixture can seize or look lumpy. Slow and steady gives you a silky, even filling.
- Cool completely before slicing. The filling needs at least 1 hour in the refrigerator after baking to set properly. Cut into a warm crostata and the filling runs. Chill it and you get clean, beautiful slices.
- Add the cocoa dusting just before serving. Cocoa powder absorbs moisture and will look patchy if dusted too far in advance. Dust it right before you bring the tart to the table.
Make-Ahead and Storage
The pasta frolla dough can be made up to 2 days ahead and kept wrapped in the refrigerator, or frozen for up to 1 month. Thaw overnight in the refrigerator before rolling.
The fully baked and cooled crostata keeps covered in the refrigerator for up to 4 days. Bring individual slices to room temperature for 15 minutes before serving - the crust regains its texture as it warms. The tart can also be frozen whole (before dusting with cocoa) for up to 1 month; thaw in the refrigerator overnight.
More Italian Desserts
- Teresa's Crostata with Amaretti - The same pasta frolla dough filled with almond-scented amaretti cream.
- Italian Thumbprint Cookies - Buttery pasta frolla cookies filled with jam, a staple in Italian homes.
- Lemon Curd Bundt Cake with Lemon Curd Filling - A stunning citrus Bundt for when you want something showstopping.
- Vegan Blueberry Cheesecake - Creamy, rich, and completely plant-based.
Did you make this and love it? Please RATE THE RECIPE below:)
I would LOVE IT if you can leave me a star rating and a review down below and let me know your thoughts! It means the world to me to hear how you liked it.
Please Subscribe and give a follow on Instagram, Facebook, Pinterest, and TikTok xx
Easy Nutella Crostata Recipe
Equipment
Ingredients
- 300 grams 10.54 ouncespastry flour
- 200 grams 7.025 ounces unsalted butter
- 100 grams 3.512 ounces sugar
- 1 whole egg and 1 yolk 60 grams eggs
- 1 26.5 ounce jar of Nutella
Instructions
- In the bowl of a food processor, add the flour and sugar and process a few times to mix together. Next add the butter and pulse a few times until the mixture looks like wet sand. Add the egg and yolk and process a few seconds more until the dough forms . Be sure to not over process the dough.
- Dump the dough from the food processor bowl onto a lightly floured counter. Form the dough into four disks and chill in the refrigerator for about an hour.
- Preheat oven to 375°F with a foil-lined large baking sheet on middle rack.
- When the dough is nicely chilled, remove from the refrigerator. Roll out the first piece of dough between 2 sheets of plastic wrap into a ⅛-inch thick or slightly thicker. Keep other pieces of dough chilling while assembling the tarts one at a time.
- Spray a mini fluted tart pan with removable bottom with baking spray. Gently wrap the dough over the rolling pin and place it over the first mini tart pan (or an 11-inch fluted tart pan); release the rolling pin and let the dough fall into the tart pan. Press the dough softly into the bottom of the tart pan. If some of the dough breaks while you press it into the tart pan, that's not a problem. Simply piece the dough together. Press the sides of the dough about ½ -inch up the side of the tart pan. The rim of the tart should be lined with a slightly thicker layer of pastry than the bottom (about ¼-inch thick). Cut off the extra dough from the sides and keep these excess pieces to make the lattice topping. Repeat this process with the remaining 3 tart shells.
- Wrap the remaining dough in plastic wrap. Place the remaining dough and the tart pans in the refrigerator for about 30 minutes to chill.
- When the tart shells are chilled, remove them from the refrigerator and prick the pastry bottoms with a fork a few times. Fill each tart shell with Nutella almost all the way to the top. Roll out the extra dough into lattice strips. Place the dough strips in a criss-cross pattern over the Nutella. Repeat the same process with the remaining three tart shells.
- Place the mini crostatas on a baking sheet and bake for about 25-30 minutes at 375 F, or until the crust is a light golden brown. *Check the crostata at 25 minutes. Every oven is different. The crust should not be too brown.
Nutrition Disclaimer
Please keep in mind that the nutritional information presented below is an approximation and may vary depending on the exact ingredients used.
Notes
- Chill the dough at every stage - after mixing, after rolling the shell, after cutting the lattice strips, and after assembling the tart. Cold dough holds its shape; warm dough loses it.
- Do not overmix the pasta frolla. Stop as soon as the dough comes together into a cohesive mass. Overworked dough turns tough.
- Whisk the Nutella filling slowly - fast whisking can make it seize. Patient, steady stirring gives you a smooth, glossy filling.
- The tart must be fully chilled before slicing. One hour in the refrigerator after baking is the minimum. The filling will look loose when warm but firms up beautifully as it cools.
- Add the cocoa powder dusting immediately before serving - it absorbs into the filling if added too early and loses its appearance.

Lora, I missed it this year, but I can find sweet solace just looking at your gorgeous and delicious crostatas!Mmmmmm 🙂
Fabulous! I just love Nutella and this recipe is a definite must try!
Absolutely gorgeous, just like you! Thanks again for sharing these over at bella nutella xoxo
oooh, this is perfect for Nutella Day! I can almost taste it now, and it looks so flakey perfect...
What could be more luscious than a Nutella-filled pastry? Simply delicious!
"Happy Cooking"
Love these crostata! They are perfect to make for Valentine's Day! 🙂