
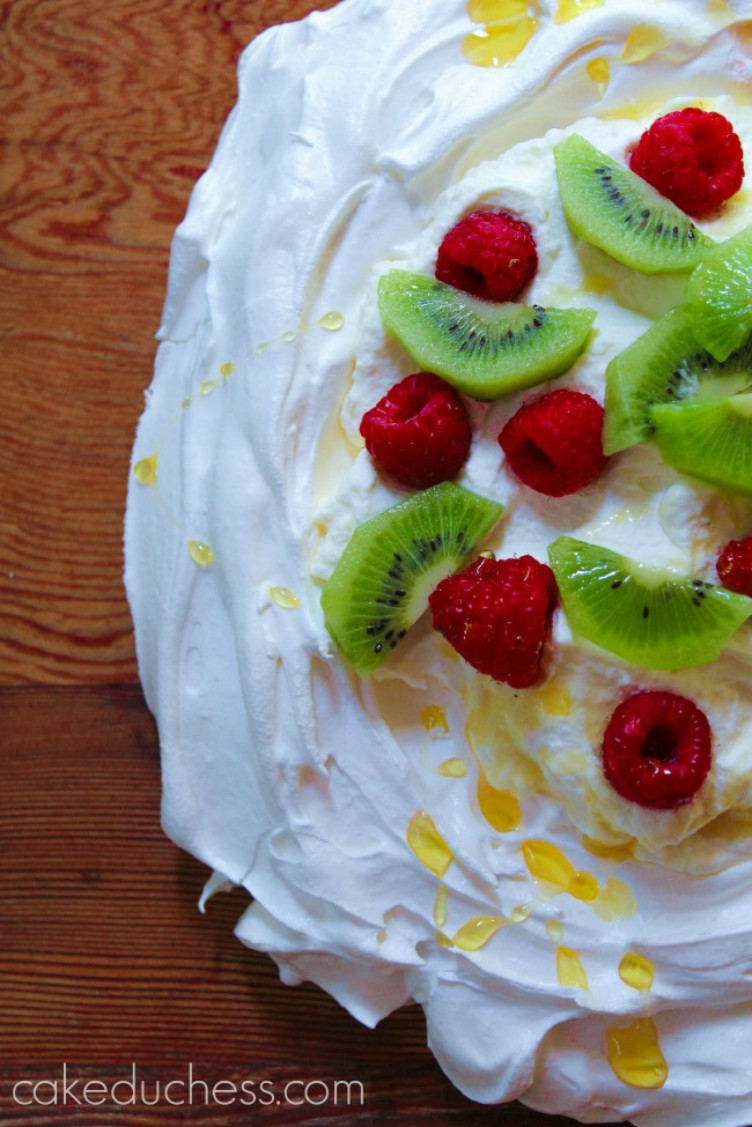
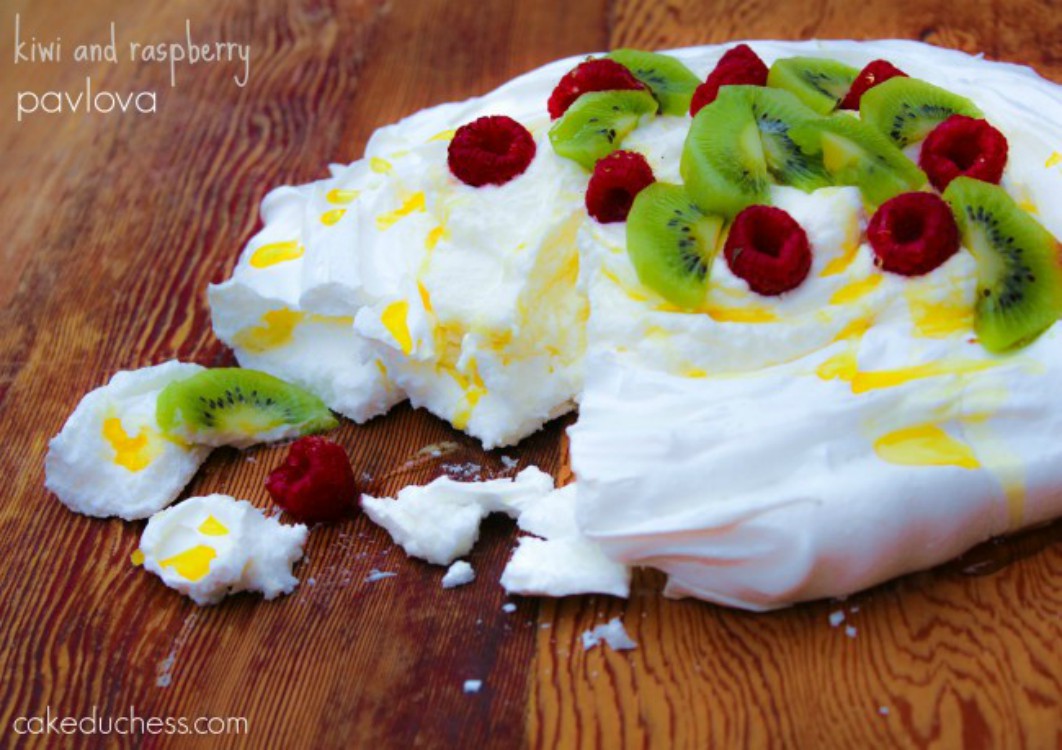
Kiwi and Raspberry Pavlova is a delicious and decadent dessert made with egg whites. Totally gluten-free topped with whipped cream, sweet raspberries, kiwi and a drizzle of honey.
If I really want to impress my friends and family, I make a pavlova! They are just so pretty look at and they are not as complicated to make as you may think!
Making a pavlova is pretty easy and relatively fool-proof! The results: crunchy on the outside and as fluffy as a marshmallow inside. Topped with luscious whipped cream and gorgeous kiwis and raspberries...this is a dessert to IMPRESS!!
You could decorate your pavlova with whatever you prefer: fresh berries, cooked pears or apples (very fall!). For the chocolate lovers: you could add cocoa powder to the meringue and top with chocolate and cream...a chocolate pavlova delight!
The pavlova is as fluffy as a cloud and very delicate! Be super careful (it's very fragile!) when you remove it from the parchment paper.
Important to remember: When the egg whites have quadrupled in volume, that is the time to add the sugar just a little bit at a time and keep on beating! and adding them slowly while whipping the mixture continuously. Even more important, when they are whipped to perfection...don't wait to bake them. It's important to get them shaped on your pan and put in the oven. No hesitating.
My very important tip for you: let it cool completely on the pan before transferring to your serving plate. I didn't wait the most recent time I baked it and my pavlova did break apart a bit before I had a chance to decorate it. Luckily, nobody complained! Even not so perfect to look at...it was perfection to taste!
What is the difference between a meringue and a pavlova?
A meringue is a mixture of whisked egg whites and sugar and a pavlova is a type of meringue. Pavlovas have a marshmallow-like center from the cornstarch.
How Do I Know My Pavlova Is Done?
The pavlova will look dry and pale when it is perfectly baked. When you insert a skewer into the meringue it will have a sticky almost like marshmallow consistency.
Easy Italian Pizzelle Cookie Recipe
Equipment
Ingredients
- 3 cups all‐purpose flour
- 2 teaspoons baking powder
- ¼ pound butter melted (you could use a butter alternative like Earth Balance to go dairy-free)
- ¾ cup sugar
- 3 large eggs at room temperature
- 1 large organic lemon zest (not the white part that is bitter), organic is best
- 1 teaspoon vanilla extract optional
- 2 teaspoons anise extract optional (or any liqueur like Strega)
- 3 Tablespoons fresh orange juice
- ¼ cup milk (use unsweetened almond milk to go dairy-free, but feel free to use whatever milk you like)
Instructions
- Warm up a pizzelle iron.
- In a medium bowl, whisk together flour and baking powder; set aside.
- In a large mixing bowl or the bowl of an electric mixer fitted with the paddle attachment, beat the eggs and sugar until frothy and beginning to thicken (about 2-3 minutes). Add in the lemon zest.
- On low speed, add the extracts and melted butter to egg mixture in a steady stream and mix for 30 seconds. Slowly add in the orange juice and milk.
- Slowly add the dry mixture to wet and blend just until combined. Your batter will resemble a soft and sticky dough.
- Spray pizzelle iron lightly with baking spray.
- Drop 1 tablespoon of batter on hot pizzelle press.
- Close press and cook for about 1 minute or until light indicated cookies are done (cookies should be slightly golden).
- Use a fork to lift pizzelle off the press and transfer to a cookie rack or plate to cool down (keep in mind that they should lay flat. While they are hot, they will mold into another shape if they’re not completely flat).
- Spray iron again and repeat process until you finish all the batter.
- Dust with confectioner’s sugar and ENJOY!
Nutrition Disclaimer
Please keep in mind that the nutritional information presented below is an approximation and may vary depending on the exact ingredients used.
Notes
some expert tips for making the best classic italian pizzelle
Even though you make pizzelle with an iron, there are some tricks to make them turn out really great!- Beat the cookie batter: Use an electric mixer fitted with the paddle attachment to beat the eggs and sugar until frothy and thickened. This will help create the light and airy texture of the cookies. IF you don't have a mixture, you can make batter by hand (takes some arm work and a good wooden spoon!).
- Warm the pizzelle iron: Make sure to warm up your pizzelle iron before starting the recipe. This will ensure that your cookies cook evenly and have a nice golden color.
- Batter sticking: Use baking spray if you have a stainless steel iron. I usually spray a quick spritz of the spray before adding each batch of batter. I do not want to end up with a sticky stuck batter mess so that’s how I prevent any chances of it happening.
- Batter dripping out the side: You may find in the beginning you will add too much batter. When you squeeze the top part of iron on the bottom part, you’ll have batter oozing out the sides. And that is super messy to clean and the iron is very hot, so you have to carefully clean it. Make sure you spoon the batter right in the center and with the back of my spoon and even my clean finger, I shape it to cover all around and slightly above the center.
- Watch the pizzelle maker: Keep an eye on the light indicator on your pizzelle press to make sure the cookies are not overcooked. If you prefer a crispier cookie, increase the cooking time by a few seconds. For a softer texture, decrease the cooking time.
- Soggy Pizzelle: The pizzelle need the right environment to crisp up. If it happens to be a very humid day, once you make the pizzelle, lay them flat and store them in a very dry part of the house (a cold and damp basement would not be the right place to store them while they’re drying and crisping up).
- Drying: Allow them to stay on the baking rack or even laying flat on a baking sheet, side by side (NOT stacked) until they cool and crisp up.
- Batter amount: Also, use the correct amount of batter. Using too much batter will end up with thick pizzelle that will not crisp up. IF you like thicker, pizzelle, than make them with more batter. ONE tablespoon of batter should be enough to make the cookie. IF it seems too small, add slightly more than 1 tablespoon. Depending on the design of your pizzelle iron, you may need a little more batter. It could take some trial and error with the first batches. The first ones maybe won't look as perfect as you imagine, but they will still be delicious!
- Enjoy warm or cooled down: These cookies are amazing hot off the iron. They are delicious as they cool down and crisp up.

Leave a Reply