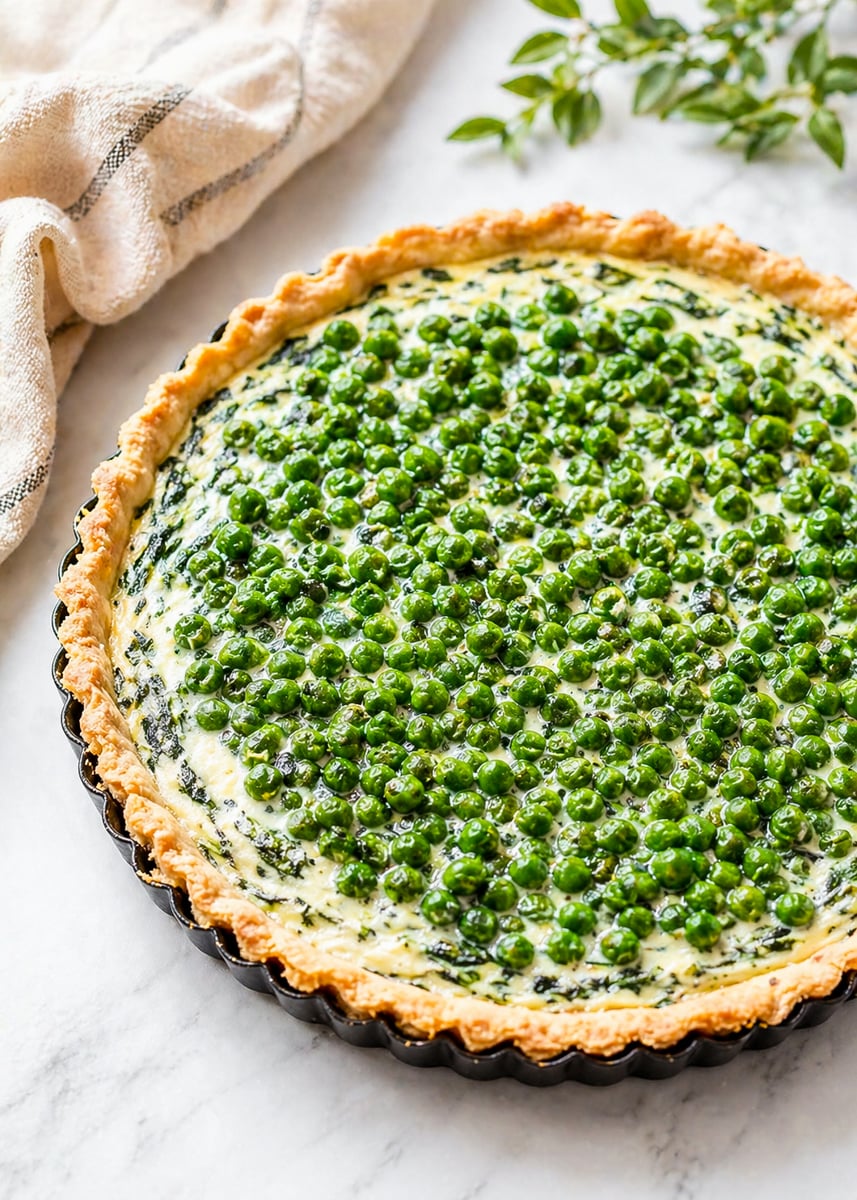
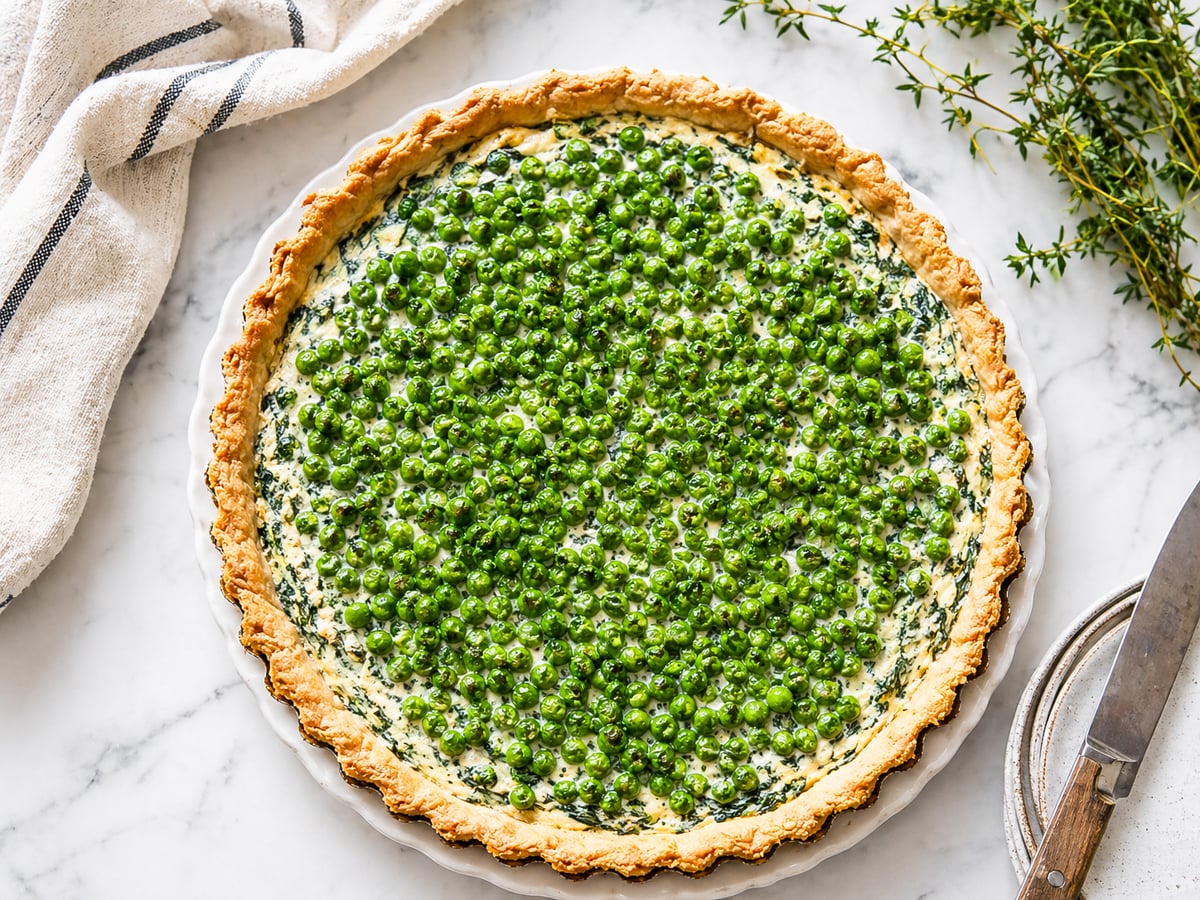
This savory ricotta tart is filled with fresh peas, spinach, mint, and Parmigiano in a buttery homemade crust. The perfect easy spring dinner or brunch recipe ready in under an hour.
If you love savory tarts, also try my Tuna and Spinach Tart and my Mixed Vegetable Galette.
This article contains affiliate links which support us at no extra cost to you.
Jump To
- What is a ricotta tart?
- Why you'll love this ricotta tart
- What's needed for Spring Pea and Ricotta Tart?
- How to Make Savory Ricotta Tart
- Substitutions and Variations for this Italian ricotta cheese tart
- expert tips for making this ricotta tart recipe:
- FAQ'S
- How to store this ricotta tart?
- Savory Ricotta Tart with Peas
I even was able to add in a little bit of whole-wheat flour in the amazing homemade crust (nobody noticed it was there!). This tart looks and tastes like spring to me!
What is it with peas? Some people just hate...I mean, HATE THEM! I'm not one of those people. It's not that I go crazy about them and say, "Hey! I'm having a mad craving for PEAS!" But, I do sort of enjoy them, in a very subtle way.
And my kids sort of have amnesia, but I had to remind the both of them that I used to make peas and place it directly on their high chair tray, and they both would eat them one after another. Almost as if it were candy! I swear, they both did! They don't remember and they think I'm making this up.
Luckily, they both like ricotta, they both like spinach, and peas is one of those vegetables that they can take or leave. They'd rather take peas when they're nestled in sweet ricotta cheese and filled in a flaky and delicious homemade crust! It's a good thing I'm writing this blog so there is proof that I used to make them homemade tart crusts for dinner! What a mom!
So where are you with peas? Love them or leave them?!? (I won't judge, just simply curious). Let me know in the comments below!!
What is a ricotta tart?
Ricotta tart is a traditional Italian dessert that has been enjoyed for centuries. It typically features a sweet crust filled with creamy ricotta cheese and a variety of sweet or savory ingredients. The history of this tart dates back to the 14th century when it was first introduced in Italy.
Why you'll love this ricotta tart
- t tastes like spring in every bite. Peas, spinach, mint, and lemon - every ingredient is bright and fresh.
- The homemade crust is worth it. Butter and cream cheese together make a crust that is flaky, tender, and completely different from store-bought. I promise it is easy.
- Great hot or cold. I actually think it is better the next day straight from the fridge. The flavors settle and it slices perfectly.
- Naturally vegetarian. No substitutions needed - it is a full, satisfying meal as written.
- Endlessly adaptable. Swap the peas for asparagus, add pancetta, use a different hard cheese - this recipe takes to variations beautifully.
What's needed for Spring Pea and Ricotta Tart?
To make this lovely savory tart, you'll need:
For the crust:
- cold cider vinegar
- all-purpose flour,
- whole wheat flour
- sea salt
- cold unsalted butter
- cold cream cheese
For the filling:
- ricotta
- egg
- spinach
- baby peas
- grated Parmigiano Reggiano
- mint leaves
- chopped chives
- Kosher salt and freshly ground black pepper
- butter
How to Make Savory Ricotta Tart
- CRUST
- Preheat oven to 375 F.
- Combine water and vinegar in a small bowl. Combine flour and salt in another bowl.
- Using a pastry cutter or your fingers, cut butter and cream cheese into flour mixture until mixture resembles coarse crumbs with some larger pieces remaining.
- Add water mixture to dough in a slow, steady stream, stirring, until mixture just begins to hold together. (Alternatively, pulse ingredients in a food processor.) Turn out onto a piece of plastic wrap. Press dough into a disk. Refrigerate until firm, about 1 hour or overnight.
- FILLING
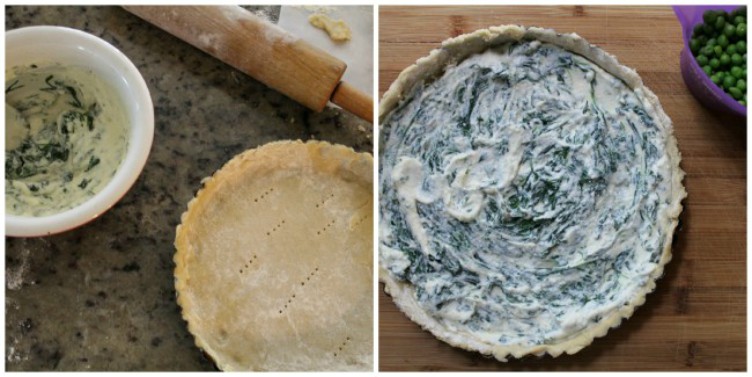
- Roll dough to fit your chosen tart pan, then drape dough in pan. Neatly press dough up the sides of the pan and shape it. Set it on a sheet pan. Prick bottom of the tart with a fork.
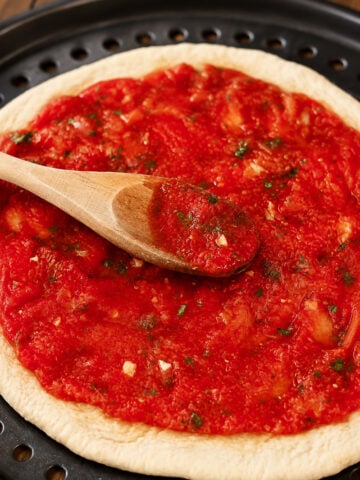
- In a medium bowl, whisk together the ricotta and egg. Stir in the steamed spinach, peas, Parmigiano Reggiano, mint, chives, ½ teaspoon salt, and 1 teaspoon black pepper.
- Spoon filling into tart shell and spread around evenly.
- Dot top of tart with butter.
- BAKE
- Place the tart pan over a foil lined cookie sheet.
- Bake for about 35-40 minutes or until the tart is golden brown and the filling is set. Check tart at about 30 minutes. If the tart shell is browning too much, cover the tart with foil paper for the rest of the baking time.
- Let tart cool before removing from tart pan or slice directly in the tart pan when warm. If you remember, you could place a few mint sprigs on top before serving.
Substitutions and Variations for this Italian ricotta cheese tart
- No peas? Asparagus tips, roasted zucchini, or roasted red peppers all work beautifully in this filling.
- Different cheese: Pecorino Romano or Asiago can replace the Parmigiano Reggiano.
- Add protein: Stir in crumbled cooked pancetta or bacon, or lay a few slices on top before baking.
- No time for homemade crust? Use a store-bought pie crust or puff pastry. There is a flavor difference but it still works.
- Gluten free: Use a 1:1 gluten free flour blend in place of both flours.
- Frozen peas: Completely fine here - no need to thaw, just stir them in frozen.
expert tips for making this ricotta tart recipe:
- Use cold butter and cream cheese: It's important to use cold butter and cream cheese for the crust to ensure it's flaky and tender. Cut the butter and cream cheese into small pieces and work quickly to incorporate them into the flour mixture.
- Chill the dough: After making the dough, wrap it in plastic wrap and chill it in the refrigerator for at least an hour or overnight. This will help the dough become firm and easier to work with.
- Blind-bake the crust: To prevent the crust from becoming soggy, you can blind-bake it before adding the filling. Line the crust with parchment paper and fill it with baking beans or rice, then bake for about 15 minutes until the crust is set but not browned.
- Drain the ricotta: To avoid a watery filling, it's important to drain the ricotta cheese. Place it in a cheesecloth-lined strainer over a bowl and let it drain for about 30 minutes before using.
- Customize the filling: This recipe is very versatile, so feel free to customize the filling to suit your taste preferences. You can use different vegetables, cheeses, and herbs, and even add in some protein for an extra boost. Just make sure the filling is well-seasoned with salt and pepper before baking.
FAQ'S
Yes - white wine vinegar works just as well. The small amount of vinegar in the crust helps keep it tender and flaky. If you do not have any on hand, just use cold water instead.
Yes, you can make the crust up to 2 days in advance and store it in the refrigerator until you're ready to use it.
Yes, you can use all-purpose flour for the entire amount of flour in the recipe if you prefer.
Yes, you can use any type of hard cheese that you prefer, such as Pecorino Romano or Asiago.
Yes. It will save you time and the tart will still be delicious - just know that the homemade cream cheese crust has a noticeably better flavor and texture. If you have 10 minutes, it is worth making.
Of course - just leave them out or swap in another vegetable. The spinach and ricotta hold the filling together beautifully on their own.
Yes! Cook and crumble it, then stir it into the filling or sprinkle on top right before baking. It adds a wonderful salty contrast to the creamy ricotta.
How to store this ricotta tart?
Let it cool completely, then wrap tightly and refrigerate for up to 3 days. To reheat, place slices on a foil-lined sheet pan at 325°F for about 25 minutes. Or eat it cold - honestly the better option.
I have a thing for savory tarts and here are some other savory tarts I think you'll enjoy:
- Ham, Goat Cheese and Vidalia Onion Tart
- Sweet Potato, Goat Cheese and Bacon Tart
- Mixed Vegetable Galette
- Sicilian Pasta with Ground Chicken
Originally published May 4, 2020 and slightly updated on April 29, 2021.
Did you make this and love it? Please RATE THE RECIPE below:)
I would LOVE IT if you can leave me a star rating and a review down below and let me know your thoughts! It means the world to me to hear how you liked it.
Please Subscribe and give a follow on Instagram, Facebook, Pinterest, and TikTok xx

Savory Ricotta Tart with Peas
Ingredients
Crust
- 2 teaspoons cold water
- 1 teaspoon cold cider vinegar
- 1 cup all-purpose flour plus more for surface
- ½ cup whole wheat flour
- ½ teaspoon salt
- 4 ounces 1 stick cold unsalted butter, cut into small pieces
- 4 ounces cold cream cheese cut into small pieces
Filling
- 1 cup ricotta
- 1 egg
- 1 cup spinach I used one bag of fresh baby spinach steamed
- ½ cup baby peas
- ¼ cup grated Parmigiano Reggiano
- 10 mint leaves thinly sliced
- ¼ cup chopped chives
- Kosher salt and freshly ground black pepper
- 1 Tablespoon butter cut up in small pieces
Instructions
Crust
- Preheat oven to 375 F.
- Combine water and vinegar in a small bowl. Combine flour and salt in another bowl.
- Using a pastry cutter or your fingers, cut butter and cream cheese into flour mixture until mixture resembles coarse crumbs with some larger pieces remaining.
- Add water mixture to dough in a slow, steady stream, stirring, until mixture just begins to hold together. (Alternatively, pulse ingredients in a food processor.) Turn out onto a piece of plastic wrap. Press dough into a disk. Refrigerate until firm, about 1 hour or overnight.
Filling
- Roll dough to fit your chosen tart pan, then drape dough in pan. Neatly press dough up the sides of the pan and shape it. Set it on a sheet pan. Prick bottom of the tart with a fork.
- In a medium bowl, whisk together the ricotta and egg. Stir in the steamed spinach, peas, Parmigiano Reggiano, mint, chives, ½ teaspoon salt, and 1 teaspoon black pepper.
- Spoon filling into tart shell and spread around evenly.
- Dot top of tart with butter.
Bake
- Place the tart pan over a foil lined cookie sheet.
- Bake for about 35-40 minutes or until the tart is golden brown and the filling is set. Check tart at about 30 minutes. If the tart shell is browning too much, cover the tart with foil paper for the rest of the baking time.
- Let tart cool before removing from tart pan or slice directly in the tart pan when warm. If you remember, you could place a few mint sprigs on top before serving.
Nutrition Disclaimer
Please keep in mind that the nutritional information presented below is an approximation and may vary depending on the exact ingredients used.


This is such a great recipe for spring! Would be a great addition to my Easter menu. Thank you for this!
A bright spring tart that’s simple, flavorful, and perfect for brunch or light meals.
I tried this ricotta tart and added extra green asparagus, and it was wonderful! Love this for Spring!
This savory tart is creamy rich and delicious, my family enjoyed for their dinner. I am going to make it again.
This ricotta tart with spring peas is delicious and perfect for dinner. I made the crust at home, and it was really good!
I’m excited about making this recipe. Are you sure that you don’t need to blind bake the crust before adding the filling?
Hi Thomas, I've made this so many times not blind baking it, and it turns out great, but go ahead and blind bake the crust! Thank you for checking (I'll add that in the notes inside of the post).
absolutely love peas and my Grandson eats them like candy. Frozen ! So wilbe doing this for Nigel and his Mimi. Your crust recipe looks delightful. Cannot wait to make it. I just did your marinated zucchini and used mizran, Will let you know how it turns out.
tu r
Hi Dena, That is so cute that your grandson enjoys peas so much (and frozen, too!). Let me know how the marinated zucchini turned out using mizran. I hope you do make this and that you and Nigel will enjoy it. Have a great Sunday!