
Are you thinking about starting a blog? Not sure where to begin? In this post, we'll walk you through how to start a blog. We'll cover everything from choosing a niche and finding the right hosting platform to promoting your blog and growing your audience.
By the end of this post, you'll have all the information you need to get your blog up and running.

How to start a blog in 9 easy steps...let's begin
Jump To
- How to start a blog in 9 easy steps...let's begin
- Step 1: Choose a topic you're passionate about
- Step 2: Choose a domain name and register it
- Step 3: Set up hosting
- How to use BlueHost?
- Step 4: Choose a Platform for your Blog
- Step 5: Find a theme and install it.
- Step 6: Set up Google Tools:
- Step 7: Install essential plugins.
- Step 8: Focus on SEO
- Step 9: Start publishing content and promoting your blog
Step 1: Choose a topic you're passionate about
It can be something you already know a lot about or something you're just beginning to explore. Once you've chosen your topic, research it thoroughly and make sure you understand it inside and out.
A lot of popular topics are:
- food
- fashion
- travel
- fitness
- finance
- lifestyle
I grew up around chefs and I've always felt passionate about baking for my kids, so I knew that creating a food blog was the right decision for me. It's something that I enjoy talking about.
Step 2: Choose a domain name and register it
Your domain name should be unique, but it also needs to be something that people will remember and type into their web browsers. The domain name is what appears in the URL for your website (www.savoringitaly.com) .
Once you've chosen your domain name, you need to register it and pay the fee. I originally used GoDaddy and purchased my domain name for only $2.99 for the first year. You can also get it free for the first year with BlueHost. I recommend BlueHost if you are just starting off and want an affordable option.
However, if you want to invest more money into hosting, I would recommend Big Scoots. Now that I am making more income on the blog and I am receiving more traffic, I upgraded to an even more reliable hosting service. I truly recommend them (I currently pay $40 a month now for their hosting since I am more established).
Step 3: Set up hosting
A host is a company that stores your website's files on their servers and makes them available to people who want to view your site. You should begin with an affordable shared hosting plan that has automatic WordPress installation. I understand that this hosting stuff may sound difficult, but choose one and just go with it.
My advice if you are a new blogger is to use Bluehost as your hosting platform; it's what I used for my website in the beginning. Bluehost currently serves over 2 million websites, which is pretty incredible. In other words, it's incredibly popular.
Also, it's extremely inexpensive and a fantastic hosting choice for new bloggers since they provide exceptional customer service.
Bluehost gives you a FREE domain name if you select them as your host. If you use my particular link to sign up, the yearly fee is just $2.95, which is the price of one Starbucks latte.
One less coffee a month and you'll be running your own business!
How to use BlueHost?
1. Select your plan:
I recommend the basic plan, which is the most affordable and provides all you'll need to get started.
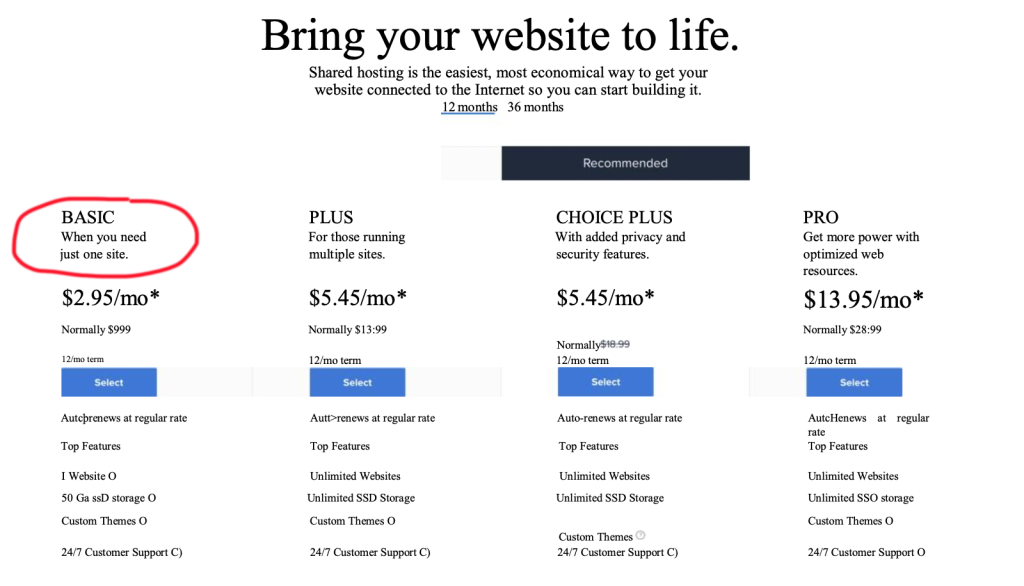
2. Choose your term:
![image of How to Start a Blog in 9 Easy Steps [2022]](https://www.savoringitaly.com/wp-content/uploads/2022/03/bluehost-2-e1648481911305.png)
To get a free domain name for a year (a $15 savings) and a significant reduction on your monthly fee, you must first pay for at least one year of hosting. If you're serious about blogging and want to save money, sign up for a longer period; nevertheless, one year is a good start.
3. Choose your add-ons:
I recommend the “Domain Privacy Protection” add-on because it will ensure that your address and phone number are kept private. Your personal information will be shared with marketers and the public generally. Please exercise caution!

4. Create a password

Make sure it fits their requirements and that you don't forget it.
5. Choose a theme

They give you an option of themes, you can select one temporarily.
6. Launch your site

Choose either a business or personal account, then add in a Title and Description. This can all be adjusted later. Now you are set to go!

Step 4: Choose a Platform for your Blog
You’ll need to choose a platform for your blog. There are many different platforms to choose from, but I recommend using WordPress. Another good option is SquareSpace, but 90% of successful bloggers like to stick with WordPress.
It’s free and easy to use, and it has a wide variety of plugins and themes that you can use to customize your blog. I've used WordPress for over 5 years and I will continue using it for years to come.
If you choose WordPress...
You can connect it with your host, they will provide instructions of how to connect the domain name to your new WordPress site!!
Make sure to replace the old permalinks with the new ones. Go to Settings > Permalink Settings and replace your current permalink structure with "Post name." Save changes. It's now time to spruce up your blog!
Step 5: Find a theme and install it.
Themes can be found for free or they can be purchased from a third party. I recommend using the Feast theme and finding one of their themes there.
What you should look for:
- Responsive: Your theme will work well for mobile and desktop.
- Good design: Is aesthetically pleasing to you, with all the features you want.
- User-friendly: It is easy for you to set up and make adjustments.
- Genesis Themes: They are SEO optimized, nicely coded, and have fast loading times
Step 6: Set up Google Tools:
Google Analytics and Google Search Console are all tools you should use after you set up your blog. These tools will help you track your website's traffic and see how people are finding your site. They're both free to set up and use and provide extremely valuable information. I highly recommend getting that set up so you can checkout all your blog post's data.
Step 7: Install essential plugins.
There are essential plugins that you should install on your WordPress blog. These plugins will help improve the functionality and performance of your website.
How to install a WordPress plugin
Go to your WordPress Dashboard, hover over "Plugins", then select "Add New"
Then look for the “Search Plugins” field and search for your plugin. When you've found it, click "Install Now." Then, follow the instructions in the plugin's settings.
We recommend installing the following plugins:
- Yoast SEO: This plugin will help you optimize your website for the search engines.
- WP Recipe Maker (food bloggers) : This plugin will help you create recipe cards for your blog posts.
- JQuery Pin It Button For Images: This plugin will add a “Pin It” button to your images, making it easy for readers to share your content on Pinterest.
- W3 Total Cache: Helps with fast load time
- Smush Image Compression: Reduces image size with high quality
Step 8: Focus on SEO
SEO is short for “search engine optimization.” It’s the process of optimizing your website for the search engines so that people can find it more easily. Everything you do for SEO is so that Google can find your page and rank you on page 1. Your goal is to use the right keywords that people are searching for so that people can find your Blog posts.
There are a few simple things you can do to optimize your website for the search engines:
- Use keyword-rich titles and descriptions (using search terms that people are searching in google)
- Use long-tail keywords strategically within the blog post (keywords that are longer than just one word)
- Optimize the meta description (with the Yoast SEO plugin)
- Include image alt-text (add alt text for each image so that Google can read your images too)
A tool that I find really effective when doing keyword research is called RANKIQ. This software allows you to find easy to rank keywords, it helps with updating old content so that it ranks faster, and lets you know what posts are doing good/bad.
I have over 600 blog posts published and almost 500 of them are very old and need help. Part of my strategy is updating my old articles using softwares like RANKIQ so that I can start generating new traffic to these articles. I highly reccomend investing in a keywords program like RANKIQ.
I also LOVE the course I took called Cooking with Keywords. Aleka is the coach and she teaches you everything you need to know about how to do proper SEO research. I will say it isn't very cheap, but it is worth every penny. It is important to invest in yourself and your business.
Step 9: Start publishing content and promoting your blog
Now that your blog is all set up, it's time to start writing content and promoting your site. I recommend writing at least 2-3 posts before you start promoting your site.
This will give you enough content to show people what your site is about and what they can expect from you. Once you have a few posts, you can start promoting your website!
Promote your blog using:
- TikTok
- Email Marketing
Pinterest is a great way to promote your content. It is a visual search engine that provides direct links to your posts. Out of all social media accounts that I have, Pinterest brings me the most traffic! So I recommend starting with Pinterest and getting beautiful Pins out there.
The best way to be extremely effective on Pinterest is to use a scheduling software like Tailwind. I swear by it! It allows you to create and schedule out Pins to Pinterest so that it can drive more traffic to your website. It is a very effective way to market your blog.
This post contains affiliate links. For more information, see my disclosures here.
I hope you now understand how to start a blog in 9 easy steps. Happy blogging !
More useful posts:

Leave a Reply