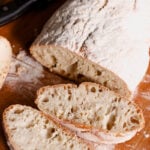
Easy Homemade Ciabatta Bread
This Easy No Knead Italian Ciabatta Bread delivers crusty, homemade bread with a soft, airy crumb and delicate flavor, perfect for sandwiches or dipping. It’s simple to make with just five ingredients and ideal for both beginners and seasoned bakers.
Servings: 10 slices
Calories: 95kcal
Equipment
- 1 Large Mixing Bowl
Ingredients
- 1 cup warm water
- 2 teaspoons active dry yeast
- ½ teaspoon sugar
- 2 cups all-purpose flour plus more for dusting
- 1½ teaspoons sea salt
Instructions
Activate yeast:
- First step is to activate the yeast. Add ¼ cup warm water to a bowl. Sprinkle on the yeast and the sugar and gently stir to combine. Let stand until foamy, about 5 minutes.
Add yeast to flour:
- In a large bowl add the flour and salt, make a well in the center. Add the yeast mixture and ½ cup of water and stir. If too dry, begin to add another ¼ cup of water, a little bit at a time, and stir. Stir together with a wooden spoon. If dough seems too wet, add a tablespoon more of flour and stir. If still wet, add more flour a tablespoon at a time. It's a sticky dough, but it shouldn't be runny.
Let dough do its first rest:
- Sprinkle the top with 1½ tablespoons of flour. Cover with a clean tea towel or plastic wrap and set aside. Set a timer for 30 minutes.
Coil fold and second rest:
- When the timer goes off, you are going to give the dough 4 folds. Wet your fingertips. The only way to do this is lift the dough a bit at time and sprinkle a little bit of flour over the entire bottom of the dough. I have made this very wet dough many times, and even with wet hands, the only way I was able to actually lift sections of the dough was to have some flour under the dough as well as on top.
- Turn the bowl and pull a second portion to stretch and pull it over onto itself. Repeat turning and stretching two more times (total of 4 times). Cover with plastic wrap again. Set a timer for another 30 minutes.
Second set of coil folds and rest again:
- When timer goes off, repeat the 4 folds one more time. Cover with plastic wrap and let it rise 1-2 hours (or more, if needed).
- It took my dough 1.5 hours to proof to be ready. Different environmental factors will affect the dough while it's proofing.
- At this point, you could turn it onto a floured work surface and cut it into two or 4 sections.
Final rest:
- Or do what I did and leave it as one loaf, and turn it onto a parchment lined baking sheet prepped with flour. Shape the dough into an oblong loaf. Sprinkle a little flour on top of the dough. Place a clean tea towel on top and flip the dough over into the tea towel.
- Wrap the dough with the tea towel and let it do the final proofing for 20 minutes while you preheat the oven to 425F. The towel will give it the distinctive lines on top. You could skip this step, but it won't have the lines.
Place dough on baking sheet:
- When the oven is ready, open the tea towel and flip it onto the parchment paper lined sheet prepped with flour.
Prep water bath for the oven:
- Fill a casserole or 9-inch round baking pan with 1-2 cups boiling water. Carefully place that pan with boiling water on the bottom rack of the oven.
Place dough in the oven:
- Place the baking sheet with the ciabatta on the middle rack of the oven.
- Set a timer and bake for 10 minutes. Remove the water bath and bake the bread another 10-15 minutes, until the loaf has a golden color.
Cool loaf before slicing and serving:
- Move loaf to a wire rack to cool completely before slicing and serving. Enjoy!
Notes
BE SURE to read my post for all the best ciabatta baking tips. Here are some that you should keep in mind:
- While the oven is pre-heating place an empty cake pan at the bottom of the oven, with a cup of hot water before adding the bread dough on the baking sheet to the middle shelf.
- It is a wet and sticky dough. Add more water 1 tablespoon at a time if it's too dry when you start mixing it. Keep in mind that different environment factors affect the dough.
- Store the cooled baked bread in an airtight bag, for 2-3 days. You can freeze it in freezer safe bags, defrost the bread in the refrigerator as needed, passing them in the oven for a few minutes to revive them. It will keep up to 2-3 months in the freezer.
- Try out some different toppings like garlic, rosemary, garlic, or sea salt.
- To get the gorgeous signature air pockets, do not overhandle the dough. Be gentle when shaping it.
Nutrition
Serving: 1slice | Calories: 95kcal | Carbohydrates: 20g | Protein: 3g | Fat: 1g | Saturated Fat: 1g | Polyunsaturated Fat: 1g | Monounsaturated Fat: 1g | Sodium: 235mg | Potassium: 38mg | Fiber: 1g | Sugar: 2g | Calcium: 5mg | Iron: 1mg