Easy Sourdough Starter With Yeast
Here is a super easy way to make your own Sourdough Starter Recipe! Once your sourdough starter is ready you will be on your way to making your very own sourdough bread, cakes, muffins and more!
Calories: 956kcal
Equipment
- Kitchen Towels
Ingredients
- 2 cups warm water 95-100 F
- 1 package active dry yeast
- 2 cups all-purpose flour
- 1 tbsp sugar
Instructions
- In a large glass bowl (or ceramic), pour in the water and sprinkle on the yeast. Whisk the yeast and the sugar into the water and let it sit a few minutes. Whisk in the flour a little at a time until combined. Whisk it well because that will incorporate more air which equals more yeast spores. Cover the bowl with a clean towel and set aside in a warm corner of your kitchen where it will be safe from not being tipped over or have something drop into it.
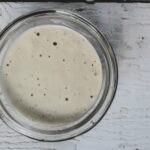
- On the next day (see photo “Day 1”), you will start to smell a sour smell. At the end of that 2nd day, whisk the starter until it is combined again. There is a film with bubbles that will form on top and liquid settled on the bottom. Cover it again with your kitchen towel and set it in the corner to ferment some more.
- On the next day (see photo “Day 2”), the sour smell will be very strong. The smell will permeate throughout your kitchen. If you are a lover of yeast and fresh bread, you can’t help but smile at the smell. Breath it in. Stir your starter again. The part on top may be a little thicker. Cover again with kitchen towel and set aside to ferment some more.
- Day 3, whisk together. Separation will have occurred again and the smell may be more acidic and pungent. Remove about 1/2 of the starter (mine equaled about 1 cuYou could discard of this 1/2 cup of starter, or use it in a sourdough recipe, as it’s ready to bake with. Add into your starter another cup of flour and one cup of warm water. Whisk it together and put it into a plastic container with a lid. The consistency should be like a thick pancake batter. Place the starter in your refrigerator.
- Once sourdough is refrigerated and you are ready to bake again, take the starter out of refrigerator for 24 hours before you are ready to bake so it can activate again.
- To replenish the sourdough, just add 1 cup of flour and 1 cup of warm water to at least 1/2 a cup of the starter. Bake something with what you will discard from the starter.
Notes
-
- Flour Quality Matters: Use high-quality, unbleached all-purpose flour for the best results. The quality of flour can significantly affect the health and taste of your sourdough starter.
-
- Water Temperature Precision: Ensure your water is at the right temperature (95-100 F). Water that's too hot can kill the yeast, while too cold water won't activate it effectively.
-
- Consistent Feeding Schedule: Establish and stick to a regular feeding schedule for your starter. Consistency is key to maintaining a healthy and active starter.
-
- Watch for Signs of Readiness: A ripe starter will have a pleasant, slightly sour smell, a bubbly appearance, and a consistency that’s thick yet pourable.
-
- Avoid Metal Containers: Use glass or ceramic bowls for mixing your starter. Metal can react with the acidity of the starter and affect its flavor and growth.
-
- Stirring Technique: When feeding your starter, mix it thoroughly to incorporate air. Oxygen is important for yeast activity and health.
-
- Temperature Control: Keep your starter in a part of your kitchen where the temperature is stable. Extreme temperature fluctuations can impact the fermentation process.
All images and text ©Savoring Italy. Please do not use my images without prior permission. If using my posts in collections and features, please link back to this post for the recipe.
Nutrition
Calories: 956kcal | Carbohydrates: 203g | Protein: 26g | Fat: 2g | Saturated Fat: 0.4g | Polyunsaturated Fat: 1g | Monounsaturated Fat: 0.2g | Sodium: 5mg | Potassium: 268mg | Fiber: 7g | Sugar: 13g | Calcium: 38mg | Iron: 12mg